|
|
|
|
| HOME SEW CRAFTS DECOR SHOP |
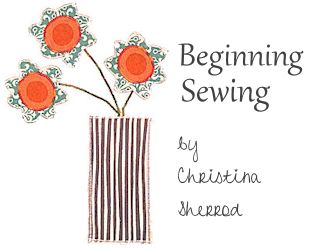
Free Sewing BookSewing Lessons For BeginnersChapter Six: Now We're Sewing!page 3 of 3 |

|
|
|
-> table of contents
|
Chapter 6 Page 3 Go Back To Page 1
Articles, images and patterns © Christina Sherrod of CraftAndFabricLinks.com unless otherwise noted.
|
Sewing Terms: Ribbing, Seams, StitchesThis section of the book covers basic sewing terms, techniques and tips, in alphabetized order. To review various types of stitches (such as basting), go to "Stitches" in this chapter. I also provide reference to pages on my website that provide further information, plus free patterns and lessons on the subject. To see all of my free sewing lessons and patterns, refer to the links below. |
|
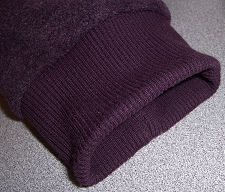
Properly attached ribbing is finished inside and out (no seam showing inside the cuff). Ribbing provides a finished edge and snug fit around a wrist, ankle, neckline or waist, while still allowing flexible movement of the body. For instructions on properly attaching ribbing, go to: Ribbing Lesson. |
|
The first several methods shown below finish the raw edges of the seam allowances separately. The final two methods (binding together and French seams) encase the entire seam allowance, creating a more finished appearance. Binding a seam (encasing both layers) is a very nice way to finish bulkier seams, such as when working with double-sided prequilted fabric. The French seam method is a fabulous way to finish delicate fabrics that have a tendency to fray (sheer curtains for example). Choose one of the following finishing methods. |
|
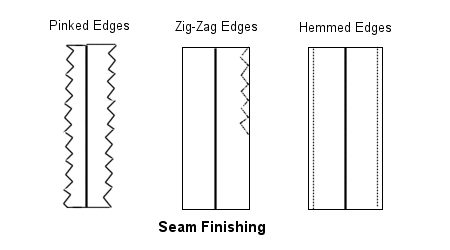
Pinking shears cut a zig-zag edge on the fabric. "Pinked" means the edge is cut into a zig-zag. This gives a finished look and helps prevent fraying. NOTE: It is a good idea to add a line of stitching inside the pinked edge to add more protection against fraying. Zig-Zag Stitched Seam Allowance A machine sewn zig-zag stitch sewn along the fabric's cut edge helps prevent fraying. The zig-zag stitch should be sewn close to the edge, allowing the outer zig-zag points to just barely fall over the edge of the fabric. An overcast stitch can be used in place of a zig-zag stitch. Pink & Stitch Combination Finished Seam Allowance Pink the edge (using pinking shears), then run stitch a straight stitch 1/4" from the pinked edge. Clean Finish Seam Allowance A nicely finished, sewn edge. The edge is hemmed, in other wordsl. Iron under 1/4" along edge of seam allowance. Then iron under another 1/4" and stitch close to the edge. This method prevents against fraying and provides a finished appearance.
Tricot Bound Seam Finish Tricot tape is lightweight, and is stitched around the seam allowance edge. It can be applied to fabric BEFORE the seam is stitched. I recommend this if the fabric is especially prone to fraying. It can be found under names such as Seams Great™ or Seams Saver™. Each seam allowance is bound separately. Stitch the seam, press it open, then curl the tape around the edge of the seam allowance (gently tugging on the tape will encourage it to curl around the edge). Use a straight stitch or zig-zag stitch to hold the tape in place, stitching through all three layers - top tape layer, fabric, bottom tape layer. For fabrics that fray easily, use a zig-zag stitch. |
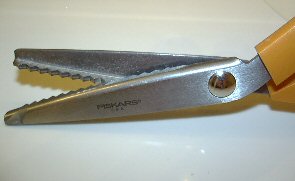 Pinking Shears
|
Binding is stiched onto the seam allowance in the same way that it is stitched around a quilt or placemat. The raw edges are totally covered - together. Rather than finish each edge separately, the edges are placed together and the binding encloses the two layers together. Use this method for heavy fabrics, such as very heavy denims or other bulky fabrics. It can also be used for delicate or lightweight fabrics. The photo shows the inside of a tote bag. The seams are nicely encased in binding. For more information on using this method, go to my free tote bag pattern. |
 Binding Seam Allowances
|
Double Stitched Seam Double stitching a seam provides a "back-up" for seams that need to withstand extra stress. It also provides a seam finish for fabrics that tend to fray. Stitch the seam, but DO NOT press the seam open. Instead, stitch a second line 1/8" from the original line of stitching (INSIDE the seam allowance). The second line of stitching can be a straight stitch or a zig-zag stitch. Zig-zag stitches provide more protection from fraying. Trim close to the outer line of stitching. Lapped Seam This type of seam is used only of fabrics that do not fray. They are suitable for heavy fabrics such as suede or leather, or faux suede or leather. The fabric layer that is to be the upper layer is trimmed closely to the edge. Place the upper layer over the under layer, both right sides up, overlapping the edges. Stitch close to the trimmed edge of the upper layer, and again 1/4" from the first line of stitching. Flat Felled Seam This type of seam provides a finish both inside and out. It also creates a very strong seam. Stitch a seam line. Press the seam allowances to one side. Trim the bottom seam allowance to 1/8". Turn the upper layer seam allowance under 1/4" and wrap it around the edge of the lower layer seam allowance. Baste it into place with a machine stitch or pins. Stitch the seam allowance to the garment, using an edgestitch (stitch close to the edge). |
|
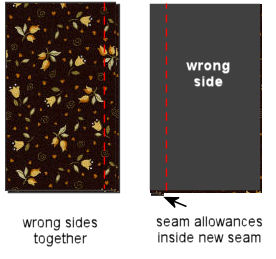
By totally encasing the seam that holds the raw edges within a second seam, the raw edges are protected. The second seam provides a backup to the first seam. The inside of the garment or other item is nicely finished; there are no raw edges showing. 1. Stitch seam with layers WRONG sides together. Fold back fabric layers so that they are now right sides together, with seam allowances between the two layers. 2. Stitch a new seam so that the first seam edges are totally inside the new seam allowance. STITCHES – SEWING & EMBROIDERY The purpose of basting is to temporarily hold fabric in place until the permanent stitching is in place. Example: Baste a seam that will later hold a zipper. For a center back dress zipper, the back of the dress is made in two halvs. A center back seam is sewn from the bottom of the dress up to the point where the zipper will be installed. From that point up to the top, the seam is basted. This holds the seam edges in place until the zipper in installed. The basting is removed once the final stitching is completed.
|
 French Seam
 Hand embroidery adds a beautiful finish to items. Embroider a quilt; add decorative embroidery to tote bags, apparel, pillowcases, placemats and just about any other item you sew. See our
 |
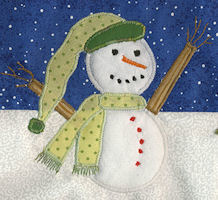
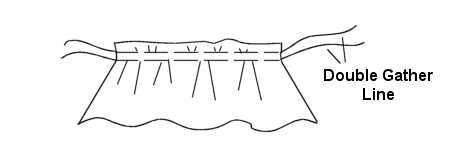
Free motion embroidery can be done with any machine that has zig-zag capability. A darning foot is used, the feed dogs are lowered, and your hands guide the fabric under the needle. It is easy to learn. A stabilizer must be used to add body to the fabric. Learn how to use your sewing machine and a darning foot to create beautiful free motion machine embroidery with our lesson on Free Motion Machine Embroidery. Free motion embroidery was used to create the finger branches and the scarf fringe on the snowman in the following photo. For a free lesson on machine embroidery, go to: Free Motion Embroidery Christmas Wall Hanging. Gathering can be done by hand or by machine. Most people find it easier to use the machine. The gathering stitch, like the basting stitch, is an extra long, straight stitch. Gathering is done to ease in fabric along curves, such as when sewing in sleeves, and for adding fullness, such as with curtains. The gathering can be very subtle (just enough to ease in the sleeve) and not show along the seam, or can be much fuller, such as for a puffy sleeve or a skirt. The permanent stitch is placed right on top of the inside gathering stitch (away from the fabric edge). An important note in gathering: Proper gathering for full skirts or puffy sleeves calls for two lines of gathering stitches (gathering for use in gently easing in a sleeve uses only one gathering line). Don't omit the second stitch line! The second stitch line serves two important functions.
It is a back-up in case the first line breaks.
|
|
|
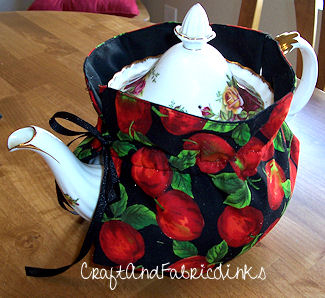 Practice gathering while making a beautiful tea cozy. Go to:
 |
Hem Stitch Refer to "Hems", earlier in Chapter 6, for information on creating hems. |
|
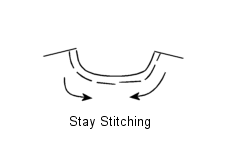
Stay stitching is used to prevent stretching and fraying in fabric. Stretching can occur when handling and sewing curved areas. Fraying can occur where curves are clipped. Start at the edge and stitch to the center. Repeat on opposite side. Stitch Length and Width (also see Chapter 5: Setting Up Your Machine) Stitch length: refers to how long each individual stitch is. Regular: 11 - 12 stitches per inch Basting: 6 stitches per inch (i.e. a longer stitch, so fewer per inch) Gathering: 6 - 8 stitches per inch Generally, heavier fabrics work best with a longer stitch length, and finer fabrics are best with a shorter stitch length. Proper stitch length is important and is a first place to start if you do not like the look of your stitching. For example, a slightly puckered seam in the fine fabric could be caused from too long of a stitch length - the feed dogs are feeding too much fabric through each stitch, making a puckered look. To correct this, a shorter stitch length should be used (also check tension). Remember that the higher number of stitches per inch translates to a short, tighter stitch. Stitch width refers to how wide the stitch is. A regular straight stitch has no width, but a zig-zag or decorative stitch can be set to any number of widths.
STITCH LOCKING When sewing any seam, always lock the stitch at both ends. To do this, sew in reverse at each end. This will hold your seam, so it does not come apart at the ends. |

|
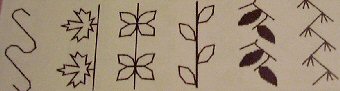
1. Hold Seams Flat It is used to hold seams down flat, such as topstitching around the sleeve or waistband seam. 2. Decorative Use topstitching to add a decorative touch to a garment. Make it more noticeable by using contrast thread color. Your machine may have several decorative stitches to choose from. The photo below shows several decorative stitches available on a Pfaff sewing machine.
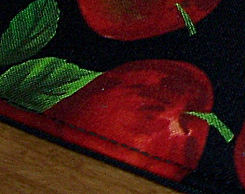
Straight stitch topstitching is usually done close to the edge. The example below shows a placemat with topstitching 1/8" from the edge. See my Easy placemat pattern for a quick and easy method of making a nicely finished placemat. Go to: Easy Placemat Pattern |
 TOPSTITCHING
Topstitching refers to stitching done on the top side of the garment. In other words, it shows. It serves two main purposes. It can be a straight stitch, zig-zag or any other stitch you choose. If a straight stitch is used, it is usually done with a slightly longer stitch length.
TOPSTITCHING
Topstitching refers to stitching done on the top side of the garment. In other words, it shows. It serves two main purposes. It can be a straight stitch, zig-zag or any other stitch you choose. If a straight stitch is used, it is usually done with a slightly longer stitch length.
Quick Reference |
Learn To Paint!free video tutorialsVisit my youtube channel. Free videos with step by step instructions. Paint beautiful paintings for your home. |

Please ShareI rely on advertising to keep my site free. Please share with friends. |
Privacy Policy & Terms Of UseBy using our website, you expressly consent to our Privacy Policy and Terms & Conditions. All Patterns, images and instructions are copyright protected. |