|
|
|
|
| HOME SEW CRAFTS DECOR SHOP |
Free Sewing BookSewing Lessons For BeginnersChapter Three: Understanding Pattern Instructions |

|
|
|
-> table of contents
|
Articles, images and patterns © Christina Sherrod of CraftAndFabricLinks.com unless otherwise noted.
Reading Instructions
There are four main areas in the instructions, plus the back of the pattern, and each area is very important. 1. Fabric Lay-out The first part of the pattern shows a diagram of recommended fabric lay-out. This is covered more in Chapter Four. 2. Instruction Symbols There are various symbols used throughout the instructions to designate different pieces of fabric. Check this part of the instructions very carefully. You wouldn't want to end up with the top of your collar sewn on wrong side out! The following are some examples.
NOTE: Your pattern symbols might be different. Refer to your pattern instructions. 3. Body of Instructions This is the area that takes you step by step through the assembly of your project piece. Read through the entire set of instructions before you begin to sew. You may need to read through the entire set of instructions more than once to fully understand them. Look carefully at the diagrams in the instructions. They are very helpful in understanding what is being said. NOTE: When sewing, follow the proper sequence of instructions. It is always tempting to skip ahead in any project. However, until you are skilled, it is safest to carefully follow the sequence of contruction laid out for you in your pattern instructions. There is usually a very good reason they have you do one particular step before another.
4. Pattern Back
The section called "Fabrics" states that this pattern is not suitable for obvious diagonal prints. It lists many types of fabric which can be used. All seem to be medium weight fabric. For success, it is best to choose from suggested fabrics. Always avoid fabrics specifically stated as inappropriate, such as diagonals in this case. Under sizes, you can see that a 23" waist is a size 6 and a 25" waist is a size 10 (also check hip measurement to be sure the size is correct). What if your body parts are different sizes? Most of us are not perfectly proportioned. In that case, buy the size that most closely fits and adjust as necessary. For a simple skirt, purchase the size that fits your largest measurement and adjust for the smaller measurement. For example if you have a size 6 waist and size 8 hips, purchase a size 8 pattern and adjust the waist as necessary. If the waist contains a waistband, it would be easier to purchase the size that fits the waist and enlarge the pattern for larger hips. Be sure to purchase extra fabric for this. To find out how much fabric is needed, simply review the next pattern back section. 45" and 60" refers to the width of the fabric. If the fabric you are using is 45" wide, you will need to buy 2 3/8 yard for size 6. If the fabric is 60" wide, you only have to buy 2 yards. Remember to buy extra if you are tall or you have to allow for shrinkage or enlarging the pattern. It is always better to have a bit extra than be a bit short! You will also need interfacing according to this pattern. 22" to 36" refers to the width of the interfacing. You will need 1.25 yards of light to mid weight. Under Notions, you can see that you need thread, a button and a hook & eye closure. Purchase thread to be one shade darker than the background color of the fabric. For more information, go to Chapter Two: Choosing Fabric, Pattern, Notions & Thread . The salesperson can be a tremendous help in choosing proper fabric and notions. Don't hesitate to ask for help! 5. Pattern Pieces and Pattern Symbols
Fabric Placement Symbols
Direction is very important because fabric usually has more stretch in one direction than in the other (perpendicular) direction. The double ended arrow depicts the direction of the grain of fabric (it means the arrow will run the direction of least stretch on the fabric). Sometimes, however, this arrow will say "stretch", which means the arrow is to placed in the direction of greatest stretch. This line should be parallel to the edge of the fabric. |

|
|
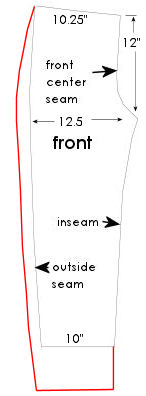
 "Place on fold" with arrows pointing to one side means that the side the arrows are pointing to is to be placed right on the folded edge of the fabric. This is used when two halves of a piece are identical. You will end up with one piece of cut fabric whose right side is a mirror of the left side (such as a skirt front).
|
If the pattern piece is not cut on the fold, and it is cut all the way around and through two layers, twopieces are created, with one being a mirror of the other. This would be done for a skirt back that must have a center seam to accomodate a center zipper. Refer to Chapter Four: Fabric Layout for more information on fabric placement symbols. |
|
Refer to Chapter Four: Cutting Notches for more information on notches. |
 Sewing Symbols
|
Quantity Cutting Instructions
Refer to Chapter Four: Fabric Cutting for more information on fabric cutting symbols. |
|
To learn how to transfer pattern symbols to fabric, Chapter Four: Marking Fabric. |
 Altering Instructions
* Special Bonus *
Go to: Tips & Techniques |
 "Alterations & Tips"
Quick Reference |
Learn To Paint!free video tutorialsVisit my youtube channel. Free videos with step by step instructions. Paint beautiful paintings for your home. |

Please ShareI rely on advertising to keep my site free. Please share with friends. |
Privacy Policy & Terms Of UseBy using our website, you expressly consent to our Privacy Policy and Terms & Conditions. All Patterns, images and instructions are copyright protected. |