CraftAndFabricLinks home
fabric store
Sewing Center    Craft Center    Free Patterns    Free sewing and craft lessons    Fabric Shop
   Home    Contact    Newsletter    Supply Resources    Freebies    Advertising

Sewing Lessons

  -->

Sewing Book


discount fabric
Discount Fabric


sewing machines
AllBrands.com
sewing machines


beginning sewing

Chapter Six: Page 1

NOW WE'RE SEWING!


All Patterns, images and instructions are copyright protected.
Please read our Terms & Conditions before using our patterns.


QUICK INDEX

Clipping Curves
Guiding Fabric
Elastic
Hem Methods
Facing
Interfacing
Ribbing
Seam Finishing
Tools for sewing
Sewing Stitches:
Basting
Embroidery
Gathering
Stitch Locking
Staystitching
Topstitching
Zig Zag Stitch


Page 1   Go To Page 2   Go To Page 3


The following are basic sewing techniques as well as some good tips. They are listed alphabetically.

Clipping & Notching Curves

Clipping and notching seam allowances allows the fabric to mold into a curve. This is what makes the finished garment lie flat, with nice flat seams and edges.

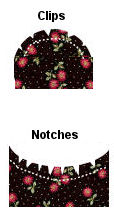
If the fabric edge is outside the curve of the seam allowance, a straight snip is made in the seam allowance. This is called clipping. The fabric in the seam allowance will separate into segments allowing the seam allowance to lie flat. Cut from the outside just to, but not into, the seam allowance.

If the fabric edge curve is inside the curve of the seam, a notch is cut into the seam allowance. A notch is a wedge shaped cut. This removes bulk in the seam allowance and allows the seam allowance to lie flat. Cut from the outside just to, but not into, the seam allowance.
clipping and notching


Edges of a garment must be finished in some way (unless you like the look of raw edges). There are several ways to finish an edge. Seam binding can be sewn to the edge. A straight edge can be hemmed. What if you do not want anything showing on the ouside? If the edge is curved (such as around an arm hole of a sleeveless dress or along the neckline), hemming would not work. To finish such an edge, a facing is used. The facing is cut to the same shape as the edge, and is sewn to the edge, right sides together, and then turned to the inside of the garment (after trimming seam allowances). Pressing with an iron helps give it a crisp edge.

Interfacing is used to line the facing, giving it more body. This gives a firmness to the edge of the garment. Refer to Interfacing  later in this chapter.

The photos below show the front of a dress. The facing is on the inside of the dress front. The dress has a nice "finished" look inside and out.


outside of dress

inside of dress


Guiding Fabric When Sewing


Guiding fabric is most difficult when working with stretch knits, and is why we prefer not to work with stretch knits in a beginning class. They are wonderful if you have a serger, but can be very difficult on a regular machine.

For example, if you have stretched ribbing to fit the edge of the garment body or sleeve, be sure you keep it the same as it passes through. In other words, don't stretch it further. This way, you are keeping the ribbing in place, but not adding any more tension as you sew. Think of it this way. If you have stretched the ribbing so that your left hand is holding a point 4" in front of your right hand, your hands should remain exactly 4" apart all the way through as you guide your piece through. The ribbing is stretched, but the garment fabric is not. Don't pull or push the piece through.

Other fabrics, such as tricot and other similar synthetic knits, require support while being stitched. Apply gentle tension by holding the two layers of fabric at the front and back of the pressor foot as you sew. Do not pull on the fabric.

For elasticized fabric (stretch lycra or stretch lace and knits with an unusual amount of elasticity), you do need to gently stretch the fabric as it passes through, but by an even amount all the way through. Hold the two layers of fabric firmly in front and back of the pressor foot and gently stretch the fabric as the stitches are being placed (use a long stitch). You may find that you need to tighten the tension slightly if the stitches seem to be too loose.

Refer to Chapter Five for information on feed dogs and differential feed.

Elastic

Elastic is used to hold a garment in place while allowing flexible movement of the body. Swimsuit leg openings, waistbands of pyjamas, and wrists of full sleeves are a few examples. As the body moves, the garment fabric stretches and gives, yet stays in place.

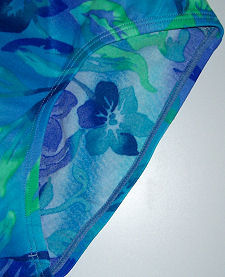
For instructions on properly attaching elastic, go to our free lesson: Attaching Elastic.
use of elastic


Index & Table of Contents  Chapter One  Two   Three  Four  Five
  Six   Seven  Eight  Nine   Ten  Needle & Thread Chart


CraftAndFabricLinks.com


CraftAndFabricLinks Store