|
|
|
|
| HOME SEW CRAFTS DECOR SHOP |
Free Sewing BookSewing Lessons For BeginnersChapter Ten: Darts & Pleats |

|
|
|
-> table of contents
|
Articles, images and patterns © Christina Sherrod of CraftAndFabricLinks.com unless otherwise noted.
|
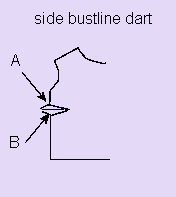
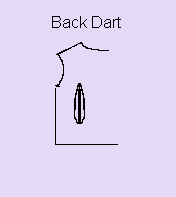
Darts & PleatsFabric is two dimensional, meaning that it has a length and width but no depth. Your body, on the other hand, is three dimensional. It has places that curve in and places that curve out. A piece of flat fabric must be sewn so that it accommodates a non-flat surface. This is done with the use of darts and pleats. Darts are straight stitch lines that connect areas of fabric that must fit properly to the body. For example, darts may take in bulk in the center back of a man's fitted shirt. They may be placed at back shoulders to allow the shirt to be looser at the shoulder blades, but taper in up at the shoulder seam. They can also be placed on the sides or under the bustline. The top of a skirt often has darts to allow the skirt to be full at the hips, but taper in at the waist. A dart starts and stops without creating any puckers in the fabric. In other words, the dart lies flat on the fabric. When sewing a dart, careful tapering from the largest part of the dart, to the end of the dart, is important. If you abruptly end a dart, you will get puckering. A dart is made by folding the fabric, and then sewing from one end of the dart to the other end of the dart. In the first diagram below, the dart runs from the outer edge of the garment out to the bust area. Fold the dart along the center line, lining up Point A with Point B. Sew from the outer edge to the point of the dart. Take a couple of extra stitches at the point, very close to the folded edge. This helps prevent a pucker at the end of the dart. If the dart is in the middle of a garment (such as a dart up the back of a shirt), fold the dart along the center line, then sew from one folded edge, along the line shown on the pattern (curves away from the folded edge) area and back again to the folded edge. Refer to the second diagram below.
Pleats allow fabric to be fitted in one area and fuller in another area, and they also cause fullness at the end of the pleat. A pleat is made by folding the fabric, and stitching a straight line at some distance parallel to the fold. Because the stitching abruptly stops, there is a lot of fullness at the end of the pleat.
In this type of pleat, the fabric is folded, then the fold is topstitched on the RIGHT side of the garment. The folds are created on the RIGHT side of the fabric, then pressed to one side, then topstitched in place. All stitching is done on the right side. |
 Topstitched Pleats
|
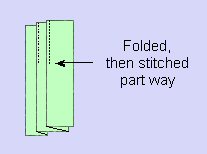
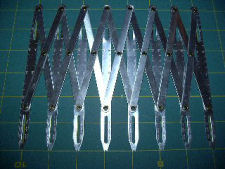
The images on the right show pleats created by stitching a seam a certain distance from the fold on the WRONG side of the fabric . The folds are pressed to one side and all that shows on the front is the seam line. All stitching is done on the wrong side. Several pleats are sewn, equal distance from one another, and all of the same length. The tool shown below is an expanding sewing guage and is used for marking pleat placement. When the ends are moved in or out, the tool expands or contracts, and pleat placement then can be marked on the garment, with even spacing guaranteed.
|
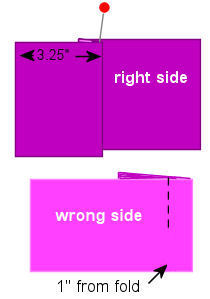 Hidden Stitch Pleats
|
|
 For more detailed instructions and more photos, go to my free pattern:
Quick Reference |
Learn To Paint!free video tutorialsVisit my youtube channel. Free videos with step by step instructions. Paint beautiful paintings for your home. |

Please ShareI rely on advertising to keep my site free. Please share with friends. |
Privacy Policy & Terms Of UseBy using our website, you expressly consent to our Privacy Policy and Terms & Conditions. All Patterns, images and instructions are copyright protected. |