|
|
|
|
| HOME SEW CRAFTS DECOR SHOP |
Free Sewing BookSewing Lessons For BeginnersChapter Four: Getting Ready To SewTools, Layout, Cutting, & Marking |

|
|
|
-> table of contents
|
Articles, images and patterns © Christina Sherrod of CraftAndFabricLinks.com unless otherwise noted.
Sewing Tools & Fabric Preparation
|
|
Preparation of fabric is important for several reasons. New fabric can change when washed or dry cleaned. New fabric might have become stretched out of square during processing. To obtain the best results for your finished product, always pre-treat the fabric (and trim if it will later be washed or dry cleaned). This means wash and dry (or dry clean if that is required for the fabric to be used) and square it into shape. 1. Pre-wash Fabric (or dry clean): addresses shrinking, fading and out of square Fabric (especially inexpensive fabrics) might have been treated with sizing. Sizing can hinder the performance of a sewing machine. It also might interfere with adhesives used for attaching appliques and other items. Sizing is used to give body and a bit of stiffness to fabric that would otherwise be limp. It gives “life” to inexpensive fabric, making it appear to be more like a higher quality fabric. The sizing should be removed by washing before the fabric is used for sewing. Another reason to pre-wash is that fabric might shrink or fade with machine washed, or change in some way when dry cleaned. I once made a baby quilt that used beautiful pale yellow flannel, contrasted with a dark navy flannel. I didn't care if it shrunk because fit was a blanket – I was not concerned with fit. I didn't think about fading. The first time it was washed the navy faded all over the yellow. It was a difficult learning experience. |
|
Fold the fabric as shown in your pattern instructions and lay out flat on a cutting surface. If the fabric does not lie in line nicely, it might be a bit stretched out of shape. If this is the case, you will need to stretch the fabric on the diagonal. Get someone to help you stretch the fabric from one corner to the opposite corner, in the direction that needs the adjustment. This should take care of the problem (pre-washing the fabric tends to take care of this problem also). |
 2. Stretch Fabric Back Into Shape: addresses out of square fabric
|
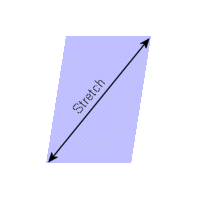
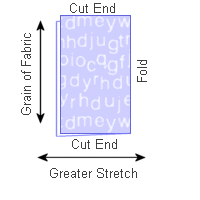
Grain vs. Stretch of Fabric
|
|
Please note that the greatest stretch may be opposite of what is shown on the right. If you are not sure, grab the fabric in two places, 1" apart. Pull the points apart and measure the length of stretch. Repeat in the opposite direction to see which direction has the greatest stretch. Be sure to place the pattern pieces according to greatest stretch. It is very important to follow layout instructions regarding correct fabric direction (the direction the pattern piece is placed on the fabric). This is because there is usually more stretch in on direction than in another, even with non-stretch fabrics. This can make a difference in how the finished garment behaves. At least a bit of stretch is desired across the back width of a skirt, for example, but not along the length of the skirt. The pattern pieces will be clearly marked as to what direction they should be laid on the fabric. Place the pieces on the fold, and make sure you have enough fabric go cut the necessary number of pieces. Refer to the image on the following page. Refer to Chapter Three: Pattern Symbols for more information on pattern layout symbols.
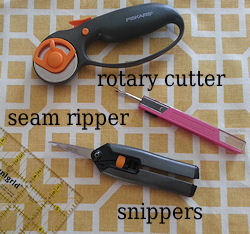
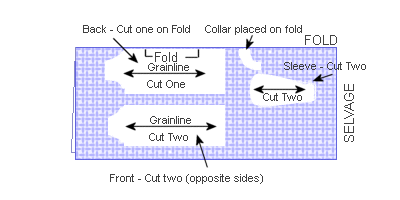
Position Pattern Pieces Always position all pieces before cutting any pieces from the fabric. This will ensure that you fully understand the lay-out, and there is sufficient fabric for all pieces. Review the lay-out instructions in the pattern and carefully follow these directions. When you are more experienced, you might have your own preferences for lay-out. Secure Pattern Pieces Secure the pattern pieces in place before cutting. Pins or weights work well. Pins are more precise and secure, reducing risk of knocking a piece out of place. Therefore, I recommend pins for beginners or precise cutting. Always place pins in the seam allowance. For patterns that do not require a lot of precision cutting, I like to lay my fabric on a large sewing mat. I secure it with weights and use a rotary cutter to cut out the pieces. It is a quick and easy method of cutting. Cut Fabric Pieces For cutting out the pieces, a rotary cutter or any of a wide variety of scissors can be used. As with pins, scissors are more precise. Bent handle scissors are best if cutting fabric on a flat surface. A rotary cutter is fast and easy to use for long, straight edges, but difficult to use around corners. It's easy to overshoot your mark with a rotary cutter, and they are very sharp (not at all appropriate for children). I definitely recommend scissors until you are experienced. Small snippers are wonderful for cutting small areas. Refer to "Sewing Tools", earlier in this chapter, for more information on pins and cutting tools. |
|
To save space when printing patterns, companies often print the notch (triangles) TOWARD the main part of the pattern piece. DO NOT CUT toward the pattern piece. Instead, cut away from the pattern piece. Notches are used to line up pieces when sewing them together (see below under "Marking Pieces". |
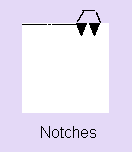 1. Cutting Around Notches
|
There are many different places where you will need to mark your fabric pieces. In marking fabric, you are transferring important information from the pattern piece to the cut fabric, such as where to sew in darts, where to place buttonholes, where to place a zipper, etc. There are various ways to mark fabric. You need to consider your own preferences, as well as the type of fabric, when you choose your method. 1. Pins Pins can be used to mark places such as start and stop places for sewing and measurements. You must be careful with pins, however, because they can leave tiny holes in our garment. Consider the placement of the pins as well as the type of fabric before choosing this method. Pins are best used only where you will sew a seam line. |
|
Tailor tacking uses thread to mark the fabric pieces. The following is an example. The thread can be sewn through the fabric only, or the pattern piece and the fabric. Then cut the thread and pull away the pattern piece. You now have your mark in exactly the right place. |
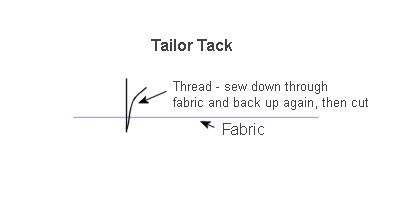 2. Tailor Tacks
|
3. Washable or "Disappearing Ink" Markers / Water Soluble Pencils Washable markers and markers with disappearing ink come in many colors, and are very easy to use. NOTE: ALWAYS before using a marker or pencil, try it on a piece of scrap fabric to be sure it performs well. It should stay on long enough to be useful (not smear or rub off), but should be easily erased with a fabric eraser. 4. Tracing Paper and Tracing Wheel The tracing paper is placed between the fabric and pattern piece with the transfer color toward the fabric. Use the wheel to press down on the pattern marking to be transferred. The color on the paper will rub off onto your fabric. 5. Notches Notches (shown above under "Cutting") mark the fabric by creating areas that extend beyond the regular seam allowance. These notches are used for lining up two pieces of fabric (such as lining up the front and back pieces of a skirt to sew the side seam). HINT: Whenever possible, I trace my patterns onto freezer paper (bought on a roll at Costco). The reason is that most patterns come with multiple sizes. I can trace and cut only my size, without cutting the original pattern. |
Quick Reference |
Learn To Paint!free video tutorialsVisit my youtube channel. Free videos with step by step instructions. Paint beautiful paintings for your home. |

Please ShareI rely on advertising to keep my site free. Please share with friends. |
Privacy Policy & Terms Of UseBy using our website, you expressly consent to our Privacy Policy and Terms & Conditions. All Patterns, images and instructions are copyright protected. |