|
|
|
|
| HOME SEW CRAFTS DECOR SHOP |
Free Sewing BookSewing Lessons For BeginnersChapter Eight: Buttonholes & Zippers |

|
|
|
-> table of contents
|
Articles, images and patterns © Christina Sherrod of CraftAndFabricLinks.com unless otherwise noted.
|
Buttonholes & ZippersCreating a buttonhole is basically a 4-step process. Below is a typical buttonhole. Please note, however, that your machine may follow a different sequence (start at a different point, or go in the opposite direction). Please refer to your machine's manual.
|
|
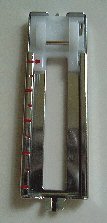
A buttonhole presser foot (shown on right) is used in making buttonholes. Snap off your regular foot and snap on the buttonhole foot. The photograph on the right shows a buttonhole foot for a Pfaff machine. With some fabrics, there may be a difference in the density of the stitches on the right and left sides of the buttonhole. Your machine will have a method for correcting this, usually by turning the dial. Check your machine manual. After the buttonhole has been sewn, the center is cut in one straight line. That's all there is to it. Remember, the cutting is not done until the buttonhole is completed, so if you feel the buttonhole is not the correct size, you can change it. Be sure that you do not cut any buttonholes until they are all sewn and you are sure they are correct. Refer to the diagram and instructions that come with your zipper, as well as the pattern instructions. |
 Older, simpler machines require selection of steps one through four by turning a dial. The start and end of each buttonhole must be marked on the fabric the buttonhole will be made on. Today's more complex machines have the entire process automated. The machine is set, and then every buttonhole is made in the exact same size. Read the manual for your machine to learn how to create buttonholes on your particular machine.
|
A zipper foot is necessary when installing a zipper with your sewing machine. The zipper foot allows the needle to get much closer to the zipper teeth than a regular foot would, because it has an open area toward the zipper. Refer to your machine's manual for directions on using your zipper foot. |
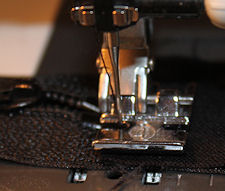 Zipper Foot
|
|
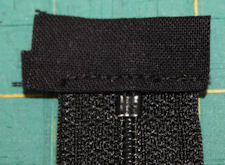 Stitching is close to the end of the zipper teeth. This is possible with the use of a zipper foot. This technique is used for finishing the ends of a zipper in preparation of installing it into the top of a
 |
There are three styles of zipper that I will discuss here. Your zipper will come with instructions in the package. Refer to those instructions as well. Also, I provide a free coin purse pattern that has several photos on installing a zipper. That link is posted below. When installing a zipper, always baste the seam first, and press open. Use medium or low setting to iron the zipper. Use a zipper foot for all steps. Remove the basting when the zipper is installed. 1. Centered Zipper 2. Lapped Zipper 3. Fly Extension Zipper - like a Lapped Zipper, but it has an inside extension.
1. Centered Zipper Remember to baste the garment seam closed first, using a 5/8" seam allowance. Work on the inside of the garment. With the bottom of the zipper away from you, extend the right seam allowance on the garment. By that, I mean that the garment is folded back out of the way, so you will only be basting through the seam allowance. You don't want to sew to the garment at this point. This holds the zipper in place to make sewing it on easier.Place the zipper tape face down on the seam allowance with the bottom stop at the marking point on the seam and the zipper coil lying directly on the seam. It may be easier if you pin the zipper in place before basting. Starting at the bottom of the zipper, machine baste the right zipper tape in place on the right seam allowance, using a zipper foot. Extend the left seam allowance. Baste the left zipper tape in place.
To topstitch the zipper, use a stitch that is slightly longer than a regular stitch length. Spread the garment flat and work on the outside (right side) of the garment. Mark the bottom of the zipper with a pin. Begin at the seam and stitch up one side of the zipper. Repeat with the other side. 2. Lapped Zipper Keep the tab turned up for neck or skirt applications; down for side dress application. For side dress application, whip stitch tapes together above top stop to form a bar tack. Work on the inside of the garment. With the bottom of the zipper opening away from you, extend the right seam allowance. Place the closed zipper face down on the seam allowance with the bottom stop at the marking on the garment and the zipper coil next to, not on, the seam. Machine baste the zipper into place. The stitching may curve out around the zipper slider. Change to a regular stitch length. Turn the zipper face up, forming a fold in the seam allowance (not in the tape). Bring the fold close to the coil but not close enough to touch it. Stitch the fold to the zipper tape. To topstitch, spread the garment flat. Turn the zipper face down over the free seam allowance. A pleat is formed at both ends of the zipper opening. Secure with pins. On the outside of the garment, mark the bottom of the zipper with a pin. Begin at the seam and stitch across the bottom and up one side of the zipper. For waistbands and stand-up collars - stitch to end of tape. For faced edges - stitch to 1" from edge. Cut off end of tape at leam line and stitch to edge. For dresses with side openings - stitch beyond bar tack, pivot, and stitch to seam. |
|
|
 For fully illustrated instructions on installing a zipper on a coin purse, see my
Quick Reference |
Learn To Paint!free video tutorialsVisit my youtube channel. Free videos with step by step instructions. Paint beautiful paintings for your home. |

Please ShareI rely on advertising to keep my site free. Please share with friends. |
Privacy Policy & Terms Of UseBy using our website, you expressly consent to our Privacy Policy and Terms & Conditions. All Patterns, images and instructions are copyright protected. |