|
|
|
|
| HOME SEW CRAFTS DECOR SHOP |
Free Sewing BookSewing Lessons For BeginnersChapter Six: Now We're Sewing!page 2 of 3 |

|
|
|
-> table of contents
|
Chapter 6 Page 2 Go To Page 3
Articles, images and patterns © Christina Sherrod of CraftAndFabricLinks.com unless otherwise noted.
|
Sewing Terms: Guiding Fabric, Facing, HemsThis section of the book covers basic sewing terms, techniques and tips, in alphabetized order. To review various types of stitches (such as basting), go to "Stitches" in this chapter. I also provide reference to pages on my website that provide further information, plus free patterns and lessons on the subject. To see all of my free sewing lessons and patterns, refer to the links below.
free sewing lessons
FACING
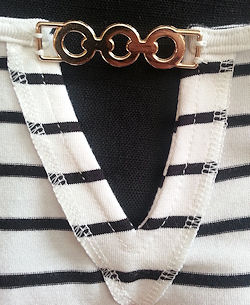
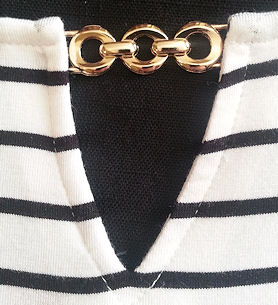
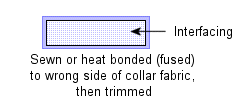
Interfacing is used to line the facing, giving it more body. This gives a firmness to the edge of the garment. Refer to "Interfacing" later in this chapter. The photos below show the front of a knit shirt. The facing is on the inside of the shirt front. The shirt has a nice "finished" look inside and out. See next page for photographs of facing, inside and outside of a garment.
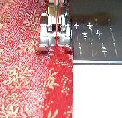
Fabric must be guided as it is fed through the stitching area. If it is not guided, it can swivel around and the machine stitch will not be straight. If you are not watching and guiding, the stitch line can run too close to the edge of the fabric, run off the edge, or wander in from the edge. Guiding fabric is most difficult when working with stretch knits (beginners tend to pull on the fabric and this can stretch a stretch knit fabric), and is why we prefer not to work with stretch knits in a beginning class. These fabrics are wonderful if you have a serger, but can be very difficult on a regular machine. For example, if you have ribbing that has been stretched to fit the edge of the garment body or sleeve, be sure you keep the amount of stretch the same as it passes through. In other words, don't stretch it further. This way, you are keeping the ribbing in place, but not adding any more tension as you sew. Think of it this way. If you have stretched the ribbing so that your left hand is holding a point 4" in front of your right hand, your hands should remain exactly 4" apart all the way through as you guide your piece through. The ribbing is stretched, but the garment fabric is not. Don't pull or push the piece through. Other fabrics, such as tricot and other similar synthetic knits, require support while being stitched. Apply gentle tension by holding the two layers of fabric at the front and back of the pressor foot as you sew. Do not pull on the fabric. For elasticized fabric (stretch lycra or stretch lace and knits with an unusual amount of elasticity), you do need to gently stretch the fabric as it passes through, but by an even amount all the way through. Hold the two layers of fabric firmly in front and back of the pressor foot and gently stretch the fabric as the stitches are being placed (use a long stitch). You may find that you need to tighten the tension slightly if the stitches seem to be too loose. Refer to Chapter Five: Feed Dogs for more information on feed dogs and guiding fabric. |
|
A hem is a finished edge, such as the bottom of a pant leg or skirt. There are numerous methods for creating a hem. Which method is best for a project depends on several factors. Do you want the hem stitching to show? Straight or decorative stitches can be used for hem stitches that will show. Do you want a strong hem? Machine stitched hems will probably be stronger than a hand stitched hem. Machine stitched hems can show on the outside, or be invisible. I will cover four methods for adding a hem your item. No matter which method you choose, always take careful measurements (a hem guage is very useful) and use an iron to firmly press under your hems before sewing, if your fabric allows it. Hem tape adds a nice finish, and is helpful when hand sewing a hem. The hem tape is sewn along the edge of the hem before ironing under the hem. Use a hem guage to ensure your hem is accurate and straight. Cover Stitch Hem Cover stitch sergers are capable of creating a serged edge inside the garment, and double or triple top stitching on the outside of the garment – all in one stitch line. These machines are very useful for creating hems on sleeves, necklines or lower hems on apparel and other items made from stretch fabrics. Hand Sewn Hem Hand sewing works very well, if you are good at hand sewing. If not, you will want to learn how to machine hem. There are times, however, when hand sewing will work best, such as when you want a truly invisible hem stitch. It takes a lot of practice with machine hemming to get an "ivisible" stitch. For a nice, almost invisible hand sewn hem stitch, fold your hem under 1/4" and press with iron. Fold it under again to the height you want for your hem (1/2", 1", 1/5" hem depending on what you are hemming and how large you want your hem to be) and press with iron again. Thread your hand sewing needle and tie a knot in one end. Pull the needle and thread through the fold of the hem, close to the folded edge, from the underside to the top. This way, the knot will be hidden under the hem. Pull your needle through only a couple of threads from your garment, just above the place your needle originally came up. If you take too many threads, your stitch will show on the outside. If you take only one or two, your hem could break away later. Refer to figure 1, below. Practice to get a good, strong stitch and the look you want on the outside. Run the needle under the fold of the hem and come up through the fold again. Repeat this stitch around the hem. Your stitch should not show much on the inside, and should be almost invisible on the outside.
Iron under the hem 1/4". Then iron under again to desired hem width and stitch the hem in place. Topstitching is actually done on the outside of the garment. I prefer to stitch hems from the wrong side, so I know I am stitching close to the edge of the hem. The hem stitch line will show on the outside of the garment.
|

 Use a thread that matches your garment. Be sure your needle is appropriate for the type of fabric you are using.
|
This one takes some practice, as stated above, but is very easy once you get the hang of it. Fold under to the desired hem width. Set your machine to "hem stitch" (refer to your machine's manual). Then, bend back the edge of the hem, away from the garment. Stitch along this edge, and with every fourth stitch or so your needle will zig-zag over to catch the edge of the garment side. If it zig-zags too far into the garment, it will show more. If it just barely catches it, it may break away. |
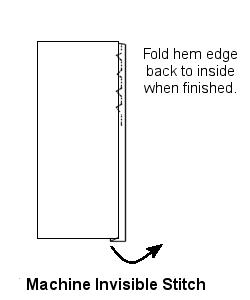 Machine Invisible Hem Stitch
|
Interfacing is used to give stability to the garment piece. It usually lines a facing (see "Facing" earlier in this chapter). I use it for tote bags, purses and other items that rerquire more body or stiffness. Interfacing gives body and weight to the piece, and can stiffen the piece if a heavy weight is used (such as adding stiffness to a baseball cap bill). There are various weights and types of interfacing available. Interfacing is fusible (iron-on) or sew-on. Which one you choose depends on your own preference and type of fabric it will be adhered to. Fusible interfacing is very popular because it is quick and easy to use. We highly recommend it, if the fabric allows pressing with a hot iron. Follow the directions that come with the interfacing. Proper interfacing weight depends on the weight of your fabric, and your desired stiffness of the finished piece. Use a light weight interfacing for lighter weight fabric, and a heavier weight for heavier weight fabric, such as denim. Check washing instructions. It would not make sense to use dry clean only interfacing with a washable fabric. |
* Special Bonus *
Go to: Pillowcases |
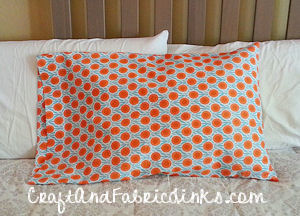 Properly Hem A Pillowcase
Quick Reference |
Learn To Paint!free video tutorialsVisit my youtube channel. Free videos with step by step instructions. Paint beautiful paintings for your home. |

Please ShareI rely on advertising to keep my site free. Please share with friends. |
Privacy Policy & Terms Of UseBy using our website, you expressly consent to our Privacy Policy and Terms & Conditions. All Patterns, images and instructions are copyright protected. |