|
|
|
|
| HOME SEW CRAFTS DECOR SHOP |
|
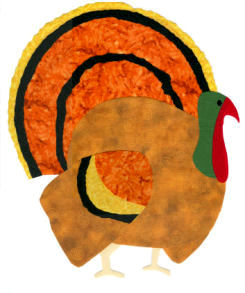
TURKEY APPLIQUE
page 2
Sewing Pattern |
| lessons holiday patterns sewing patterns |

|
|
Page 2: Directions |
DirectionsAll seams are 1/4"1. Attach Fusible Web & Cut Fabric PiecesCut fabric pieces large enough to contain each pattern piece. Following instructions for your fusible web, attach fusible web to wrong side of your fabric pieces. Trace the pattern pieces (backwards) to the paper side of the fusible adhesive. Cut out each fabric piece. IMPORTANT: cut ONE piece's edge (the piece you lay down first) slightly longer (about 1/8"). That piece will be laid down first. The next piece will be laid down over it so that the edges overlap slightly. Due to the fusible web on the back of each piece, the pieces will stick together where they overlap. THINK IT THROUGH CAREFULLY - think ahead about which pieces you will lay down first, and in what order your other pieces will be put down. Peel off paper. For instructions on using an applique pressing sheet, go to: Applique Floral Pattern TIP: It is easier to create the turkey in parts. First, create the turkey's right wing. Then, create the head. Then create the large tail feather section. Once those pieces are completed, you can then complete the turkey. Lay down the feet and tail, then the body, then the right wing and head. |
2. Right Wing Assembly
|
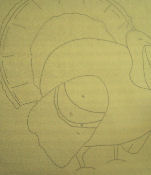 Using one set of the pattern pieces and my layout guide, tape the pieces together to create the layout page (refer to page 1: pattern). Place the layout page under the applique pressing sheet.
|
|
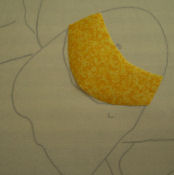 Wing piece 1: Remember that pieces must overlap on one edge, so that the finished piece will stay together as a unit. Wing piece 1 is cut slightly larger on the side next to wing piece 2, so that wing piece 2 can overlap it a bit on that edge.
|
|
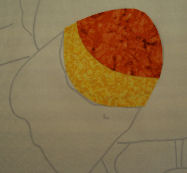 Wing piece 2: Lay wing piece 2 over wing piece 1 so that the edges where they meet overlap.
|
|
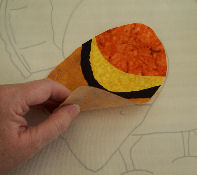
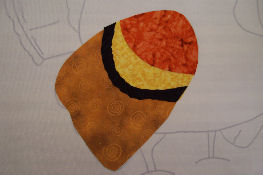 Finished wing: Lay down wing piece 3, then the black border last.
|
|
 Using an iron, press over entire piece. When finished, the applique peels off the sheet. Fabric
pieces stick to each other - not to your sheet.
Using an iron, press over entire piece. When finished, the applique peels off the sheet. Fabric
pieces stick to each other - not to your sheet.
3. Finish The Turkey Applique Block
You can now lay the entire, finished turkey, onto the top fabric of your wallhanging. Press with iron to adhere the turkey to the top fabric. You now have a finished turkey block. If you created the block in my original size, you can use it to make a wallhanging or pillow. A smaller version could be used to create hot pads, pillows, placemats, quilt blocks or anything else you wish to use a Thanksgiving turkey applique on. |
 Create the remaining turkey parts in the same way that you created the right wing. I laid down the parts in the following order: create the head next; then create the large tail feather section. Once those pieces are completed, you can then complete the turkey. Lay down the feet and tail, then the body, then the right wing and head.
Borders For Wallhanging
Fold the 18.5" long green strips in half, lengthwise, right side out. Press with iron. Working on the right side of the turkey block, pin the green strips to the side edges of the turkey block, aligning raw edges. The green fold will be toward the turkey; the raw edges of the greeen strip will line up with the raw edge of the turkey block. Baste into place close to edge and remove pins. Repeat with the top and bottom green strips (measuring 15.5" in length). Stitch the two side yellow borders to the sides of your turkey block, stitching right sides together. Press seams open. Stitch upper and lower yellow border to block. Fold the 20.5" long black strips in half, lengthwise, right side out. Press with iron. Working on the right side of the turkey block, pin the black strips to the side edges of the block, aligning raw edges of black strip with raw edges of yellow border. The black fold will be toward the turkey; the raw edges of the black strip will line up with the raw edge of the yellow border. Baste into place close to edge and remove pins. Repeat with the top and bottom black strips (measuring 17.5" in length). |
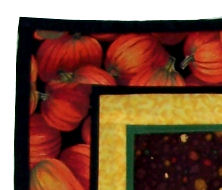 I added a 1" yellow border, then a 1.5" outer pumpkin border. A small strip of green is placed on top of the background with the fold toward the turkey, a small strip of black is placed with the fold toward the turkey on top of the yellow print. The outer binding is black.
Assemble and Bind Finished PieceRefer to Assemble & Bind Lesson to learn how to assemble, bind and add a hanging sleeve to your finished quilt or wallhanging.
Hanging Sleeve Size Refer to Hanging Sleeve Lesson for directions on finishing the hanging sleeve. Also see Halloween Cat Project for instructions on finishing a layered or quilted piece. The Halloween wall hanging is part of this series, so the sleeve is made in the same way. |
Related Project
Free pattern for patriotic wood turkey for home or yard decor. Painting instructions included. |
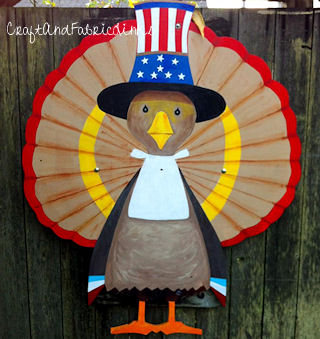 WOOD TURKEY PATTERN
Quick Reference |
Learn To Paint!free video tutorialsVisit my youtube channel. Free videos with step by step instructions. Paint beautiful paintings for your home. |

Please ShareI rely on advertising to keep my site free. Please share with friends. |
Privacy Policy & Terms Of UseBy using our website, you expressly consent to our Privacy Policy and Terms & Conditions. All Patterns, images and instructions are copyright protected. |