|
|
|
|
| HOME SEW CRAFTS DECOR SHOP |
|
HALLOWEEN CAT APPLIQUE
|
| lessons holiday patterns sewing patterns |

|
|
Page 2 |
Directions - continued from page 1All seams are 1/4"6. Create Fence Applique
Cut 2 long, horizontal fence boards that measure 15.5" x 3/8". These do not have to be absolutely straight. I purposely cut mine a bit crooked. Cut 12 vertical fence boards, each measuring 3" tall by 3/8" wide. Peel paper backing off pieces. Lay the two long horizontal boards on the pressing sheet. Place the vertical fence boards on top of the horizontal boards. These boards do not have to be straight either. I set each of my boards slightly askew. When you are happy with the placement, use your iron to fuse the pieces together. |
 Fuse web to back of fence fabric.
7. Create Main Fabric PieceStitch sky piece (7" x 15.5") to ground piece (3" x 15.5"), right sides together. Press seam toward darkest side. |
8. Fuse Appliques To Background
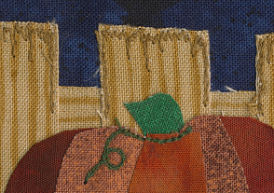
NOTE: I later replaced the face pieces with embroidery (eyes and mouth). |
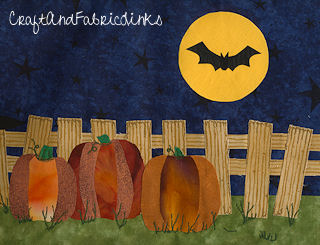
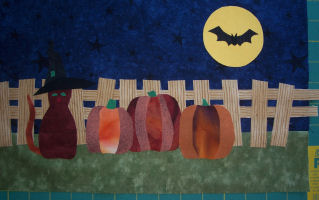 Lay background piece (ground/sky) on ironing board, right side up. Fuse the fence applique to the background. Lay out the cat, pumpkins and moon/bat pieces. When you are happy with the placement, fuse all appliques in place by pressing with iron.
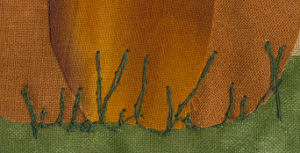
9. Add Free Motion Machine EmbroideryPin a 15.5" x 9.5" piece of stabilizer to the wrong side of your fabric piece. Go to my free free motion embroidery tutorial for instructions on free motion embroidery. I embroidered the cat face, grasses and small plants. I also added "cracks" and detail to the fence boards. Add grass and plants to base of pumpkins and cat. Add vines to pumpkins. The machine embroidery tears the edges of the tail, helping to create a "furry" effect. Add whiskers and face detail to cat. Add plants to ground area. Add detail to fence boards.
|

10. Add BordersSquare down (trim evenly) main piece to 9.5" x 15.5". Cut two side borders, each measuring 2.5" x 9.5". Stitch, right sides together, to the two sides of the main piece. Press seams to darkest side. Cut top and bottom borders, each measuring 19.5" x 2.5". Stitch, right sides together, to the top and bottom of the main piece. Press seams to darkest side. The overall size of your finished top should be 19.5" x 13.5". |
10. Assemble, Bind And Add Hanging Sleeve
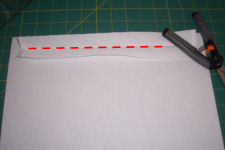
Fold sleeve lengthwise and press with iron. Place the sleeve right side right sides together on the right side of your backing piece so that it is centered along one long edge of the backing piece. This will be the TOP of the backing piece. Pin in place along edge. Stitch along fold line. Remove pins. See photo on right (stitch line is enhanced in red). Fold lower edge up and press; pin along edge of piece. Baste raw edges of sleeve to raw edge of backing. Stitch from edge of piece down 1/2", stitching close to edge of sleeve. Stitch the length of the sleeve, parallel to fold line, 1" from fold line. Stitch back up to top edge of piece, stitching close to edge of sleeve. The photo below shows the stitching enhanced in red.
|
 Create hanging sleeve
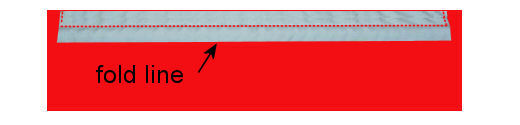
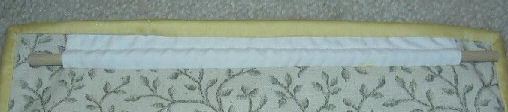
10. Layer, Bind & HangLay down the backing piece, wrong side up. Place the fusible fleece or batting on top of the backing. Place the finished top piece on top, right side up. Pin along edges; baste edges together. Cut binding 1.5" wide and long enough to go around piece (perimeter measurement plus about 10" - in this case about 80"). Add binding to your wall hanging. For more information on adding binding, go to: Assemble & Bind Quilt Run a wood dowel through the hanging sleeve. The dowel should be 2" longer than the sleeve. The sleeve measures 15" cut the dowel 17". Screw two 5/8" brass cup hooks into your wall at a distance that is 1" greater than the length of your sleeve. If the sleeve is 15", the dowel is 17" and the hooks are 16" apart. Place the wood dowel with wall hanging onto the hooks. The photo below shows a finished sleeve with the dowel in the sleeve.
NOTE: ALL of our wall hangings in this series will use this same size of sleeve. You do not have to add new hooks. You can use the same wood dowel and hooks for each wall hanging. Change the wall hangings with the season. |
|
Page 2 |
Quick Reference |
Learn To Paint!free video tutorialsVisit my youtube channel. Free videos with step by step instructions. Paint beautiful paintings for your home. |

Please ShareI rely on advertising to keep my site free. Please share with friends. |
Privacy Policy & Terms Of UseBy using our website, you expressly consent to our Privacy Policy and Terms & Conditions. All Patterns, images and instructions are copyright protected. |