|
|
|
|
| HOME SEW CRAFTS DECOR SHOP |
|
PLEATED APRON page 2
Optional Embroidery |
| lessons holiday patterns sewing patterns |

|
-> home decor -> Kitchen
|
Page 2: Create Lower Hem
|
4. Stitch Sides & Hem
You can now hand or machine stitch the hem line into place. Measure it all the way across to be sure it is straight. It should be a 5.5" hem. Press. Pin. Stitch into place. |
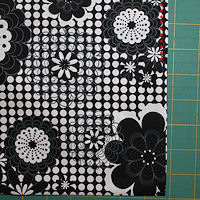 The sides naturally rolled under another 1/4" when the hem was turned right side out. Press each side 1/4" under all the way from the hem to the apron top. Stitch from the top of the hem fold to the top of the apron. Stitching is shown in red.
5. Mark Waistband Area
|
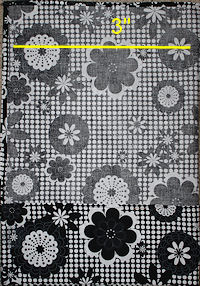 Turn piece wrong side up. Draw a line straight across the piece, 3" from the top edge. It should look like the image on the right (the right edge is cut off in the photo).
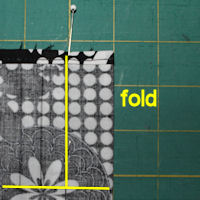
6. Create Center Pleat
The first pleat to be created is the center pleat. Turn piece right side up. Fold the piece length-wise, right sides together, to find the center. Press the fold line from the top edge to the 3" line. Draw a vertical line from the top edge to the 3" line, 1" to the left of the fold line. Stitch along the vertical line, from the top edge to the 3" line. This will create the center pleat. |
 The apron will have 5 pleats across the top. The first pleat will be in the center. The other 4 pleats will be evenly spaced, with two on each side of the center pleat.
7. Press Center Pleat
|
 Turn the piece wrong side up and lay out straight. Push the back side of the pleat down flat and press with iron.
|
Page 2 of 4
|
Related Project
I have a huge assortment of placemat patterns. Reversible, quick and easy, pieced, holiday. Browse through my placemat category to see them all. |
 Placemats
Quick Reference |
Learn To Paint!free video tutorialsVisit my youtube channel. Free videos with step by step instructions. Paint beautiful paintings for your home. |

Please ShareI rely on advertising to keep my site free. Please share with friends. |
Privacy Policy & Terms Of UseBy using our website, you expressly consent to our Privacy Policy and Terms & Conditions. All Patterns, images and instructions are copyright protected. |