|
|
|
|
| HOME SEW CRAFTS DECOR SHOP |
|
LAPTOP CARRYING CASE
Tote Bag |
| lessons holiday patterns sewing patterns |
-> sewing patterns -> accessories
|
large inside compartmentlarge outside pocketpage 1 of 3size approx. 14" w x 13" h x 3" deep |

|
page 1 of 3
|
Laptop Tote
Tired of trying to juggle a laptop, purse and books? This tote creates an easy way to pack around just what you need. This one bag does all the work of a purse, cell phone case, book bag and laptop carrier. Put your laptop inside the large inner pocket, place your cell phone and purse items in the outer pocket's compartments. There is still room inside the main tote for a jacket, books, running shoes, lunch or whatever else you might need on campus. Finished nicely inside and out, this is actually quite easy to make. You will need the following skills: accurate measuring and stitching, and sewing a buttonhole.
Also see:
|
 Designer: Christina Sherrod
Laptop Tote SizeThe finished size is approximately 14" w x 13" h x 3" deep Change dimensions to suit your needs. |
Supplies
1 Yard Craft Fuse 808
Thread Note: I used thread that matched the bag in my top spool and thread that matched the lining in my bobbin so the thread blended with the fabric. Fabric Note: I used drapery fabric for my tote. It is a bit heavier than a quilt weight cotton. You can also use duck cloth, canvas, etc. The quilt cottons on our site would work well also. If you want a stiffer tote, use Fusible Fleece rather than the Craft Fuse. General Sewing Supplies
|
DirectionsAll seams are 1/4"CUT MAIN PIECESBag
Inner Pocket
|
MAKE INNER POCKETIron one piece of Craft Fuse to the wrong side of each pocket piece. Stitch the two pocket pieces together, right sides together, across the top edge only (a 12" side). Remember to use 1/4" seam. Trim seam. Turn right side out and press stitched edge. Zig zag or serge across the lower edge, close to the edge. |
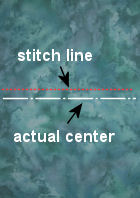
ATTACH INNER POCKETLay the bag lining right side up. Use pins to mark the center line (15" from each end). Use pins or a sewing marker to draw a line across the bag 1.5" up from the center line. This will mark your stitch line for the pocket. Lay the pocket on top of the lining piece so that it's zig zag end is at the top, overlapping your marked line by 1/4". Stitch across the bag, stitching the pocket to the bag. The finished end of the pocket is toward the bottom. Flip the pocket up into place and baste the sides of the pocket to the bag, stitching close to the edge. Your inner pocket will sit right on the bottom of your bag when the bag is finished. See drawings below. |
|
|


|
page 1 of 2
|
Quick Reference |
Learn To Paint!free video tutorialsVisit my youtube channel. Free videos with step by step instructions. Paint beautiful paintings for your home. |

Please ShareI rely on advertising to keep my site free. Please share with friends. |
Privacy Policy & Terms Of UseBy using our website, you expressly consent to our Privacy Policy and Terms & Conditions. All Patterns, images and instructions are copyright protected. |