|
|
|
|
| HOME SEW CRAFTS DECOR SHOP |
|
EASY BACKPACK PATTERN
|
| lessons holiday patterns sewing patterns |

|
-> sewing patterns -> accessories
|
Page 1: supplies & pocket |
One Easy Pattern - three choices
|
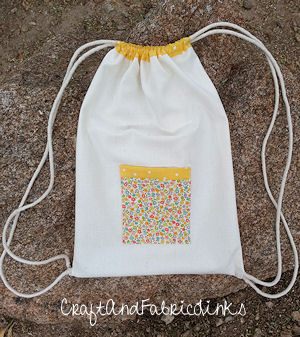 This is a fabulous "first sewing project". No zippers or buttons. Learn how to make a casing and practice straight stitching. Add a pocket for added detail.
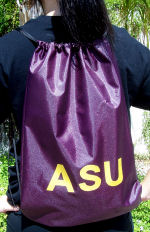 Customize! Use just one fabric for the entire backpack. Use a contrast fabric for the casing. Add a pocket. Your choice! Use 430 Denier Nylon waterproof fabric for backpack with letters (perfect for college) - or use canvas with cotton trim. Design your backpack for your own taste and purpose. Whichever way you go, it's still a very easy pattern!
Backpack SizeApproximately 18" high x 13" wide. Adjust size to fit your needs. The bag has a 1" casing. The finished pocket measures 4" square. |
SuppliesFabric - all one color
Choice 1 - One Fabric:
Optional Letters - for use with nylon fabric: Insignia cloth large enough for lettering (one 4" x 15" piece is enough for school initials). NOTE: insignia cloth sticks like scotch tape. It is NOT a permanent bond, but is also NOT easily dislodged. We scrunched up the bag, tossed it around, etc. and the letters stayed on firmly. Insignia cloth is very flexible and easy to work with. If you grab a letter and carefully peel, however, you can peel it off. This is nice if you wish to re-position the letters, remove them, etc. If you want a permanent bond, use fabric glue or iron-on adhesive (such as our heat-n-bond) and other fabric of your choice, or stitch around these letters. Cotton, twill, denim, duck cloth and fabrics with similar weights would work well, too. Any good quality cotton fabric could be appliqued on as letters. If you are using cotton fabric and wish to stitch on letter appliques, refer to my Letter Applique Pillow Pattern. I provide directions for creating and attaching applique letters. |
Play Around With Fabrics
Choice 2 -Bag With Contrast Casing:
Choice 3 - Add Pocket:
Add Trim To Pocket: If you wish to trim the upper 1" of the pocket in a contrast fabric, you will need a 5.5" wide x 5.5" high piece of pocket fabric, and a 5.5" wide x 1.5" high piece of contrast pocket fabric. You will also need a 5.5" wide x 6.5" high piece of lining fabric.
Other
|
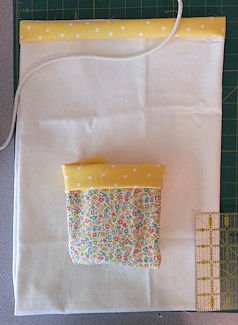 I played around with a few combinations of fabrics before choosing to add contrast casing plus a pocket with contrast trim. If you decide to use contrast casing or add a pocket, refer to the following requirements for fabric.
DirectionsNOTE: All seams 1/4" Create Main Bag Cord Casings - Choice 1 (one fabric)Without Contrast Casing Cut out two pieces of backpack fabric, each measuring 13.5" wide x 19.5" high. Set aside. With Contrast Casing |
|
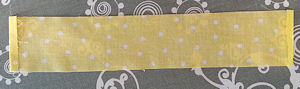
Cut two pieces of casing fabric, each measuring 13.5" wide by 2.5" high. Press under 1/4" on each short end of the casing piece. Stitch the end hems that you just pressed under. Press one long side of casing piece 1/4". Repeat for the second casing.
|
 Cut out two pieces of backpack fabric, each measuring 13.5" wide x 17.5" high.
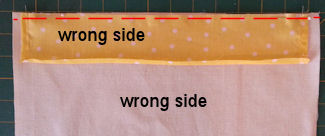 Center the casing strip at the top edge of one backpack piece, aligning raw edges. Pin in place so that the RIGHT SIDE OF CASING PIECE is against the WRONG SIDE OF BACKPACK PIECE (in other words, both are wrong side up). Each end of the casing should be 1/4" from the side edge of the backpack piece. If it is not that exact measurement, that is OK. I pressed under a bit more than 1/4" on my casing ends, so my casing was slightly short. Stitch casing to backpack piece, stitching all the way across. Stitch from one edge to the other. This will enforce the edge top edge of the bag side beyond the casing area. I enhanced the stitch line in red in the photo. Press seam open.
|
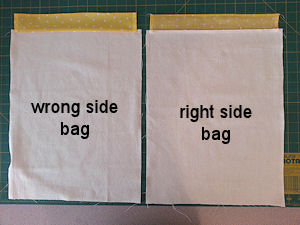
NOTE: the seam allowance is on the RIGHT side of the bag, and the inside of the casing is face up. |
 Repeat for the second backpack piece.
|
If you wish to add a pocket, do so now. If you do not wish to add a pocket, proceed to the next step: ""Stitch Bag Sides".
|
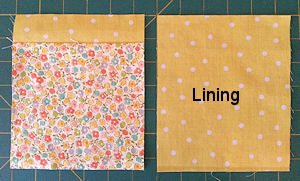 If you are using trim, stitch the contrast strip to the main pocket piece. Press seam. You should now have one pocket piece, and one lining piece, eash measuring 5.5" wide x 6.5" high.
|
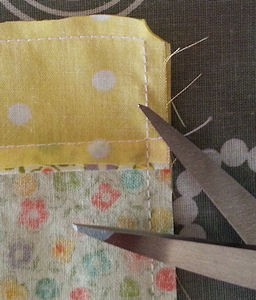
Trim the upper corners (this assists in turning the pocket right side out). Turn pocket right side out. Press firmly. |
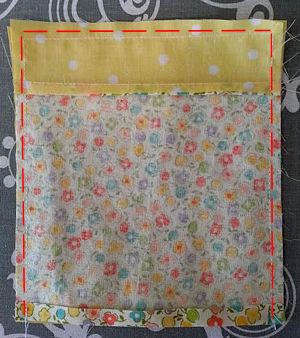 Place pocket pieces right sides together. Stitch around the three unpressed sides. I enhanced the stitching in red in the photo.
|
|

|
NOTE: if you have contrast casing, remember that the RIGHT side has the casing seam allowance showing. |
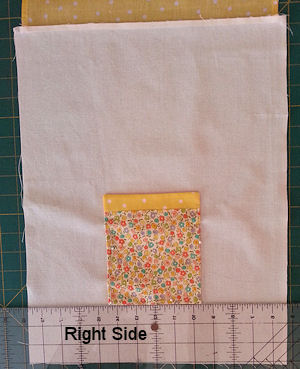 Place the pocket on the right side of one backpack piece. Center the pocket, and place it approximately 3" from the bottom of the bag piece. Pin in place. Stitch the the pocket to the bag piece, stitching the two sides of the pocket, and across the bottom. DO NOT stitch across the top of the pocket. Stitch close to the edge of the pocket. Use a slightly longer stitch length (I use 3 or 3.5).
|
Page 1: supplies & pocket |
Quick Reference |
Learn To Paint!free video tutorialsVisit my youtube channel. Free videos with step by step instructions. Paint beautiful paintings for your home. |

Please ShareI rely on advertising to keep my site free. Please share with friends. |
Privacy Policy & Terms Of UseBy using our website, you expressly consent to our Privacy Policy and Terms & Conditions. All Patterns, images and instructions are copyright protected. |