|
|
|
|
| HOME SEW CRAFTS DECOR SHOP |
|
LAPTOP CARRYING CASE page 2
Tote Bag |
| lessons holiday patterns sewing patterns |
-> sewing patterns -> accessories
|
page 2 of 3
|
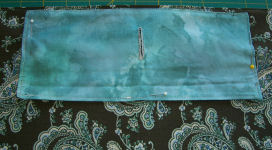
Directions - continued from page 1All seams are 1/4"STITCH MAIN BAGIron Craft Fuse to the wrong side of the outer fabric main bag piece. Iron Craft Fuse to the wrong side of the lining. Pin lining to outer fabric, right sides together. Stitch around three sides, leaving one short end open for turning, using a 1/4" seam allowance. Trim unstitched end even. Turn right side out. Press under a 1/4" hem on the unstitched end. Topstitch around all four sides. Turn right side out and press stitched sides. The following photo shows the finished main bag piece. |
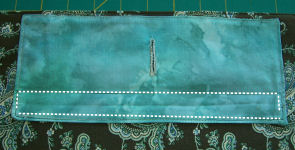
CREATE OUTER POCKETIron one piece of Craft Fuse to the wrong side of each pocket piece. Stitch the two pocket pieces together, right sides together, across the top edge only (a 12" side). Remember to use 1/4" seam. Trim seam. Turn right side out and press stitched edge. Zig zag or serge across the lower edge, close to the edge. |
ATTACH INNER POCKETPocket Cover
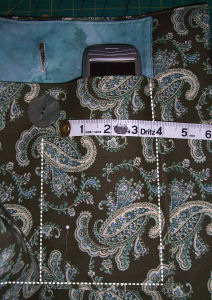
The photo shows the button next to the buttonhole for size comparison. Press under 1/4" one 4.5" end of lining piece; repeat with outer bag piece. Stitch the outer fabric and lining fabric together, right sides together, around three unturned sides. Leave the pressed 4.5" end open for turning. Trim seams. Turn right side out. Top stitch around all four sides. Measure your button and make a buttonhole in the pocket cover. I placed my buttonhole approximately 1.2" from the edge of the pocket cover edge; center your buttonhole horizontally. It is best to use thread that matches the background color of your bag. Using bobbin thread that matches the lining will make the buttonhole more attractive when the cover is raised (the buttonhole will blend into the lining on the underside of the cover). Lay down the main bag piece, right side up, with the inner pocket (on the wrong side) toward the bottom of your work area. The upper half of the bag will become the front of the bag, and will contain the outside pocket. Place the pocket cover on the bag piece, right sides together and upside down, and centered horizontally on the bag. There should be about 1/4" clearance from the bag top edge and the pocket cover. Stitch a line across the cover, stitching the cover to the bag piece. I placed my line about 2 3/4" from the upper edge of the cover. This allowed space under the buttonhole. You can place pins where you plan to stitch your line. Then fold the cover down to be sure it will look good. The pocket is not yet in place, but this will give you an idea of how the whole thing will look. After the first line is stitched, stitch a box from the stitch line down to the bottom edge, across the bottom edge and back up to the stitch line. This will secure the cover in place. My lower stitch line was approximately 7/8" from the top stitch line. This is not that important; I'm just giving you the information as a reference. NOTE: Be sure your cover is exactly horizontal on the bag. If it is crooked, your eye will pick this up. If it is not entirely straight, place either correct the original stitching or place the cover so that the edge that is turned down is straight. The end that is stitched to the bag is not important because it will be covered by the pocket. Refer to photos below. |
 Cut one piece of outer fabric (bag fabric), measuring 10.5" x 4.5".
|
|
|
Cut Two pieces of outer fabric (bag fabric), each measuring 10.5" x 8.5". Press under 1/4" one 10.5" side of each pocket fabric piece. Pin the pocket pieces right sides together, aligning the pressed edges. Stitch the pieces right sides together, leaving the pressed side open for turning. The open side will become the top edge of the pocket. Turn right side out. Press. Topstitch across the upper edge, stitching it closed.
|
 Place the pocket on top of the open pocket cover. When happy with placement, pin pocket into place. Topstitch around three sides of the pocket (leave top edge open). Stitch a straight line from the bottom stitch line up toward the button, aligning the stitch line with the buttonhole. This will divide the pocket into two equal sized compartments.
|
page 2 of 3
|
Quick Reference |
Learn To Paint!free video tutorialsVisit my youtube channel. Free videos with step by step instructions. Paint beautiful paintings for your home. |

Please ShareI rely on advertising to keep my site free. Please share with friends. |
Privacy Policy & Terms Of UseBy using our website, you expressly consent to our Privacy Policy and Terms & Conditions. All Patterns, images and instructions are copyright protected. |