|
|
|
|
| HOME SEW CRAFTS DECOR SHOP |
|
QUILT BLOCK APRON page 2
size child 4-6 |
| lessons holiday patterns sewing patterns |

|
-> home decor -> Kitchen
|
page 2 of 2 |
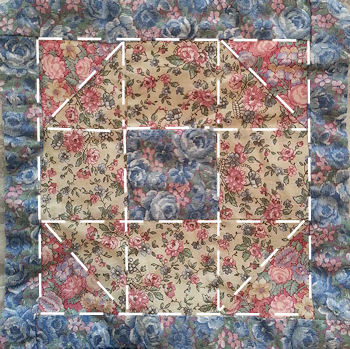
DirectionsContinued from page 1Please Note: these diagrams are not exactly to scale, but the pieces do fit as shown. 2. Create Quilt Block
1. Cut the two pink squares on the diagonal, creating 4 triangles. 3. Sew pink triangles to yellow triangles along the diagonal edge to form 4 squares as shown below. Square down the divided squares (stitched triangles) to 2.5" square. Arrange them as shown below.
|

|
The stitch lines are enhanced in the photo so the individual fabric pieces show up better. The photo shows the finished block, after the border has been added. |
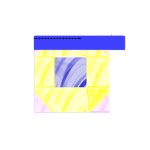
 After you have sewn your triangle squares, you should have 4 pink / yellow squares, 4 yellow squares, and 1 blue square. Place them in rows of 3 squares each; then sew the three rows together (refer to the following photo for placement of squares).
|
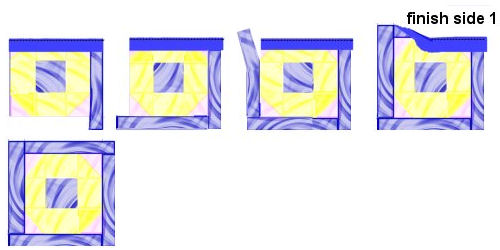
Refer to image on right. After sewing strip one on, iron the strip open. 6. Rotate the block 90 degrees to the right. Sew a new strip of blue to your new top of the block. The blue piece can be sewn entirely across this side. Repeat on around until all blue strips have been sewn on. After your 4th blue piece is sewn on, you can go back and finish off the first blue piece. Refer to picture. If you prefer, you can stitch the borders on by your own preferred method. I like the look of this method, because each strip overlaps the strip that follows, but it is not the only way to attach border pieces.
|
 5. Place one blue strip along the top of your block of squares, right sides together, lining up one end of the blue strip even with the left edge of the block. Sew the strip to the block, right sides together - but stop about 1/2 way down the line. The blue strip will extend beyond the end of the block on the open end. This is correct.
Neck Ties / Quilt Block Back
Refer to the following photo. |
 7. Fold ties right sides together. With right sides together, sew side seams and one end. Turn right sides out. Baste, serge, or sew across the unfinished edge. Repeat with second tie. Pin the muslin quilt block backing to the quilt block, right sides together, with the two finished neck ties placed inside the two layers (unfinished edge of each tie extending slightly beyond the edge of the quilt block). Place the ties so that their seams are toward one another, rather than to the outside.
|
Refer to the following photo. |
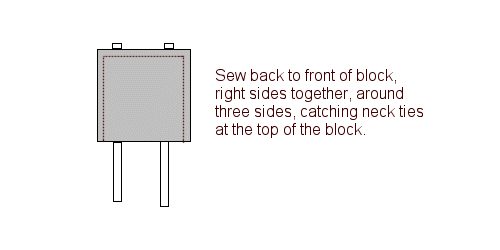 Sew backing of quilt block to the quilt block front along the two sides and across the top that contains the two ties. Be careful not to catch the ties in the sides of the block. They should be laid out straight so you do not accidentally sew them into any sides except at the top. Turn the block right side out, with ties sticking up out of the top. Iron. Refer to image on right.
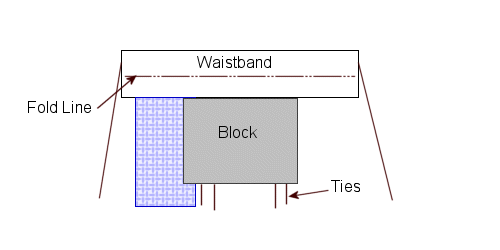
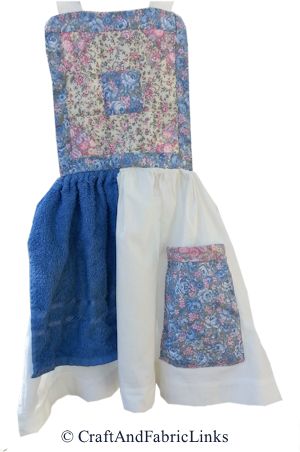
Skirt / Waistband8. Serge or zigzag along both long edges of the waistband. Fold under the two ends and iron. Fold the waistband right side out, lengthwise, and iron. 9. Serge or zig zag across the top of the skirt, the bottom of the skirt (top and bottom are the two long sides) and the top of the towel. Fold under the short sides of the skirt 1/4". Fold under again and stitch along the edge, finishing the sides. Run two gathering stitches along the top edge of the skirt and top edge of the towel. Gather the skirt across the top - adjust so that the skirt width equals the length of the waistband. Gather the top of the towel slightly. Place the towel on the skirt, with the right side of the towel and skirt facing up. Baste the towel into place on the skirt (about 2-3" from the side of the skirt). Place the quilt block bottom edge along the top edge of the skirt, right sides together. Pin the waistband to the top of the skirt, keeping ends of waistband folded under. The bottom layer is the skirt, the second layer is the towel, the next layer is the quilt block, the top layer is the waistband. Stitch across. Refer to image below.
|
Finishing Waistband / Waist Ties10. Fold waistband over top of skirt and pin in place on wrong side of skirt. Hand stitch waistband in place.
Place the unfinished edges of the waist ties into the waistband open ends so that seams face toward the floor. If ties don't fit into waistband, adjust their width to fit. Machine stitch across ends of waistband catching waist ties.
12. Hem the bottom of the skirt. |
 11. Sew the pink pocket strip to the top of the blue pocket piece, right sides together to create an outer pocket piece that measures 6.5" high x 5.5" wide. Zig zag or serge across bottom edge of outer pocket. Zig zag or serge across bottom edge of pocket lining. Turn under bottom edge of outer pocket front and bottom edge of pocket lining 1/4" and iron. Sew the pocket lining to the pocket front around three unironed sides , right sides together (keep the bottom edge that was folded under open). Turn pocket right side out. Place pocket on skirt. Sew in place along two sides and across bottom folded edges.
|
Your next apron will be easier. Remember, it is always easier to make more than one of any item at a time. It goes much faster to make two together, than it does to make one now and one later. Tip: create quilt block tops and keep them handy for using on aprons. |
 CONGRATULATIONS! YOU ARE FINISHED!
 |
page 2 of 2
|
Related Project
I have a huge assortment of placemat patterns. Reversible, quick and easy, pieced, holiday. Browse through my placemat category to see them all. |
 Placemats
Quick Reference |
Learn To Paint!free video tutorialsVisit my youtube channel. Free videos with step by step instructions. Paint beautiful paintings for your home. |

Please ShareI rely on advertising to keep my site free. Please share with friends. |
Privacy Policy & Terms Of UseBy using our website, you expressly consent to our Privacy Policy and Terms & Conditions. All Patterns, images and instructions are copyright protected. |