|
|
|
|
| HOME SEW CRAFTS DECOR SHOP |
|
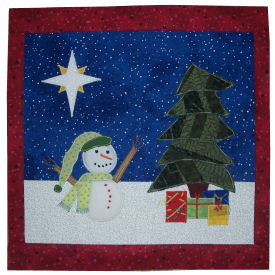
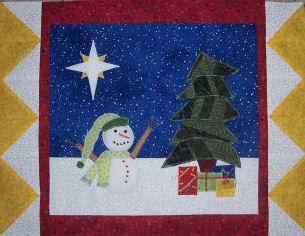
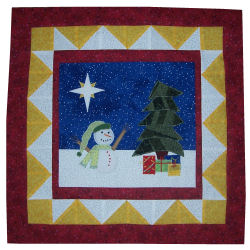
CHRISTMAS APPLIQUE page 4
star, snowman and tree |
| lessons holiday patterns sewing patterns |

|
|
Page 4: add borders and finish wall hanging DirectionsAll seams are 1/4"6. Add Inside Red Border
Stitch one 12.5" x 1.5" red strip to the bottom and top edges of the appliqued block, stitching right sides together. Press seams. |
 Stitch one 10.5" x 1" red strip to each side of the appliqued block, stitching right sides together. Press seams.
7. Add Star Point Side Borders
For solid border (in place of the star point border): For star point border: Cut twelve 3" yellow squares. Cut twelve 3" white squares. Cut all 3" squares on the diagonal. Stitch a white triangle to a yellow triangle. Repeat until you have 24 yellow/white squares. Square down each yellow/white square to create 2.5" squares. |
 NOTE: I think the star point border adds a nice touch. If you do not wish to work with points, you can create a solid outer border.
 |
If you need help with creating perfect points, go to: Free Quilt Lessons. |
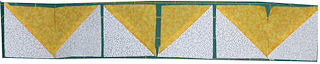 Arrange six diagonal blocks as shown. Stitch blocks together, right sides together. Press seams. Repeat until you have four rows like the ones shown.
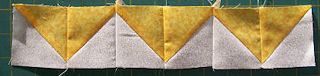
|
Note that the white points point AWAY from the main block. Stitch a solid block to the each end of the two remaining triangle rows. Stitch a triangle row (with solid block ends) to the top and bottem edges of the quilt block, right sides together. Refer to the first photo in step 8. Press seams. Note that the white points always point AWAY from the main block. |
 Stitch a triangle row to each side of the quilt block, right sides together. Press seams.
8. Add Outer Red Borders
Your finished block should measure 19.5" x 19.5". |
 Stitch a 16.5" x 2" strip to each side of the block, stitching right sides together. Press seams. Stitch a 19.5" x 2" strip to the top and bottom edges of the block, stitching right sides together. Press seams.
Assemble and Bind Finished PieceRefer to Assemble & Bind Lesson to learn how to assemble, bind and add a hanging sleeve to your finished quilt or wallhanging.
Hanging Sleeve Size Refer to Hanging Sleeve Lesson for directions on finishing the hanging sleeve. Also see Halloween Cat Project for instructions on finishing a layered or quilted piece. The Halloween wall hanging is part of this series, so the sleeve is made in the same way. |
Quick Reference |
Learn To Paint!free video tutorialsVisit my youtube channel. Free videos with step by step instructions. Paint beautiful paintings for your home. |

Please ShareI rely on advertising to keep my site free. Please share with friends. |
Privacy Policy & Terms Of UseBy using our website, you expressly consent to our Privacy Policy and Terms & Conditions. All Patterns, images and instructions are copyright protected. |