|
|
|
|
| HOME SEW CRAFTS DECOR SHOP |
|
CHRISTMAS APPLIQUE page 2
star, snowman and tree |
| lessons holiday patterns sewing patterns |

|
|
Page 2: Create Applique Pieces |
DirectionsAll seams are 1/4"1. Attach Fusible Web & Cut Fabric PiecesCut fabric pieces large enough for your snowman head and body; snowman hat, scarf and arms; yellow star and white star parts; gift packages and tree parts. NOTE: For the tree, you can use various prints and solids for the different parts, or you can create "striped fabric" and cut the pieces from that (as shown in my photo). I stitched strips of various green prints together to create one large piece of fabric. I fused my fusible web to the back of this striped fabric piece. I then cut the tree pieces by placing the tree pattern pieces at various angles on my striped fabric. This created a nice effect. It also creates a thicker fabric, however. The edges should be stitched down; fusible web alone will not hold down edges of such fabric. Following instructions for your fusible web, attach fusible web to wrong side of your fabric pieces. Trace the paper pattern pieces (backwards) to the paper side of the fusible adhesive and trace around the pattern pieces, OR lay the paper pattern pieces onto the right side of the fabric. Either way works. |
2. Cut Fabric Pieces
|
 Cut out each fabric piece. After cutting out all fabric pieces, peel off the fusible web paper from the wrong side of the fabric pieces.
3. Bond Fabric Pieces To Create Appliques
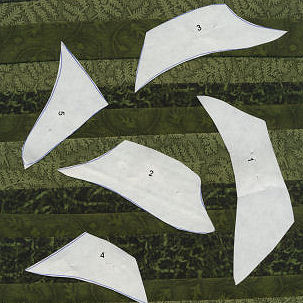
1. tree lowest section TIP: It is easier to create the Christmas tree in parts. First, create the green part of the tree. Then, lay that part over the trunk. Note that the pieces that will be on the bottom layer are placed first; pieces are then placed in order so that top layer pieces are placed last. When happy with the placement of your pieces, press all pieces with the iron. Follow the directions for your fusible web. NOTE: Do this on an ironing board or other surface that can take some heat. The pressing sheet will protect surfaces, but I found that my cutting mat started to warp a bit when it was under my pressing sheet as I ironed (my iron was turned up higher than necessary at this point). Allow your applique to cool; then peel it off the applique sheet. Place the trunk piece on the sheet. Place the tree over the trunk piece and fuse trunk to tree. Add packages in the order they are labeled. Repeat this process with the snowman parts and the star parts. With the snowman, lay down the arms first, then the body and head, then the scarf and hat parts. For further instructions on using an applique pressing sheet, go to: Applique Floral Pattern |
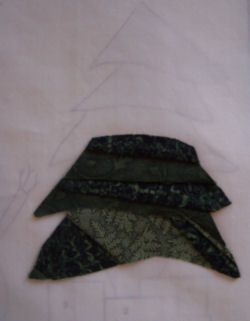 Lay down the "overall layout drawing", right side up. Lay the applique pressing sheet over the layout drawing. You will be able to see the layout drawing under the pressing sheet. Peel off the paper backing on the fabric pieces for the tree. Using the pattern as a guide, lay out your pieces in the following order:
Continue to page 3 for block assembly & embroidery |
|
Page 2: Create Applique Pieces |
Quick Reference |
Learn To Paint!free video tutorialsVisit my youtube channel. Free videos with step by step instructions. Paint beautiful paintings for your home. |

Please ShareI rely on advertising to keep my site free. Please share with friends. |
Privacy Policy & Terms Of UseBy using our website, you expressly consent to our Privacy Policy and Terms & Conditions. All Patterns, images and instructions are copyright protected. |