|
|
|
|
| HOME SEW CRAFTS DECOR SHOP |
|
CHRISTMAS APPLIQUE page 3
star, snowman and tree |
| lessons holiday patterns sewing patterns |

|
|
Page 3: assemble top & add embroidery DirectionsAll seams are 1/4"4. Assemble Main Block (wall hanging top)Stitch the sky fabric piece (7.5" x 11.5") to the ground fabric piece (3.5" x 11.5"), right sides together. This is now your main block. Press seams. Trim the main block to 11.5" wide by 10.5" tall. Using the overall layout as a guide, place finished snowman, star, tree and packages onto block. When happy with placement, fuse the pieces to the block by pressing into place with iron. |
5. Add Machine Stitching / Embroidery
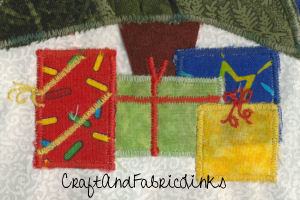
I added a satin stitch around each applique piece. I used free motion embroidery to add fringe to scarf, snowman buttons and face, package bows, etc. I used free motion machine embroidery to create the snowman "fingers", ribbon ties, and scarf fringe. If you are not familiar with free motion machine embroidery, read my article: Free Motion Embroidery. |
 Place stabilizer (11.5" x 10.5" piece) on wrong side of block. Baste it to the block, close to the edge. The stabilizer is necessary only if you are going to stitch a satin stitch around the applique pieces or add machine embroidery (machine stitches or free motion).
|
|
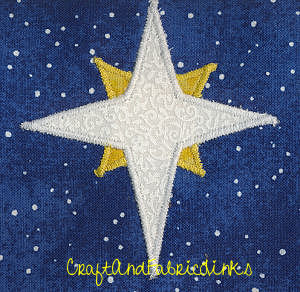 The Christmas star was creating by fusing the white star on top of the yellow star. I satin stitched the edges.
|
Fabric paints would work well for detail and edge finishing if you prefer that to embroidery.
PADDED SNOWMAN
|
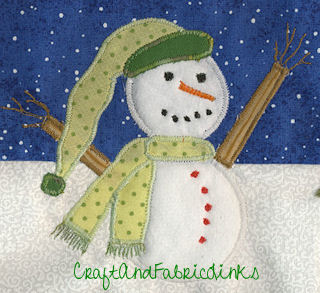 The snowman was fun to embroider. Branch "fingers" were achieved with free motion embroidery. The body was padded with fusible fleece.
Continue to page 4 for border and finishing instructions |
Quick Reference |
Learn To Paint!free video tutorialsVisit my youtube channel. Free videos with step by step instructions. Paint beautiful paintings for your home. |

Please ShareI rely on advertising to keep my site free. Please share with friends. |
Privacy Policy & Terms Of UseBy using our website, you expressly consent to our Privacy Policy and Terms & Conditions. All Patterns, images and instructions are copyright protected. |