|
|
|
|
| HOME SEW CRAFTS DECOR SHOP |
|
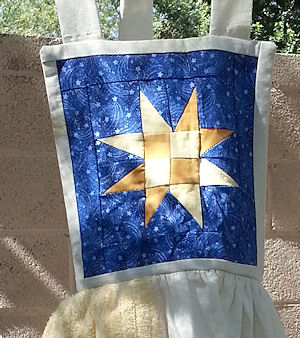
QUILT BLOCK APRON
size small adult |
| lessons holiday patterns sewing patterns |

|
-> home decor -> Kitchen
|
Page 2: Create Bib Quilt Block |
2. Create Quilt Block
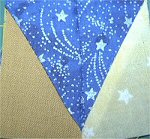
2. Stitch one gold triangle to one blue triangle (forming a rectangle), right sides togehter, and one yellow triangle to one blue triangle, right sides together, forming a rectangle. Repeat until you have 4 gold/blue triangles and 4 gold star/blue triangles. Square down to 1.5" x 2.5" rectanges. |
 CREATE TRIANGLE DIVIDED PIECES
|
Don't miss our Free Quilt Lessons. It covers basic quilt techniques as well as creating points (sewing triangles). |
|
|
 NOTE: This is not a simple procedure. It requires practice with points and triangles. You need to trim equal amounts off each side so that your points are still in the corners of the rectangle. It is difficult to get it "perfect". Don't worry about this - it is a twinkling star. Each point of the shining star can be a bit "off".
|
|
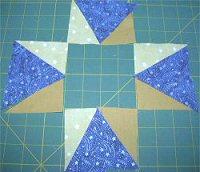
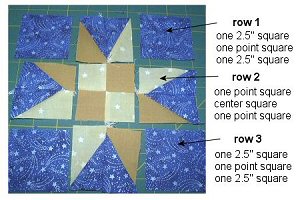
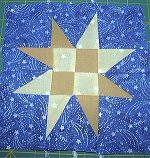
 3. Stitch your rectangles together right sides together. Square down to 2.5" x 2.5" squares. Photo above shows placement. The pieces are not stitched and are not squared down to size in the photo above. Photo below shows finished square.
|
ASSEMBLE ROWS: ROW 1: Assemble row one as per photo. ROW 2: Assemble row two as per photo. ROW 3: Assemble row three as per photo. Sew the three rows together, right sides together, being careful to line up seams.
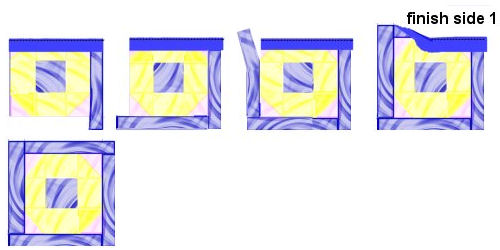
NOTE: My points do not come out to the edge of the quilt block. "Perfect points" would come out to within 1/4" of the edge. Since this is a "twinkling star", it was not important to me that the points be perfect. ADD BLUE AND MUSLIN BORDERS TO BLOCK: Place one muslin strip along the top of your block of squares, right sides together, lining up one end of the blue strip even with the left edge of the block. Sew the strip to the block, right sides together - but stop about 1/2 way down the line. The blue strip will extend beyond the end of the block on the open end. This is correct. Refer to picture below (shows a different block, but technique is the same). After sewing strip one on, iron the strip open. Rotate the block 90 degrees to the right. Sew a new strip of blue to your new top of the block. The blue piece can be sewn entirely across this side. Repeat on around until all blue strips have been sewn on. After your 4th blue piece is sewn on, you can go back and finish off the first blue piece. Refer to picture.
Repeat this process with the muslin strips (outer 1" border strips). |
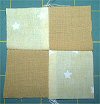 4. Sew one small 1.5" x 1.5" square gold star square to one 1.5" x 1.5" gold solid square, right sides together, with teh gold star on the left. Repeat, but with the gold star fabric on the right. Stitch these two rows together, being careful to line up seams of squares. The checkerboard of 4 small squares should measure 2.5" x 2.5".
|
Page 2: Create Bib Quilt Block |
Related Project
Beautiful "country birdhouse" design. Create a decorative, painted breadboard. |
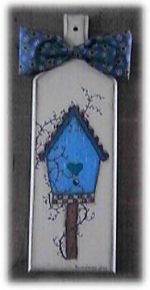 Painted Breadboard
Quick Reference |
Learn To Paint!free video tutorialsVisit my youtube channel. Free videos with step by step instructions. Paint beautiful paintings for your home. |

Please ShareI rely on advertising to keep my site free. Please share with friends. |
Privacy Policy & Terms Of UseBy using our website, you expressly consent to our Privacy Policy and Terms & Conditions. All Patterns, images and instructions are copyright protected. |