|
|
|
|
| HOME SEW CRAFTS DECOR SHOP |
|
OHIO STAR QUILT BLOCK page 2
Sewing Pattern |
| lessons holiday patterns sewing patterns |
|
Page 2 of 2 Go To Page 1 |
InstructionsContinued From Page 1use 1/4" seam allowanceIron between each step. Read through all directions completely before beginning.
|
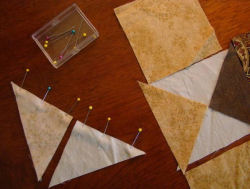
 7) Sew them both together. Remember to use a ¼" seam allowance. My presser foot has an indentation on it to signify the ¼" position, and it makes the sewing so much easier. I have found that marking it with painter’s blue tape can work nicely as well.
|
8) Hand press the seams in opposite directions, pin the two pieces together and stitch in place. |
|
|
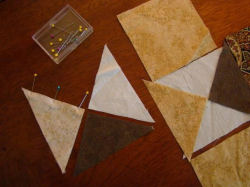
 9) Once the pieces are sewn together, press the seams down towards the darker colored fabric when possible.
|
|
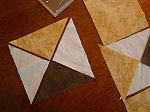 10) Now it’s time to connect three squares in a row. Make sure to pin carefully and don’t forget the ¼" seam allowance.
|
|
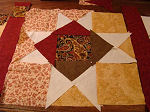
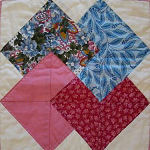
 11) With one row complete, move on to the second row, repeating the steps you took to put the triangles together. Once you have three rows complete, iron seams that will meet in opposite directions, and then sew the rows together to complete the block. The last step is to iron the entire block flat.
|
The block on the left is the |
 OK, we’re doing great, two blocks down and 4 to go! As you can see, mine aren’t perfect. I have speed issues I have to deal with…hahaha!
|
|
|
Go to: 4th Of July Placemat Pattern Finishing Your QuiltClick Here for free quilt lessons and learn how to layer and bind your beautiful new quilt. Prefer To Make A Pillow?Go to Pillow Patterns to learn how to turn your quilt block into a pillow covering. |
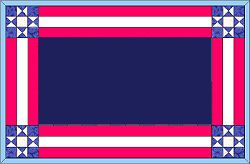 NOTE from CraftAndFabricLinks: Our Liberty Placemat uses the Ohio Star Quilt block.
|
Page 2 of 2 Go To Page 1 |
Quick Reference |
Learn To Paint!free video tutorialsVisit my youtube channel. Free videos with step by step instructions. Paint beautiful paintings for your home. |

Please ShareI rely on advertising to keep my site free. Please share with friends. |
Privacy Policy & Terms Of UseBy using our website, you expressly consent to our Privacy Policy and Terms & Conditions. All Patterns, images and instructions are copyright protected. |