|
|
|
|
| HOME SEW CRAFTS DECOR SHOP |
|
PATIENCE QUILT BLOCK
Free Sewing Pattern |
| lessons holiday patterns sewing patterns |
-> sewing patterns -> quilts
Patience: Free Quilt Pattern
Matt And Shari ProjectProject donated by MattAndShari.com finished block measures 12 " x 12 " (plus seam allowance) Also see: Quilt Patterns |
MattAndShari.comThis project was designed by Matt and Shari of mattandshari.com and is printed here with their permission. This article is copyright protected by mattandshari.com and is provided for your personal use only. Do not copy without permission. mattandshari.com is for "real people" who are looking for "real projects" to enhance their homes and their lives. Matt and Shari are excellent teachers and they lend their expertise to how-to projects, articles and videos that cover decorating, sewing, crafts, shop projects, kids & family and even food. It's a site to reference for everything that's going on in your life today! All patterns, images and text © Christina Sherrod of CraftAndFabricLinks.com unless otherwise noted. |
Item Size12.5" x 12.5" (including 1/4" seam allowances) |
Patience Corner Quilt BlockThe Patience Corner quilt block is one of the easiest blocks to make because it is made up of only three pieces. There is a square that could be considered the background color and two rectangles, one smaller than the other. You cut out four of each size piece to have a total of 12 pieces. These three pieces go together to create a small block, ¼ the size of the finished 12” block. You create four of them and once they are sewn together, your first block is complete. This is called a Four Patch design.
|
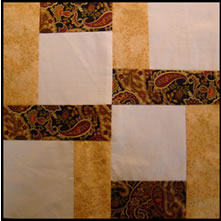
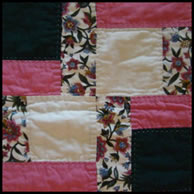 I have seen many different designs for the Patience Corner, and I’ve rarely seen more than three different fabrics used. (Except for MY quilt about 20 years ago!) As you can see, the placement of the fabrics creates quite a variety of looks for the Patience Corner.
Supplies
4 – 4 1/2" squares (includes 1/4" seam allowance all the way around)
Recommended by CraftAndFabricLinks: seam ripper, sewing thread scissors (small, sharp scissors made for trimming thread), large sewing ruler, rotary cutter and mat, and decorative thread for topstiching (optional). |
Instructionsuse 1/4" seam allowanceIron between each step. Read through all directions completely before beginning.
|
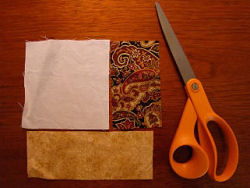
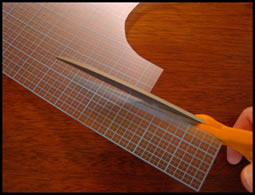 1) Begin by cutting out the plastic templates for the three pieces. Remember, the templates include ¼" seam allowance all the way around the piece. For example, your finished, sewn square should measure 4" square.
|
|
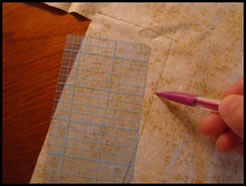 2) Place the plastic template on the wrong side of your fabric, trace around it with a sharp pencil or white pencil on dark fabrics. Then, cut out your pieces.
|
|
 3) Work with your fabrics to determine which block pieces will be in which colors. You may have to replace pieces with another color even after you have them all cut out. Save the ones you’ve cut and replaced. They may work in another quilt block. For my Patience Corner I used my background fabric for the squares and my multi-colored inspiration fabric and a lightly patterned gold tone for my rectangles.
|
|
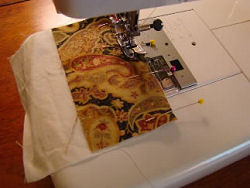 4) Once you are sure about your color choices, it’s time to start putting the four mini blocks together. It’s always best to sew the smallest pieces together first and then join them with the larger or longer ones. So start by pinning a square to a short rectangle and sewing them together. Remember to use a ¼” seam allowance. My presser foot has an indentation on it to signify the ¼" position, and it makes the sewing so much easier. I have found that marking it with painter’s blue tape can work nicely as well.
|
|
 5) Next, add the long rectangle to the side edge. Make sure to follow your pattern so you are adding this piece to the correct edge. Continue in this fashion, putting together four 6 1/2" x 6 1/2" squares.
|
|
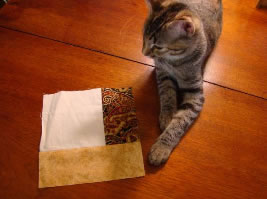 I find it’s always nice to have company while working on my projects, don’t you?
|
|
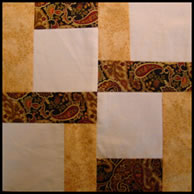 6) Next, connect the top two squares on the correct edge. Connect the bottom two squares, and then sew the strips together, completing your Patience Corner quilt block!
|
Finishing Your QuiltClick Here for free quilt lessons and learn how to layer and bind your beautiful new quilt. Prefer To Make A Pillow?Go to Pillow Patterns to learn how to turn your quilt block into a pillow covering. |
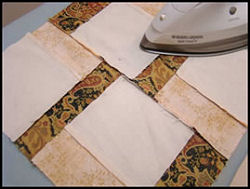 7) I have read that you should always press the seams to one side of the block because it makes the quilt top more sturdy. I have always ironed the seams towards the darker colored fabric so they don’t show through the light colored ones and so far I haven’t had any trouble, so you can decide. In any case, that’s your next step, iron the seam allowances flat!
Quick Reference |
Learn To Paint!free video tutorialsVisit my youtube channel. Free videos with step by step instructions. Paint beautiful paintings for your home. |

Please ShareI rely on advertising to keep my site free. Please share with friends. |
Privacy Policy & Terms Of UseBy using our website, you expressly consent to our Privacy Policy and Terms & Conditions. All Patterns, images and instructions are copyright protected. |