|
|
|
|
| HOME SEW CRAFTS DECOR SHOP |
|
MAIL & PAPER FILE page 2
sewing pattern |
| lessons holiday patterns sewing patterns |
-> sewing patterns -> home decor
page 2 of 3
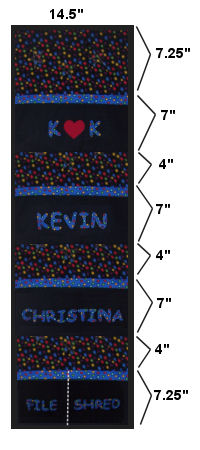
Refer to this image as needed. Check your dimensions for accuracy. |
|
page 2 of 3 |
InstructionsContinued From Page 1use 1/4" seam allowanceIron between each step. Read through all directions completely before beginning. |
|
2. Create Letters
NOTE: I used 12" (22" width) of letter fabric and fusible web. I traced the all of the letters on the one piece of web, then fused it to the piece of letter fabric. I then cut out all the letters from the one piece of fabric. See below for full directions. Lay out letters (they are backwards). Place the fusible web over the letters, paper side up. The letters will show through the web. Trace the letters onto paper side of the fusible web. Follow the directions on the fusible web to fuse the web to the wrong side of your letter fabric. If you are using Wonder Under or Heat N Bond (carried in our store), lay down your letter fabric, wrong side up. Place the fusible web over the fabric, paper side up. Iron over the paper side to fuse the web to the fabric. Cut out each letter. Lay them onto the pocket piece to get an idea of placement. Peel the paper off the wrong side of your letters. Place your letters right side up on top of your main pocket piece (one of the 14.5" x 6.5" pieces). Iron over your letters, fusing the wrong side of your letters to the right side of the pocket piece. Repeat for the three remaining main pocket pieces. |
 Cut a piece of each of the following, large enough to contain each letter:
|
|
 NOTE: I purposely placed my letters so that they slanted slightly differently from one another.
|
3. Create Pockets
NOTE: Appliqued piece should be on bottom. |
 Stitch a 2.5" x 14.5" piece of pocket trim between two main pocket pieces. Refer to image at right.
|
|
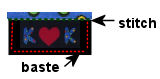 Turn pocket piece wrong side up. Fuse a piece of fusible fleece (or use stiff interfacing) to wrong side lower half of pocket piece. Turn piece right side up. Fold the lining side to the back. Stitch across the seam (stitch in the ditch) between the trim and main pocket piece. Baste close to the edge around the two sides and bottom. Repeat for all four pockets.
|
page 2 of 3
|
Quick Reference |
Learn To Paint!free video tutorialsVisit my youtube channel. Free videos with step by step instructions. Paint beautiful paintings for your home. |

Please ShareI rely on advertising to keep my site free. Please share with friends. |
Privacy Policy & Terms Of UseBy using our website, you expressly consent to our Privacy Policy and Terms & Conditions. All Patterns, images and instructions are copyright protected. |