|
|
|
|
| HOME SEW CRAFTS DECOR SHOP |
|
CHRISTMAS HOUSE page 2
free graphics & pot holder pattern |
| lessons holiday patterns sewing patterns |

|
|
Page 2: directions |
DirectionsAll seams are 1/4"Pre-wash fabric; dry; press.WARNING
First, print your graphic onto the transfer fabric (my free graphic is supplied on page 1 under "supplies required"). Follow the directions on the transfer fabric. Check with your printer's manufacturer to be sure your printer can safely print to fabric. If using my graphic, perform a test print first to be sure it measures 5" x 5". After the graphic has been printed, follow directions that come with the fabric (drying time, etc.). When the fabric is ready for use, cut out the graphic along the dotted line. If you use my graphic, it will be a larger version of the one shown in the following diagram (Christmas house). |
 Use colorfast inkjet transfer
fabric sheets and follow directions carefully. If you print to regular, untreated fabric, the ink will not
set properly and it will run when the item gets wet (yes, I learned the hard way).
Use colorfast inkjet transfer
fabric sheets and follow directions carefully. If you print to regular, untreated fabric, the ink will not
set properly and it will run when the item gets wet (yes, I learned the hard way).
1. Cut Fabric Pieces
Green Fabric: Cut two 4.5" x 4.5" squares (4 1/2" x 4 1/2"). Cut on the diagonal.
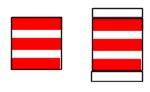
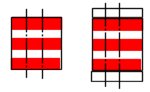
Sew strips together as follows: Sew one set of strips that alternate red/white/red/white/red Sew one set of strips that alternate white/red/white/red/white/red/white
Cut the striped pieces into strips that are 1.5" wide.
|
2. Assemble The Pot Holder Top
Continue on around until all 4 side triangles are stitched on. The outer sides of the triangles may not line up exactly, but this is also OK. Later, the outer edges will be trimmed. Just be sure that there is at least 1/4" at each corner. |
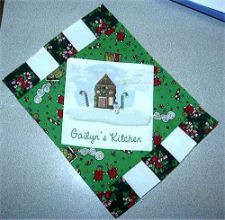
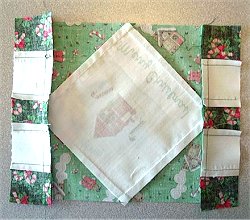
 Sew one triangle piece to one side of the center square (the center square is the 5.5" square with the graphic). The longest side of the triangle (the triangle's diagonal) should be sewn to one side of the square, right sides together. The longest side of the triangle will be longer than the side of the square. That is done on purpose. Center the triangle so the same amount "hangs off" each end. Refer to photos below. Press open. Stitch a second side; press open.
|
Triangle sides pressed. The triangles might not line up exactly; they will be trimmed (called squaring down). 
NOTE: As you can see, I made several of pot holders, and I customized them by bringing the graphic into PaintShop Pro and changing the name on each center square. |
3. Square Down Center Block
Another way to trim your square is to cut off the sides so that there is exactly 1/4" seam allowance at each corner of the center graphic square. Your sides will measure 6.75". |
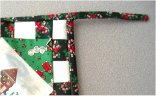
4. Stitch Side Strips To Center BlockStitch the strips with the small squares to the sides of the large square as follows: Start by sewing the shorter strips to two opposite sides; press seams open. Then sew on the longer strips to two opposite sides; press seams open. See photos below.
|
5. Assemble The Pot HolderLayer your potholder as follows. The backing goes on the bottom, wrong side up. Then, layer one piece of batting on top of the backing. Next comes the insulation. Place another layer of batting over the insulation. Place the top fabric piece on top of the other layers, right side up. NOTE: Don't plan on actually using the potholder to hold hot dishes or protect your table or countertop unless you use appropriate batting with insulation. Baste the three layers together close to the outer edge. Use one of the following two methods for attaching binding and potholder hanging ring. You can use ready made seam binding, or make your own. To make binding from matching fabric, cut strips that are 1.75" (or 1 3/4") wide. Iron in half lengthwise. Open binding. Fold the outer edges to the original center fold line. Fold the binding in half lengthwise and press again. Go to: Continuous Bias Binding Instructions. ATTACH OUTER BINDINGUSING WOOD OR PLASTIC HANGING RING If you will be attaching a hanging ring to the back of your pot holder, stitch the seam binding around the perimeter of the potholder. Attach plastic or wood ring to the back side of the potholder. USING BINDING AS HANGER The binding itself can be used as a hanger. Sart at the corner the hanger will be attached to. Stitch the binding around the potholder. When you come back to the beginning corner, extend the binding about 5" from the potholder. Stitch the binding closed along the open edge.
Twist the binding around to make a loop and sew the free end to the back of the potholder. For more instructions on layering and binding, go to: Assemble & Bind Lesson. |
Quick Reference |
Learn To Paint!free video tutorialsVisit my youtube channel. Free videos with step by step instructions. Paint beautiful paintings for your home. |

Please ShareI rely on advertising to keep my site free. Please share with friends. |
Privacy Policy & Terms Of UseBy using our website, you expressly consent to our Privacy Policy and Terms & Conditions. All Patterns, images and instructions are copyright protected. |