|
|
|
|
| HOME SEW CRAFTS DECOR SHOP |
|
WASTE BASKET COVER
|
| lessons holiday patterns sewing patterns |

|
-> sewing patterns -> home decor
Decorative Fabric Cover
Turn inexpensive into custom style!By Christina Sherrod Also see: Home Decor
|
|
Page 1 |
Inexpensive Style
Add a bow, buttons, bling, ties or other embellishments for a creative look. These instructions create lining that covers the upper 2" of the interior of the waste basket. |
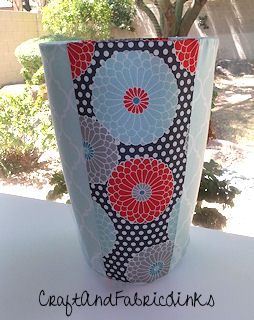
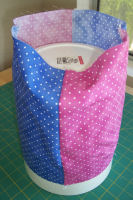
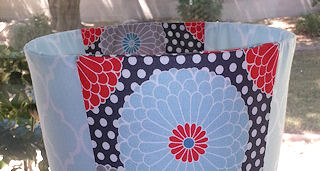 Turn an inexpensive, plastic waste basket into a decorative piece. Elegant or casual, holiday, baby theme, or special occasion.
 |
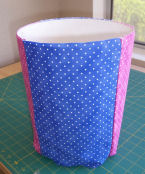
I used a round shaped waste basket for the purple / pink polka dot cover. This time around I bought an oval shaped waste basket. The construction method is basically the same. The difference is that the round basket segments are all equal in size and shape. The oval basket's end (side) segments are more narrow than the front and back segments. I use my serger often, and was tired of the scrap fabric and thread piling up on the floor. Now, I have a pretty waste basket to catch the scraps.
Also see:
|
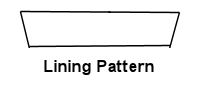
Waste Basket Size & ShapeUse any size basket of your choice. This pattern tutorial teaches how to draw pattern pieces to create a cover for a round or oval waste basket. A square or rectangular cover would be constructed in a similar way; dimensions of each side of the basket would be used to create each pattern piece. The bottom would be rectangular or square, rather than oval or round. It works best if the sides are straight (not curved in from top rim to bottom). Refer to the drawing below. Also, a perfectly round basket (bottom and top are each a round circle) is easier to work with than an oval. My purple / pink basket was round in shape (bop and base perfectly round) and the sides were straight from base to top rim. The cover was made in four pieces, all equal in size. My second basket (shown at top of page) was oval, and the pattern was made differently in that two pieces were equal in size, and the second two pattern pieces were each half the width of the first two. I placed the more narrow pieces on the ends of the oval. If you wish to create a pattern for one continuous piece for a round, oval or rectangular basket, do the following. Follow these directions, but do not add seam allowances to the sides of the four pattern pieces. Once you have your pattern pieces create, tape the pattern pieces together to create one pattern piece. You can also do this with the lining piece. |
Supplies
Supplies Required (depends on the size of your waste basket: mine measured 26.5" top circumference, and 10" tall) Other thread to match background of fabrics |
Directions - (four equal sized pattern pieces)1. Make A Pattern
ADD 2" to A. Write down these numbers. |
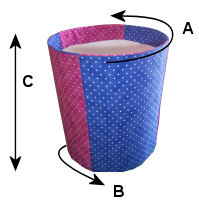 Measure circumference at top of waste basket (measure around the top, close to the upper edge). This measurement is "A".
 |
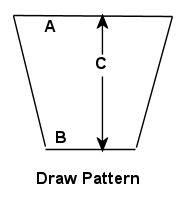
Divide "A" by 4. Divide "B" by 4. Draw a line across the top of a paper. The line should equal "A" in length. Draw two lines, connecting the ends of "A" and "B". |
 ADJUST "A" AND "B"
 |
Trace the top 2" of your pattern. This will be your lining pattern. MATH SKILLS - my oval basketFor my oval basket (shown at top of page, I followed this same method for pattern making, but divided the top and bottom circumferences into thirds. Piece A & Piece B were each 1/3 of the circumference around the top and bottom, Piece C & D were each 1/6 of the circumference of the top and bottom. A and B took up 2/3 of the way around the basket and C & D took up the other 1/3. The sides of my oval basket curved in a bit so there was looseness to the fit at the base. That was OK because it was taken up with gathers around the base. I added an extra 1/4" to the height of the pattern pieces at the base.
|
2. Create Outer ShellUsing your main pattern piece, cut two pieces from each fabric (total four pieces). Stitch all four main pieces together, right sides together. Stitch the first piece to the last piece, right sides together. Alternate your colors. Press. Turn basket upside down and slide the cover over the basket. Set it upright and check the fit.
|
Continue to page 2 for directions |
Quick Reference |
Learn To Paint!free video tutorialsVisit my youtube channel. Free videos with step by step instructions. Paint beautiful paintings for your home. |

Please ShareI rely on advertising to keep my site free. Please share with friends. |
Privacy Policy & Terms Of UseBy using our website, you expressly consent to our Privacy Policy and Terms & Conditions. All Patterns, images and instructions are copyright protected. |