|
|
|
|
| HOME SEW CRAFTS DECOR SHOP |
|
PUPPIES APPLIQUE
Pillowcase Sewing Pattern |
| lessons holiday patterns sewing patterns |
-> sewing patterns -> applique
Adorable Puppies!
use for pillowcase or quilt blockmeasures 18" x 30" (finished pillow)adorable puppies applique pattern Also see: Animal & Pets |
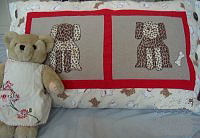
Appliqued Puppies PillowcaseAbsolutely adorable puppy pillowcase. Large buttons on ends add a decorative touch. Use the pattern to create a covering for a pillow on your child's bed. Or create appliqued puppy quilt blocks! |
Item Size18 " x 30" finished pillowcase |
Supplies
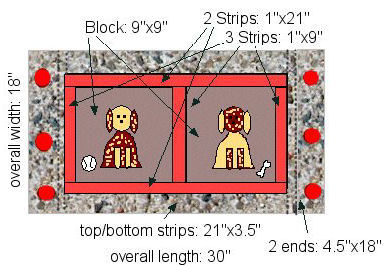
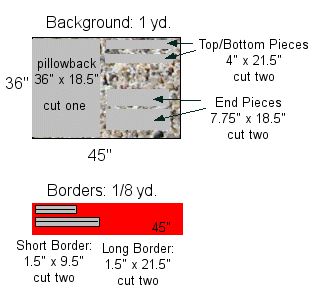
PATTERN Our pattern will download as a jpg file and will print to a sheet of 8.5" x 11" paper. Enlarge or shrink per your needs. Download Puppy Pillowcase Pattern The finished size of the puppy case is as shown in the diagram. This will help you know where various pattern pieces will be used. Fabric I chose a background print that had small dogs on it. For the dogs, I chose two contrasting prints with spots. This made a very cute pillow cover. Choose fabrics that are multi-directional and do not have a nap. Since these are pillow covers, I did not worry about laying pieces with the grain, etc. You will need the following materials: (buy extra to allow for shrinkage)
1 yard of background fabric Safety Reminders For Little Helpers
A. Always have an adult do all the ironing! |
 general sewing supplies: scissors, quilting pins, large sewing ruler, fabric marking pencils, seam ripper
Instructionsuse 1/4" seam allowanceIron between each step. Read through all directions completely before beginning. Please Note: These diagrams are not exactly to scale, but pattern pieces do fit as shown. |
|
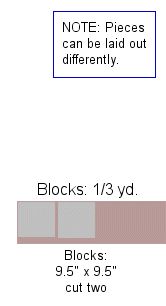
Cut out pattern pieces of dog. Do not cut out dog fabric pieces yet. For other pieces, cut pattern pieces as follows (I use butcher paper bought on a roll from Costco to create my pattern pieces):
Block: 9.5" x 9.5" Lay out as follows:
|
|
ASSEMBLY: Assemble Dog Blocks
1. Iron the Wonderunder to the wrong side of the dog fabric, according to directions on the Wonderunder.
For more direction on using fusible web to create appliques, go to: Applique Fusible Web Lesson. Assemble Pillow Front
4. Sew one short border strip between blocks, and one strip onto each end, right sides together. Assemble Pillow
8. Sew pillow back to pillow front, right sides together. For more direction on making pillowcases, go to: Pillowcase Lesson. Add Buttons 10. Lay out buttons. When sure of placement, make buttonholes of appropriate sizes on the two ends of your pillowcase (3 buttons on each end). NOTE: you can make the buttonholes on only one end; the other end has buttons that are decorative only. Sew on buttons. Congratulations! You are finished. Enjoy!
If you have any problems with the instructions, please email us. |
Quick Reference |
Learn To Paint!free video tutorialsVisit my youtube channel. Free videos with step by step instructions. Paint beautiful paintings for your home. |

Please ShareI rely on advertising to keep my site free. Please share with friends. |
Privacy Policy & Terms Of UseBy using our website, you expressly consent to our Privacy Policy and Terms & Conditions. All Patterns, images and instructions are copyright protected. |