|
|
|
|
| HOME SEW CRAFTS DECOR SHOP |
|
DRAPERY-CURTAIN PATTERN
lined valance & panels |
| lessons holiday patterns sewing patterns |

|
-> sewing patterns -> home decor
|
SUPER EASY! Lined Valance & PanelEasy valance and side panels - add a splash of color!Also see: home decor Also see: directions for hanging knobs |
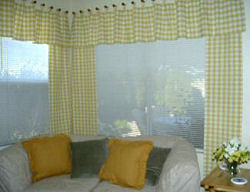
Valance & PanelsNO pleats or gathers! Add style and color to any room with these easy to make curtains, with hanging knobs. Knobs can be expensive when purchased ready-made. These knobs only cost 56 cents each! They were made from wooden spools and balls purchased at Walmart. Instructions for hanging knobs Measure Your WindowThere is quite a bit of math used in making these panels (you knew it would come in handy sometime). This can seem a bit complicated at first, but stay with me. It is actually quite easy once you understand the basic concepts. Basically, the valance width is computed by first finding the width of the window plus room on each side of the window and multiplying that by 1.5. I installed my hangers 5" apart on the wall (which means I sewed my hangers 7.5" apart on the actual valance since the valance is 1.5 times the size of the window). I added 1.25" all the way around my valance and side panels to allow for hems. For the lining, I did not add any hem allowance. I cut them to exactly the size of the finished valance or side panel. So you can see that this is actually as easy as I say it is, I will now walk you through the actual curtains shown in the photograph above. |
ExampleMy window measured 58" in width. I'm sure it was supposed to be 60", but houses are not built square anymore. I used 60" as my number for computing the length of the valance. 1.5 x 60" equals 90". My valance would be 90". Now, there is a problem here. This doesn't allow for my valance to be very much over the ends of the window. I wanted it to extend at least 2" past the window on each end. 60" only allows it to extend 1" on each side. What about the other 1"? This is where your math skills come in handy. I "fudged" a bit. I knew that if I placed my knobs at slightly more than 5" apart (5.1" to be exact), it would come out right. 5.1 x 12 = 61.2" (close enough to 60"). I would need 12 knobs, plus one for the beginning point, or 13 knobs. Are you confused? Let's say you have a window that is 10" and you want to place a knob every 5". 10 divided by 5 is 2. But that would place a knob at 5" and 10". What about the far left side, or 0 inches? You would actually need 3 knobs. Remember that when you compute how many knobs you need. Take your total and divide by 5" - and then add one. |
Valance Width and Knob PlacementSo, for this example, I cut my valance lining to be 90". I cut my valance fabric to be 92.5". I sewed my hangers 7.5" apart, and placed the knobs 5.1" apart on the wall (believe me, the eye does not pick up that little .1"). What about the length of the valance and how far up do you place the knobs from the window? That is really your choice. I placed my knobs 6" from the top of the window. I sewed my hangers to be 7.5" long and sewed them about 1/2" into the back of my valance. That means that the valance top is about 3" above my window. |
Valance LengthFor the length of my valance, I wanted about 12" of my window covered. Knowing that about 3+" would be above my window, I made the valance 15.5" in height. |
Side PanelsI wanted my side panels to go to just above the floor, so I made them 84" in length. I made them all 15" wide. They hung from the first 3 knobs, so they covered a width of 10" on the wall. Adjust yours if you want them longer or shorter, or if you want them wider.
|
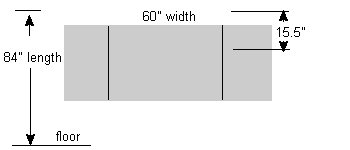 These were the measurements I used. I made my valance 90" x 15.5", and my side panels 15" x 84".
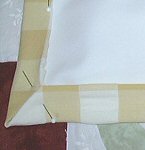
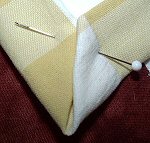
Cut Curtain FabricAfter you compute the finished size of your valance and side panels, you must remember to ADD 1.25" all the way around for your hem. That means that you add 2.5" to width and 2.5" to length. For a valance of 90" x 15.5", I cut my fabric 92.5" x 18". I cut the lining fabric 90" x 15.5" (no hem is needed). Sew Valance & Side PanelsIron under 1/4" on all edges of your fabric. Lay your valance (or side panel) piece wrong side up on a flat surface. Lay the corresponding lining piece on top of the valance piece right side up. Fold the edges of the valance piece over the top of the lining piece, so the lining edges are under the hem of the valance. Miter the corners. To miter, fold up the corner, then fold in each side. Refer to photographs below. |
|
Go On To: Knob & Hanger Instructions |
Quick Reference |
Learn To Paint!free video tutorialsVisit my youtube channel. Free videos with step by step instructions. Paint beautiful paintings for your home. |

Please ShareI rely on advertising to keep my site free. Please share with friends. |
Privacy Policy & Terms Of UseBy using our website, you expressly consent to our Privacy Policy and Terms & Conditions. All Patterns, images and instructions are copyright protected. |