|
|
|
|
| HOME SEW CRAFTS SHOP |
|
HOOKED RUG
Block Design |
| lessons holiday patterns craft patterns |
Block Design Hooked Rug
|
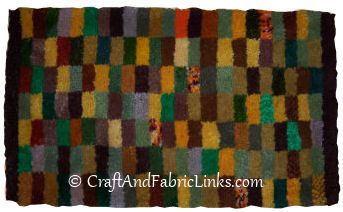 My mother made this rug, and I always thought it was such a fabulous way to use scrap yarn. Create a beautiful "Quilt Block" style hooked rug! Our rug measures approx. 28" x 50".
All text and images © Christina Sherrod of CraftAndFabricLinks unless otherwise noted.
My mother made this rug, and I always thought it was such a fabulous way to use scrap yarn. Create a beautiful "Quilt Block" style hooked rug! Our rug measures approx. 28" x 50".
All text and images © Christina Sherrod of CraftAndFabricLinks unless otherwise noted.
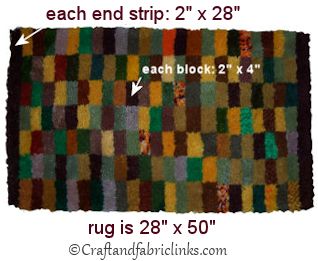
Supplies / Instructionsrug hooking mesh Each block is twice as long as it is wide. The rug / blocks can be made in any dimension you wish. To obtain the correct proportions, each block should be twice as long as it is wide. How many stitches you make depends on the size of your mesh backing. Our mesh measures 3.5 stitches per inch. We made each block 7 stitches wide (2") by 14 stitches long (4"). The rug is 7 blocks wide by 23 blocks long. Our overall rug measures approx. 28" x 50". Canvas comes in various mesh sizes. Remember that in this pattern each block is twice as long as it is wide. If your rug mesh measures 7 stitches per inch, each block would be 14 stitches wide by 28 stitches long. Each end row would be 196 stitches (entire width of rug) x 14 stitches wide. To compute how many stitches you need to make, multiply your mesh's stitches per inch by the number of inches you need. Be sure you have enough mesh to create your rug, plus hem the edges. Don't worry about being exact as far as the block dimensions are concerned, as measured in inches. Just be sure that each block is twice as many stitches long as it is wide. For example, some mesh measures 3.3 stitches per inch. To get exactly 2" width for a block you would have to make each block 6.6 stitches wide. This is not possible. In that case, make each block 6 stitches wide x 12 stitches long, OR 7 stitches wide x 14 stitches long. Use graph paper to lay out your pattern. Each line on the graph paper represents a stitch. Compute the size of mesh backing you will need. What if there is space remaining along the edges? Remember that you will be turning under the edges to create a hem. Turn under any extra width or length. The end rows can be made wider or more narrow as needed. rug hooking yarn Choose yarn in coordinating colors. The thickness of yarn should be consistent with the size of your mesh. For example, 3.5 stitch per inch canvas uses a larger yarn than 7 stitches per inch canvas. Acrylic or wool yarn can be used; wool yarn is better quality and will hold up better. NOTE: If you are cutting your own yarn, cut into a few 2.5" pieces. Attach them to your mesh to test length. Adjust as necessary. rug hooking tool (latchet hook tool) rug binding Rug binding finishes off the edges of your rug. Method 1: Stitch to raw edges of mesh backing after your rug is complete. Method 2: Stitch to raw edges of mesh backing before yarn is attached (my preferred method). Fold finished edges under to create a hem when rug is finished. Hand stitch hem into place. |
Use the following image as a guide for design
|
|
Experiment with other "quilt block" designs. Cross stitch designs can be used as well. Notice that some blocks contain multiple colors. This adds a nice texture to the rug. |
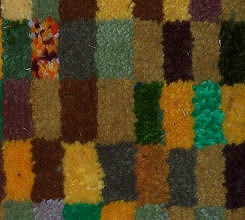 Experiment with "texture" & design
Quick Reference |
Visit our store!
|
Free Videos
|


Please ShareI rely on advertising to keep my site free. Please share with friends. |
Privacy Policy & Terms Of UseBy using our website, you expressly consent to our Privacy Policy and Terms & Conditions. All Patterns, images and instructions are copyright protected. |