|
|
|
|
| HOME SEW CRAFTS DECOR SHOP |
|
NO-SEW BLANKET
Easy Pattern |
| lessons holiday patterns sewing patterns |

|
Fringe Flannel Blanket
Knot-Tied Fringe Blanketquick & easy!my blanket measured 45" x 45" Also see: Quilts & Blankets |
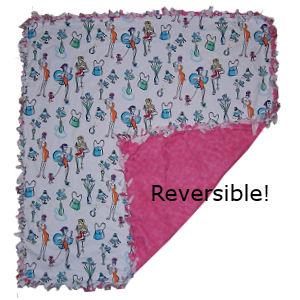
No Sew BlanketThis easy-to-make blanket can be made in a snap. Use for lap quilt, room decor or throw around your shoulders at a game. Layer two pieces of fabric, cut and tie fringe and you're ready to go. No machine needed. No sewing. Use flannel for snuggly warmth. All patterns, images and text © Christina Sherrod of CraftAndFabricLinks.com unless otherwise noted. Blanket Sizeadjustable size: mine measured 45" x 45" Supplies
general supplies
2 pieces of fabric:
*FABRIC NOTE: 42" - 44" is a common width for quilt fabric. The width of your blanket will depend on the width of your fabric. For example, if the width is 42", the width of your blanket will be 42" (including fringe). The length is determined by the amount of yardage you purchase. If you purchase 1.5 yards of 42" fabric, your blanket will be 54" long by 42" wide (including fringe). |
Instructionsuse 1/4" seam allowanceIron between each step. Read through all directions completely before beginning. 1. Cut Fabric Pieces Lay down one piece of fabric, wrong side up. Lay the other piece of fabric directly on top of the first, right side up. Cut the 2-layer piece to the desired size. I wanted a square blanket and my fabric was 45" wide, so my blanket was cut to 45" x 45". |
|
Cut out each corner from your 2 layer piece. The size of corner you remove depends on the length of you will cut your fringe. The corner sides should measure the length of fringe you will cut. For example, my fringe was cut to 3", so I cut my corners 3" x 3". Cut through both layers of fabric. |
 2. Cut Out Corners
|
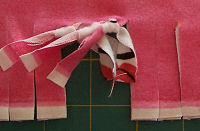
Cut slits between corner cut-outs. The fringe width is your choice. I cut my fringe approximately 1/4 " wide x 3 " long (I estimated; I did not measure). The images are not to scale, but show the idea. |
 3. Cut Fringe
|
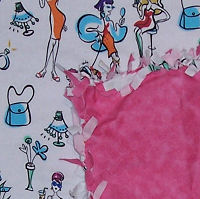
Tie each set of fringe (tie the fringe piece from the top layer to the fringe piece directly below). You can tie once or twice. I found that once was sufficient (rather than the usual double-tied knot). |
 4. Tie Fringe
|
|
 The fringe will "soften" in appearance when machine washed and dried.
Quick Reference |
Learn To Paint!free video tutorialsVisit my youtube channel. Free videos with step by step instructions. Paint beautiful paintings for your home. |

Please ShareI rely on advertising to keep my site free. Please share with friends. |
Privacy Policy & Terms Of UseBy using our website, you expressly consent to our Privacy Policy and Terms & Conditions. All Patterns, images and instructions are copyright protected. |