|
|
|
|
| HOME SEW CRAFTS DECOR SHOP |
|
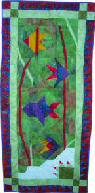
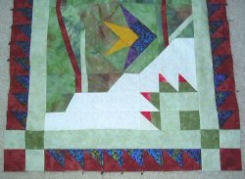
TROPICAL FISH WALL HANGING
4 fish blocks, 10 water blocks, 1 plant block wall hanging or quilt |
| lessons holiday patterns sewing patterns |
-> sewing patterns -> animals & pets
|
Tropical Fish WallhangingAssemble All BlocksReturn to INDEX OF BLOCKS / GENERAL INSTRUCTIONS Also see: Quilt Lessons |
|
Assemble Quilt Blocks
Assemble BlocksCreate all blocks. Go to Index Of Blocks for links to patterns for blocks. Print out a copy of the overall layout so you'll know where each block goes. Assemble the completed blocks into rows as shown below. NOTE: Some of the colors in the photos below are different from the wall hanging shown at the top of this page. They were taken of a second wall hanging. Assembly is the same. |
|
Row One: Water block 1 (the row consists of only this one block, so this row is not shown)
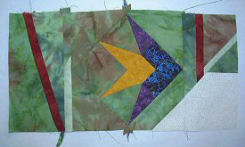
Shown at top of page as gold fish with red stripes. |
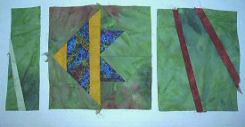 Row Two: Water block 2, fish 1, water block 3
|
|
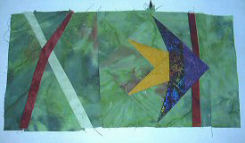 Row Three: Water block 4, fish 2, water block 5
|
|
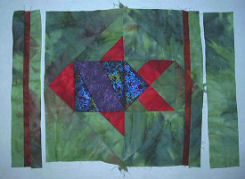 Row Four: Water block 6, fish 3, water block 7
|
|
 Row Five: Water block 8, fish 4, water block 9
|
|
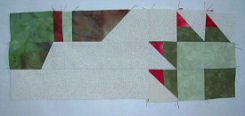 Row Six: Water block 10, plant block
Finish The Wall Hanging
Stitch all rows together.
These are instructions for my borders: 1. Stitch the long light green borders to the two long sides of the wall hanging.
3. Create long borders made from triangle squares. To create triangles, cut each of the sixty 3" squares on the diagonal. |
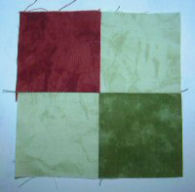 2. Create the four border squares (each made up of the small 2.5" x 2.5" squares)
|
NOTE: You can arrange these squares in any pattern you wish. I arranged mine so that the dark fabric pointed down and toward the center of the wall hanging. |
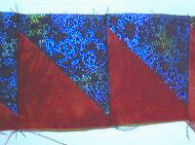 Stitch one light triangle to one dark triangle. Square down to 2.5" squares. Stitch 22 of these squares together, creating a 2.5" x 44.5" strip. Repeat.
|
4. Create short borders from triangle squares and light green fabric. Stitch 8 triangle squares together, creating a strip 2.5" x 16.5". Repeat. Stitch each triangle border to a light green border. |
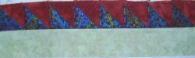 Stitch the triangle border strips to the outer edge of the long green border on your wall hanging.
|
|
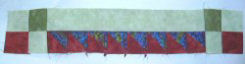 5. Stitch the border square blocks to the two short end borders.
|
Go to quilt binding instructions for layering and binding your wallhanging. Go to hanging sleeve instructions to learn how to attach a hanging sleeve. |
 6. Finish your wall hanging top.
Stitch the short borders to the top and bottom of your wall hanging.
6. Finish your wall hanging top.
Stitch the short borders to the top and bottom of your wall hanging.
Quick Reference |
Learn To Paint!free video tutorialsVisit my youtube channel. Free videos with step by step instructions. Paint beautiful paintings for your home. |

Please ShareI rely on advertising to keep my site free. Please share with friends. |
Privacy Policy & Terms Of UseBy using our website, you expressly consent to our Privacy Policy and Terms & Conditions. All Patterns, images and instructions are copyright protected. |