Paper Mache Eggs

Happy Spring-Easter Eggs
Easy! Stunning Easter eggs created with paper mache eggs, texture, paint and varnish. Add glitter and sparkle - customize as you wish!
Free Video Tutorial
IMPORTANT: I created a video for this project. It is on my youtube art channel. Please watch the video for full instructions and demonstration. The video follows my written instructions.
Disclosure: This site contains affiliate links. As an Amazon Associate, I earn from qualifying purchases. Clicking on links, and purchasing products, may result in the seller paying us compensation - at no extra cost to you. Affiliate links are in green.
Also see:
Notes From The Workroom & Trails
Home Decor Crafts
Holiday
Home Improvement
Gesso
This project uses Gesso. This provides an undercoat for painting. I coat many different types of surfaces with gesso before painting. Visit my Amazon store page to purchase acrylic paints, gesso, and other items I use for my projects.
SUPPLIES
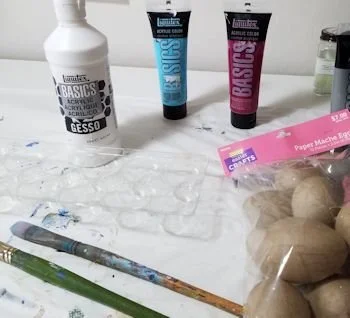
Permanent Patch 102 (purchase at home repair store such as Home Depot) - for texture
paper mache eggs (any size you wish)
acrylic paints (I use Grumbacher or Golden - any good quality artist or craft paint will work well)
choose colors you like: I used various shades of blue, aqua, lavender, pink, plus metallic silver and gold - refer to my video for a full listing of what I used.
Liquitex Gesso
paint brushes in various sizes: I used a number 10 flat brush, and a smaller brush
egg carton (for holding eggs while they dry)
Liquitex Gloss Medium And Varnish OR Gamvar Varnish (or varnish of your choice)
cup of water, paper towel
INSTRUCTIONS

1. Paint gesso over all surfaces. This will seal the paper mache so paint will not absorb into it. Wash your brush with water. Paint one end, then place in the egg holder until it dries; then turn the egg over and paint the other end.
2. Using the larger paint brush, apply Permanent Patch 102 (texture) to the eggs that you want textured.
Use a palette knife, or a paint brush, to apply the texture.
Texture is optional. I textured two, and left the others plain. Refer to the video for demonstration.

3. When the texture is dry, use the paint brushes to paint on the colors of your choice. I painted on a base coat of various colors, blended together. Some eggs were painted with metallic paint mixed directly with the main color. Other eggs were painted with a base coat of mixed colors, then an added layer of metallic paint mixed with glazing medium was painted on. Refer to the video for demonstration.
4. Add any extra design you wish. Stickers, stenciled design, or speckles create added color. I demonstrate how to tap the paint brush to "splatter" the paint onto the egg, created speckles of color, in my video.

I placed pots of artificial grass into a flower box, and then placed the eggs in the grass. It makes a fun, decorative piece.

Christmas Ornament Crafts
Decorate for an Easter or Spring tree!
Alcohol ink - acrylic paint glass Christmas Ornaments. Beautifully painted on the INSIDE, to provide outer protection.