Special Memories Box

Special Occasion?
Milestone birthday? Special occasion? A fun activity for guests, as well as guest of honor, is to ask the guests to write their special memories of the guest of honor onto paper and drop the paper into the box. Whether funny or sweet, people love to read the written memories.
Disclosure: This site contains affiliate links. As an Amazon Associate, I earn from qualifying purchases. Clicking on links, and purchasing products, may result in the seller paying us compensation - at no extra cost to you. Affiliate links are in green.
Also see:
Articles & Tips
Special Occasion Projects
Art Projects
Home Improvement
Free Video Tutorial
IMPORTANT: I created a video for this project. It is on my youtube art channel. Please watch the video for full instructions and demonstration. The video follows my written instructions.
Choose for your occasion
NOTE: The woman I made this for was turning 30, and loved old books. I chose a book shaped box, and a group of colors that created an “aged book” look. Choose the box shape and colors you prefer.
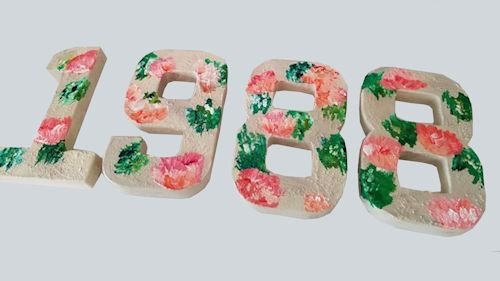
I also painted paper mache numbers of the year she was born. Click the following image for that project.
SUPPLIES
Permanent Patch 102 (purchase at home repair store such as Home Depot) - this provides texture
paper mache box (any size you wish)
acrylic paints (I use Grumbacher or Golden - any good quality artist or craft paint will work well) - choose colors you like: I used Cobalt Blue, Cerulean Blue, Prussian Blue, Payne’s Gray, White, Gold, and Warm Gray.
paint brushes in various sizes (I used a flat brush - approx. 1”)
ruler
stickers
cup of water, paper towel
gesso
INSTRUCTIONS
1. Paint gesso over all surfaces. This will seal the paper mache so paint will not absorb into it. I also used the Permanent Patch 101 to create a line around the areas where I would add my stickers. Wash your brush with water.

I used my ruler to get straight lines, and I placed my letters first to ensure I had the correct size for my outline. Refer to my video.
2. When the gesso is dry, use the paint brushes to paint the entire exterior of the box. I did not paint the interior of the box because that area would be painted a lighter color.

3. When the texture was dry, I painted the outer edge (page areas) to look like pages. I used a mix of warm gray and white. The strokes created streaks that looked like pages of a book.
4. The interior of the box was painted gold. Note that I wrapped the blue around the interior. This created the appearance of gold paper lying on the book interior.

Sticker letters were placed onto the book cover after the lighter blue paint had dried.
Refer to: Paper Mache Memory Box Video for full details and demonstration.
Special Occasion


Rustic wood bar made from wood pallets. Quick and easy.