Refinish Table For Exterior Use

Create A Stunning Garden Table
product review and instructions plus free video
heat resistant paint with UV protection
Reposted from our previous site: CraftAndFabricLinks.com
Disclosure: This site contains affiliate links. As an Amazon Associate, I earn from qualifying purchases. Clicking on links, and purchasing products, may result in the seller paying us compensation - at no extra cost to you. Affiliate links are in green.
Also see:
Blog: tips from the workroom & trails
Craft Projects
Patio & Yard Projects
Easy DIY Furniture
Turn an indoor table into a beautiful garden table!
I loved this little table, and enjoyed many mornings listening to the birds and enjoying my coffee by the wood flower boxes my husband had already built. However, my table was an interior table, and the finish was starting to take a beating. It needed a bit of TLC. We had intense sun and heat during Phoenix summers, plus rain during our summer thunderstorms. I knew I needed to protect my table. That would require paint that could withstand intense desert conditions.
This is an example of why a good quality, solid wood table is worth its price. An inexpensive veneer would have come apart. Solid wood can be sanded, patched and refinished.
The chair cushions could be cleaned, and the table and chairs could be brought back to life with an appropriate paint.

Watch The Video
Watch my video at the end of the article see the entire process.
SUPPLIES

We used Valspar Reserve Semi-gloss Exterior (formulated for extreme heat and sun)
NOTE: I chose Coral Serenade, which is an Olympic color, but had it made up in the Valspar paint.
flat white paint (or color of your choice for undercoat)
120 grit sandpaper (or paper of your choice - for light sanding between coats, and for taking off rough areas)
tack cloth
wood cleaner (I used water and a biodegradable soap)
screw driver for removing any hardware
wood putty & putty knife (if needed for filling cracks)
wood table
paint brushes: I found that brush quality made a difference with this paint. Dunn Edwards worked well; my first brush, though made for latex paints, caused problems.
gloves
face mask (for protection against sand dust)
goggles - for eye projection
stir stick or power stir equipment for stirring the paint
drop cloths - to protect floor and other surfaces
Safety Precautions
Follow all precautions and instructions listed on the paint can. Work in a well ventilated area
INSTRUCTIONS
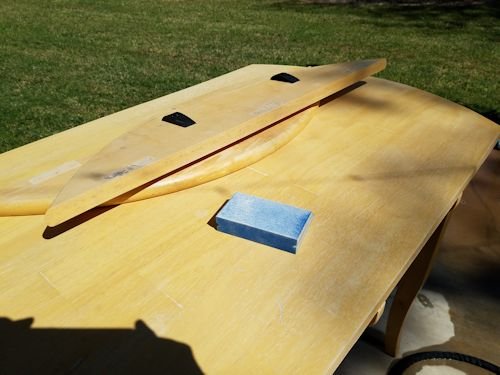
1. Clean The Table and Chairs
Remove cushions from chairs. Use tsp and water to clean the chairs - follow all instructions on the TSP box. Wear gloves to protect your hands. Remove any hardware from the chairs and table.
In the photo, the leaves and hardware have been removed, and the table and chairs have been cleaned. The table is ready for any necessary wood repair.
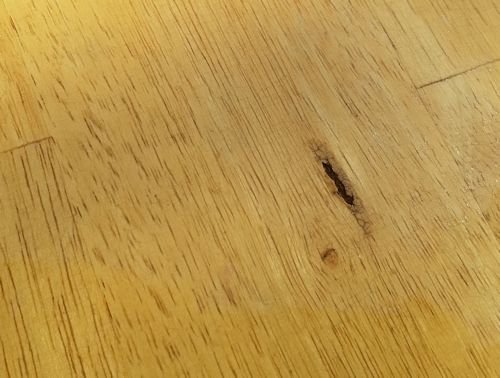
2. Fill Cracks / Lightly Sand
Use wood putty to fill any cracks or imperfections in the wood, following instructions on the putty container. When thoroughly dry, lightly sand the area.
The photo shows a crack that needed to be filled and sanded. Our table had been out in the weather for five years, and this was the only damage. This said a lot about the high quality of the table.
3. Sand The Table And Chairs
Our table and chairs had a glossy surface, and some rough areas. We lightly sanded all surfaces.
Sanding serves two purposes. It removes the glossy finish, so the new paint will bond, and it removes any uneven areas on the surface. We used a sand block with 120 paper.
Use the tack cloth on all surfaces to wipe off all dust and residue. I recommend using gloves; the tacky substace on the tack cloth can come off onto the hands.
4. Move Low Dust Area
At this point, we moved our table and chairs indoors. Our garage is not dust free, but it is lower dust than outdoors (and has less bugs).
Open windows or doors for good ventilation.
5. Apply Undercoat
Apply 1 coat of undercoat. I used a good quality flat, white paint.
If necessary, sand lightly and apply a second coat of flat, white paint.
Open windows or doors for good ventilation. We partially opened the garage doors.
Our table and chairs required two coats of undercoat, with a light sanding (and use of tack cloth) between coats.

6. Apply Top Coats

Apply the top coats in the same way you did the undercoat. Stir the paint well (we found that this paint needed frequent stirring). Apply first coat. If necessary, lightly sand, wipe with tack cloth and apply and second coat.
PAINT REVIEW

The table and chairs are beautiful, so overall I am happy. I believe the paint will work well in keeping my furniture well protected. Therefore, I do recommend the paint. However, we ran into some issues with this paint. It was a bit "fussy" to work with. I found that I had to change brushes because the first brush did not work well, even though it was listed as being appropriate for latex paint. Also, we found that we had to stir the paint frequently, or it tended to separate, creating an uneven finish and bonding problems. Our environment was the correct temperature. We needed a third coat of paint on the table top because the finish was a bit uneven regarding gloss level. We had sanded between first and second coats, and perhaps the second coat had gone down unevenly. The third coat took care of the problem, and was only needed on the table top.
Paint use: we only used a few inches off the top of the can to paint our table and two chairs. I have plenty of paint remaining for future projects :-)
For full instructions and a more complete review, please watch my video. Overall, I am quite happy!
CUSHIONS: The cushions were adhered to the chair with velcro. We left the velcro strips on the chair while painting. I love the velcro system, because the cushions stay in place on the chair during use, and they do not blow away during windy weather. I hand washed the cushions and placed them back on the chairs when the paint was thoroughly dry.
PLACEMATS: To see the free sewing pattern for the beautiful placemats (they were the perfect accent to my new garden table), go to: Reversible Placemat Sewing Pattern .

Build A Table
Super easy! Sideboard table for patio
Yard Crafts


Yard Home Improvement


I turned a fallen tree disaster into a beautiful evergreen bouquet for my front porch. Easy! Use holiday items from your stash.