|
|
|
|
| HOME SEW CRAFTS DECOR SHOP |
|
PAINT FIBERBLASS SHOWER PAN
|
| lessons holiday patterns craft patterns |

|
-> decor -> home improvement
Refinish unsightly shower pan |
|
Give your shower a bright, new appearance by refinishing the stained and worn fiberglass shower pan. This "new" pan looked good for a few years. After that it started to peel. That was fine for us; it looked wonderful during the time we were waiting to re-tile the shower stall. Yes, there is a bit of work involved, but if you can clean, sand and use a spray paint can you can create a beautiful new shower pan. Also see: home improvement |
 Article Printed: 2007 - updated 2010
CAUTION: Follow All Safety PrecautionsYou will be working with toxic chemicals; follow all safety precautions that are listed in the instructions that come with the paint system you choose. Protective gear is listed below. Do not omit any protective item. Protect your hands with rubber gloves. Protect your lungs with a respirator. Protect your eyes with protective goggles. Keep skin covered. Work in a well ventilated area. Limit your exposure time. If you have asthma or other illnesses, contact your physician before starting this project. |
Materials For Refinishing Fiberglass Shower Pan
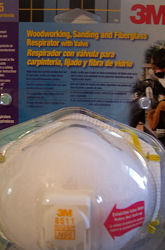
Stool: you will spend quite a bit of time removing old grout, sanding, etc. and a stool to sit on will save your legs. Caulk Removing Tools: Use whatever you like best for removing caulk. I find that a flat head screw driver works well. I have also used putty knives and exacto knives. Sand Paper or #0000 Steel Wool: Your paint instructions will either tell you to sand or use steel wool. The paint system I used instructed me to clean the area with TSP, dry the area with a paper towel, and then scour the entire area with steel wool. I also sanded with fine sand paper. TSP & Sponge: Clean the surface with TSP and a sponge. Rubber Gloves: Protect your hands from the chemicals of the cleaning and painting supplies. Protective Goggles: Splash or mist from chemicals can damage the eyes as well as be absorbed into the body. Eyes must be protected. NIOSH Approved Respirator: This type of respirator is fairly inexpensive and is well worth the cost considering the health risks of using toxic chemicals. A respirator approved for sanding fiberglass is shown in the photo. |
 General Cleaning Supplies: Paper towels, brushes and general cleaning supplies to clean your shower stall before starting the project. ALL grease, soap scum, hair and other debris must be removed.
|
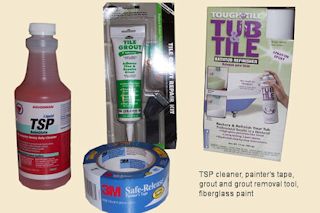
Drop Cloths or Plastic Sheets: For protecting the surrounding walls and floor from paint. Epoxy Paint: Epoxy paint for painting fiberglass shower pans can be purchased at hardware stores. I used "Tough As Tile Tub & Tile Bathtub Refinisher". The package included two cans. The cans are mixed and then sprayed on the fiberglass pan. Follow instructions carefully and work in a well ventilated area. Lacquer Thinner: For clean-up. Your paint system might require something other than lacquer thinner. Follow clean-up directions on your paint can. Bathroom Caulk & Grout: Apply as needed when project is finished. |
 Tape: For taping off drain area and other areas close to shower pan.
Instructions
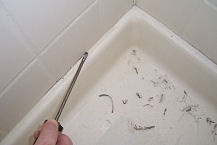
2. Remove Old Caulk and Loose Grout NOTE: Take this opportunity to inspect the old caulk. It should be dry. If it is damp on the back side, you could have a moisture problem in your wall. Inspect the shower stall tiles. Loose tiles are a telltale sign of water leakage. Tiles should be firmly attached to the shower walls and caulk should be clean and dry. If you find you have a water leakage problem, it must be repaired before you continue with this project. |
 1. Clean Shower Stall
 |
Follow Instructions On Paint Can If you are using a different system than what I used, your steps will be different. From here on, follow your directions. These instructions are for the system I used. 3. Clean Surface With TSP Use a sponge and TSP to thoroughly clean the entire surface. Be sure all soap residue, caulking and other materials are removed. Rinse the area and dry thoroughly with paper towel. NOTE: TSP is a cleaner - it is NOT a de-glosser. Paint will not adhere to a glossy or semi-glossy surface. The surface must sanded with fine sand paper or steel wool, then cleaned with TSP. |
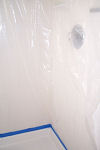
Shower Door
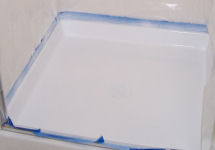
I removed the door and took it out to the back yard to thoroughly clean all around it. It looked very good when finished. To clean hard water deposits off the glass itself, I used WD-40 and a lime remover. Neither totally removed the deposits, but they did improve the overall appearance of the door. 4. Tape Off Area / Hang Plastic Sheet Tape off entire area around pan. Hang a plastic sheet over the walls. Spray paint mist can travel, so surrounding areas must be covered. 5. Apply Paint Follow instructions on your paint can. Apply coats as needed. Sand with fine sand paper or steel wool between coats as needed to produce shine and remove any drips or heavy areas. Wipe down surface to remove steel wool or sand dust. |
 If you have a glass shower door, it probably needs cleaning as well. I have found that vinegar works well for cleaning hard water deposits, soap scum etc. off many surfaces. The vinegar must be HOT. Pour it into a squirt bottle, heat in microwave (with lid OFF), then squirt onto surface. Wipe with lint free cloth.
Paint Product Review
Even though the first coat was a bit blotchy, the look of the pan was greatly improved. The second coat of paint provided much better coverage. After I applied the third coat, I felt the pan looked better than it did when new. We were overall very happy with the results. There are several paint products on the market. They tend to be quite inexpensive. I recommend that you review the products, then practice on cardboard to be sure you are happy with the product. Although the paint we used provided good results on our shower pan, I would not recommend it for bath tubs. A bath tub must have a perfectly smooth application with no runs or uneven distribution of paint. I don't feel I could have achieved that with the product we chose. Imperfections in our paint did not show because a shower pan has an uneven surface anyway. The information on the product we used stated that sanding with steel wool between coats will produce an even coat and shine on a bathtub. That might be possible, but I feel it would have been very difficult. UPDATE 2010: This application lasted a few years. Our shower stall looked dirty and worn again after that time. Therefore, I would not consider this to be a permanent solution. It does, however, dress up the shower stall for at least a few years. |
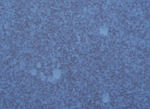 We found that the system we chose was difficult to use. It required two cans, one marked "hot" and one marked "cold". The "hot" can was heated, then squirted into the "cold can". The cold can was refrigerated, then warmed to room temperature before using. The spray did not come out evenly, though we felt that all directions were followed precisely. We also found that the nozzle had to be wiped clean fairly often during application. The photo on the right shows a practice spray on a piece of cardboard. This is one coat.
Quick Reference |
Learn To Paint!free video tutorialsVisit my youtube channel. Free videos with step by step instructions. Paint beautiful paintings for your home. |

Please ShareI rely on advertising to keep my site free. Please share with friends. |
Privacy Policy & Terms Of UseBy using our website, you expressly consent to our Privacy Policy and Terms & Conditions. All Patterns, images and instructions are copyright protected. |