Reversible Gift Bag
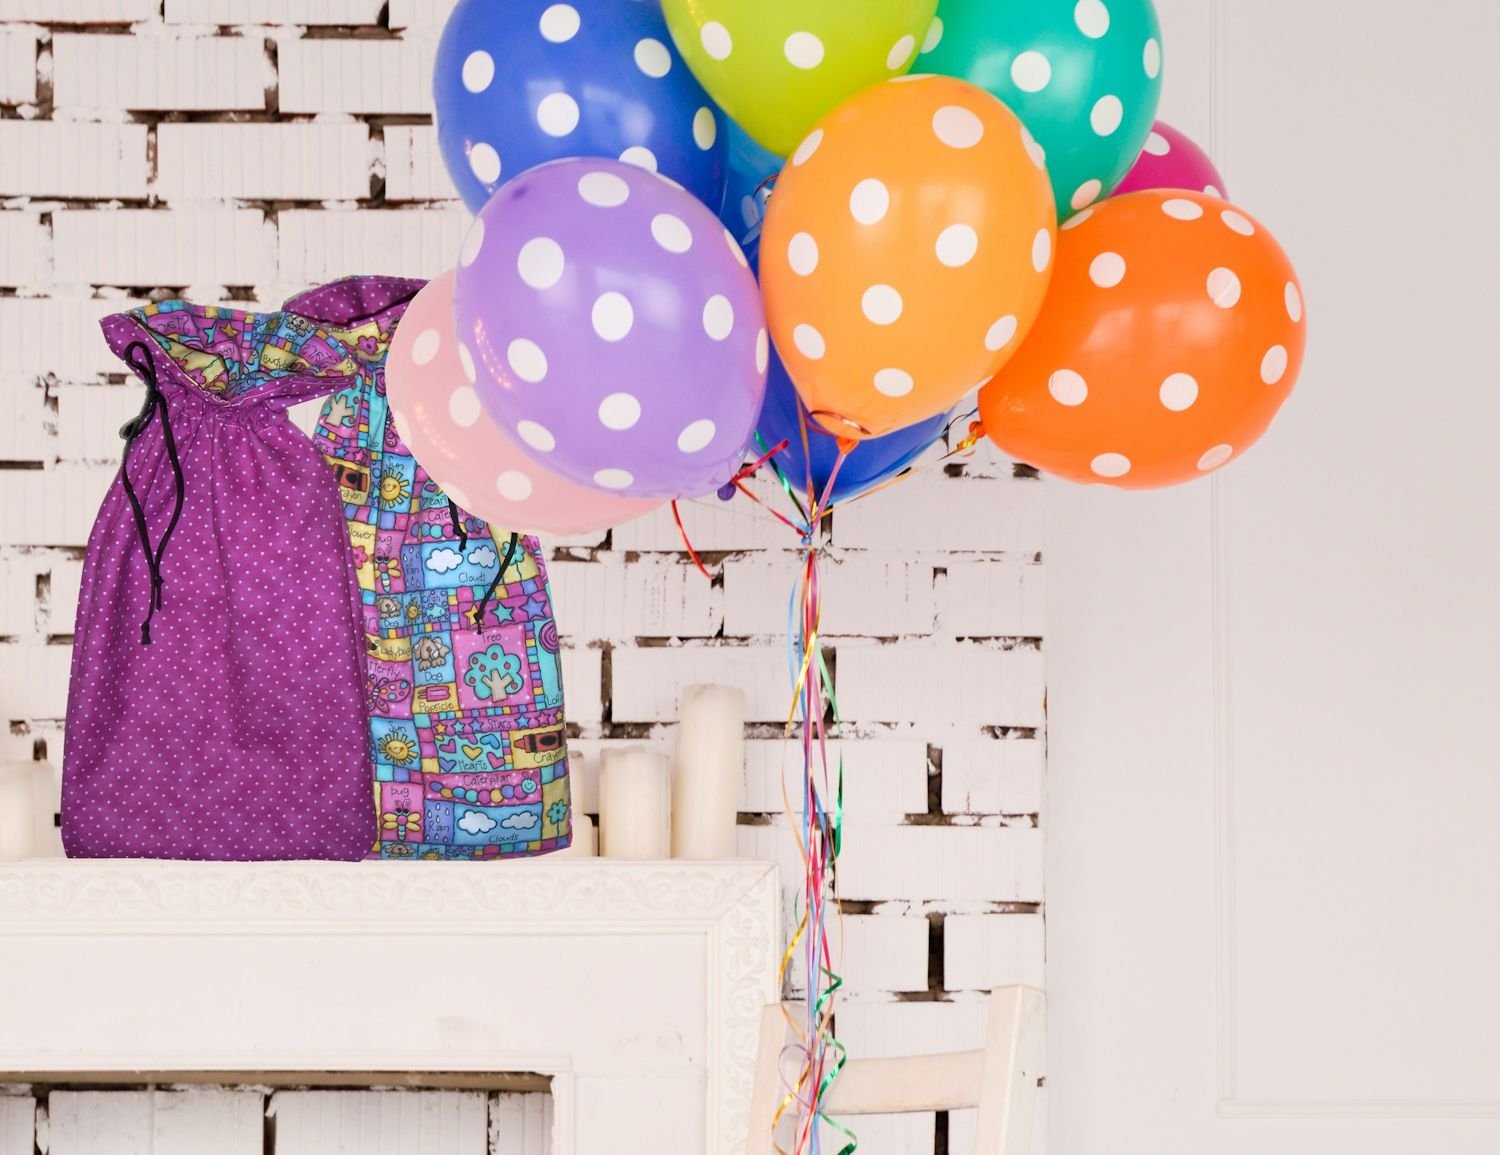
Drawstring Closure
This pattern comes from our former site, CraftAndFabricLinks. Same owners - new site.
Disclosure: This site contains affiliate links. As an Amazon Associate, I earn from qualifying purchases. Clicking on links, and purchasing products, may result in the seller paying us compensation - at no extra cost to you. Affiliate links are in green.
Great “beginner” sewing project. Practice straight stitching.
Also see:
Blog: Follow Our Adventures
Easy Sewing Patterns
Remodel Projects
Holiday Projects
Drawstring Closure Reversible Gift Bag Sewing Pattern
Quick and easy reversible drawstring bag pattern! Use contrast fabrics or holiday fabrics. Stitch contrast layers together, add a casing, and feed the laces through the casing. For each side, a lace is pulled through the casing and tied. You end up with a reversible draw string bag, fully functional on both sides.
Gift Bag Size
This pattern creates a roomy 11" x 20" bag, with an inside area of 11" x 15" (the casing adds 1" and the ruffle adds another 4")
Cutting Tools
I recommend using a Rotary Cutter, Cutting Mat, and Sewing Ruler. I use these tools for most projects. They allow for easy, precise cutting. See Amazon links at the end of this article.
Supplies
Project Supplies
Two 1-yard pieces 1/4" lace or ribbon
1/3 yard fabric (42" width)
1/3 yard contrast fabric (42" width)
Thread (to match background - or use contrast color)
NOTE: if your fabric is directional and runs the lengh of the fabric, you will need 1/2 yard of fabric, rather than 1/3 yard. The bag will be made from two pieces of fabric (one for front and one for back), rather than one piece that is folded.
Sewing Supplies
thread
sewing scissors
quilting pins
large sewing ruler
fabric marking pencils
seam ripper
rotary cutter and mat (optional but nice)
PRE-WASH, DRY, & PRESS ALL FABRIC BEFORE USING
DIRECTIONS
NOTE: All seams 1/4"
These directions are for unidirectional fabric - the bag is made from two pieces (one for front and one for back). If your fabric is multidirectional, you can fold the fabric across the width of the bag, omitting the bottom seam.

1. Cut Fabric Pieces
Cut two 20.5" x 11.5" pieces from each fabric selection.
The drawing on the right shows layout for multi-directional fabric, using 1/3 yard, or unidirectional fabric with pattern running lengthwise, using 3/4 yard. The drawings are not exactly to scale, but pieces do fit as shown.
You will have a total of 4 pieces of fabric when finished, each measuring 20.5" x 11.5".
2. Stitch Seams

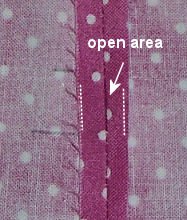
Lay out two pieces of the same fabric. Place them right sides together, aligning all edges. Stitch across bottom of bag, using a 1/4" seam. Measure 15" up from the bottom stitch line on one side edge of the bag and mark with a fabric marker or pin. Make another mark 1" above the first mark. Repeat on other side. Pin layers together along sides.
Stitch from the bottom seam up one side to the 15" mark. STOP. Leave the 1" area between marks open. Stitch from the upper mark to the top edge. Repeat on opposite side of bag. The 1" opening is needed for the casing.
Your bottom seam and side seams are now finished.
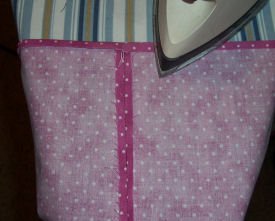
3. Press Top Edge / Finish Side Openings
Press upper raw edge under 1/4".
Press side seams open. Stitch close to edge of seam allowance next to casing opening.
4. Turn The Bag Inside Out
5. Repeat Steps 1-3 With Your Second Fabric
6. Pin The Two Bags Together
Lay the two bags side by side, with one right side out and one wrong side out.
Place the wrong-out bag inside of the right-side out bag. Pin the bags together around the top, aligning the side seams.

7. Stitch The Two Bags Together
Stitch the two bags together by topstitching around the top, aligning the top edges and stitching close to the upper edge. Make sure the side seams remain aligned.
8. Create Casing
Find the opening on each side seam of the bag. Place a ruler on the bag and draw a straight line (or mark with pins) across the bag just above and just below the side openings. Do this for each side of the bag (front and back). Stitch all the way around the bag, folowing the lines you just drew. Stitch through both layers - the inside bag and the outside bag. DO NOT STITCH THE FRONT OF THE BAG TO THE BACK OF THE BAG. This creates your casing.
NOTE: Be sure your side openings are lined up before you stitch the lines.

9. Feed In The Drawstring For Side One

Attach a safety pin to one end of a drawstring (or shoe string). Run the drawstring through one side opening, around the casing and out the same opening you started with. Tie the ends of the strings into knots to prevent them from frayingg. I also tied the two ends together to be prevent them from slipping back into the casing (tie the ends together while the bag is still fully open).
I will call this side "right side out".
10. Reverse It!
Turn the bag inside out (so that the reverse side is now on the outside).
Repeat step 9 above.
I used the opposite side opening for my second drawstring, rather than use the same opening I had used for my first drawstring. It decreased bulk and made the ties easier to work with when they are on opposite sides - just my opinion.

Enjoy your new bag!
Use contrast fabrics - or make one side one holiday, and the other side a different holiday. Have fun!
Projects To Help You Organize


Accessory Patterns


Organize your yard and pool toys! Easy PVC yard and pool toy caddy.