|
|
|
|
| HOME SEW CRAFTS DECOR SHOP |
|
PURSE PATTERN Page 3
Interior Pocket / Custom Zipper Pull |
| lessons holiday patterns sewing patterns |

|
-> sewing patterns -> accessories
|
Page 3: lining with 2 pockets / make custom zipper pull
DIRECTIONSNOTE: All seams 1/4" Lining - continued from page 22. Create Lining Piece With Two Pockets
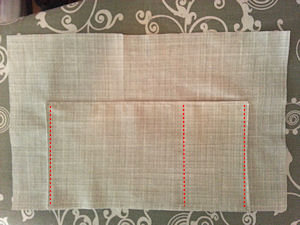
Topstitch across the top of the pocket piece. Pin the pocket piece to the right side of one lining piece. Center the pocket between the two side edges of the lining, and align the raw edges along the bottom. Stitch the pocket to the lining, stitching close to the pocket edges. Stitch the two sides. Do not stitch across the top. Stitch another line, dividing the pocket (your choice of placement). The photo shows the stitching enhanced in red. The second lining piece is now complete. |
 Fold the 10.5" square in half, right sides together. Press with iron. Stitch the two side seams. Clip upper corners. Turn right side out. Press.
3. Create Purse Bottom - join to sides
Stitch the purse bottom piece to each of the lining pieces, right sides together. Be sure that the lining BOTTOM EDGES are stitched to the purse bottom. Otherwise you will end up with lining pieces that are upside down. DO NOT stitch lining sides together at this time. |
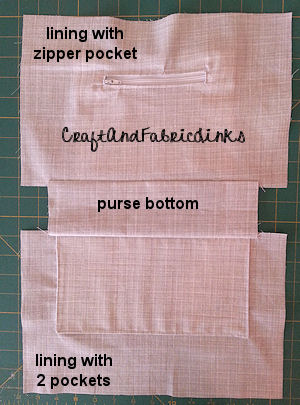 Lay both lining pieces right side up. Cut a purse bottom lining piece, 3.5" high x 10.5" long, if you haven't already cut this piece. Place it between the two lining pieces. Refer to photo. Center the purse bottom between the lining side edges.
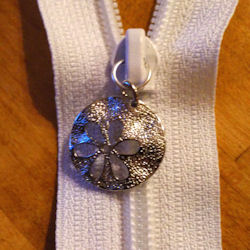
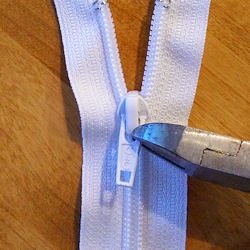
Create Custom Zipper Pull For Purse Top Zipper
My daughter came up with the perfect solution. Cut off the pull that comes on the zipper (attached to the slider) and create a custom pull. All that's needed is a jewelry "O" ring, and a charm or other custom item. I purchased an inexpensive silver tone sand dollar that was created for earrings. Cut off the old pull, using a wire cutter. The zipper might now work correctly at this point. I was able to slide the slider UP, but not back down. This is because the slider must be lifted off the coil a bit to slide correctly and this could not be done without a pull. It worked fine after our new pull was attached. "O" rings have an opening so that they can be opened. Using your fingers or a jewelry tool, bend the ring so to open it. Slide on the charm. Slide the ring through the opening in the zipper slider. Close the ring. See photo above. Voila! A beautiful new zipper pull.
Continue to page 4 for directions for purse top zipper |
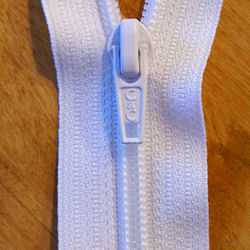
 This step is optional. The parts that make up a zipper are the zipper tape, zipper coil, zipper slider and zipper pull. For some reason, it is very difficult to find zippers with nice pulls. The selection is limited and expensive. I like to buy my zipper coil on a roll, and cut the zipper to the length I need, then add the slider and pull. OR I buy nylon coil zippers and cut them to fit. Either way, the pulls are usually not very appealing. What makes a purse look professional are the details such as zipper pulls.
Quick Reference |
Learn To Paint!free video tutorialsVisit my youtube channel. Free videos with step by step instructions. Paint beautiful paintings for your home. |

Please ShareI rely on advertising to keep my site free. Please share with friends. |
Privacy Policy & Terms Of UseBy using our website, you expressly consent to our Privacy Policy and Terms & Conditions. All Patterns, images and instructions are copyright protected. |