|
|
|
|
| HOME SEW CRAFTS DECOR SHOP |
|
PURSE PATTERN
Page 2
Line Interior Pocket |
| lessons holiday patterns sewing patterns |

|
-> sewing patterns -> accessories
|
Page 2: lining with interior zipper pocket |
Cutting Tools
|
 I recommend using a Rotary Cutter, Cutting Mat and Sewing Ruler. I use these tools for most projects. They allow for easy, precise cutting. Visit my Amazon store page to purchase these tools, fusible fleece, insul-bright, heat resistant cloth, quilting pins, and other items I use in my projects.
DIRECTIONSNOTE: All seams 1/4" Lining1. Create Lining Piece With Zippered Pocket
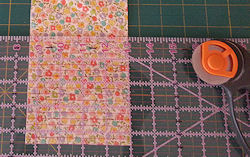
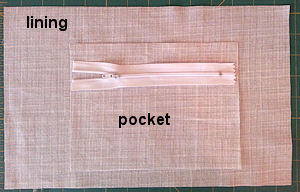
NOTE: This type of pocket looks nice, but it can be a bit difficult to make. If you prefer an easier method, use the same method that is used on the outside zipper segment. OR you can just add a pocket to this lining side. See "2. Create Lining Piece With Two Pockets" on the following page. Cut Purse Lining Pieces: Cut two 8.5" high x 13.5" wide pieces of lining fabric. These will be used for the purse front and purse back. Cut one piece of purse lining measuring 3.5" high x 10.5" long (set aside for later - this piece will be the purse bottom lining). Cut one pocket piece, measuring 6" high x 8" wide. Cut one piece of lining measuring 10.5" square (set aside for later - this piece will be used for the interior, divided pocket). Check Placement: lay one purse lining piece right side up. Lay one pocket piece over the lining piece, right side up. Lay down your zipper right side up over the pocket piece. Check the length of the zipper. It should not extend beyond the pocket piece. If it does, trim the end - trim from the zipper pull end. The pocket should be 2.75" from each side of the lining piece, and 2" from the top edge of the lining piece. |
 I chose a zipper installation method for the inside of the purse that is fairly easy to do, and the finished look is very nice. If you do not wish to have an interior zippered pocket, skip this step.
|
Stitch over the outside lines of the rectangle. Use a straight stitch. Do not stitch over any of the lines inside the rectangle. |
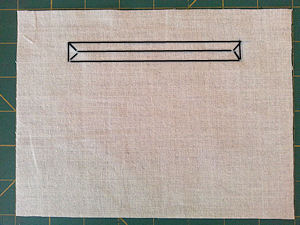 Set the zipper and lining piece aside. Lay the pocket piece wrong side up. Draw the outline for the zipper opening onto the wrong side of the pocket fabric. I decided to make the opening 5" long. Therefore, I drew a rectangle 1/2" high x 5" long. When centered, the ends of the rectangle are 1.5" from the sides of the pocket. The top of the rectangle is 1" from the top of the pocket.
|
|
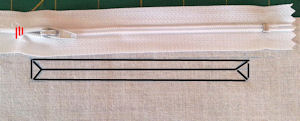 Whipstitch pull end of zipper. Place the zipper alongside the drawn rectangle. Be sure the metal tab is far enough away that you will be able to top stitch around the zipper opening later and not hit the metal. Whipstitch the pull end together so that it stays together when the zipper is later stitced into place.
Whipstitching is enhanced in red.
Whipstitch pull end of zipper. Place the zipper alongside the drawn rectangle. Be sure the metal tab is far enough away that you will be able to top stitch around the zipper opening later and not hit the metal. Whipstitch the pull end together so that it stays together when the zipper is later stitced into place.
Whipstitching is enhanced in red.|
|
 Place the lining fabric right side up. Place the pocket right side down over the lining fabric. The pocket should be 2" from the top edge of the lining, and 2.75" from each side of the lining. Stitch over the outside lines of the rectangle. Use a straight stitch. Do not stitch over the three lines inside the rectangle.
 |
|
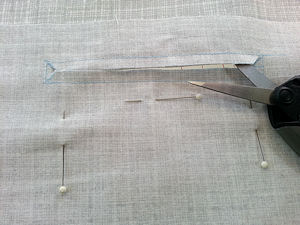 Using very sharp scissors, cut along the three lines inside the rectangle. Cut out as far as you can to the corner, but be careful not to snip into the corner stitching.
|
|
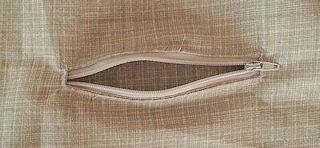
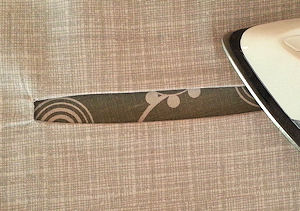 Pull the pocket through the zipper opening. Press. The pocket is now right side out on the back side of the lining fabric. The opening for the zipper is now nicely finished. Press well with an iron. Steam is helpful, if safe for the fabric you are using.
|
|
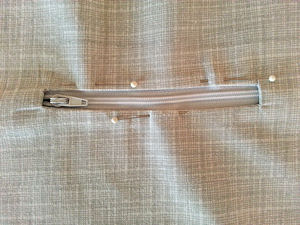 Place the lining piece right side up. Place the zipper right side up, under the lining so that it shows through the opening. Pin into place. Be sure the overall piece is still 13.5" long by 8.5" high. Hand baste zipper into place. Using a zipper foot, top stitch around the opening, close to the edge of the opening (use a longer stitch lengh).
|
|
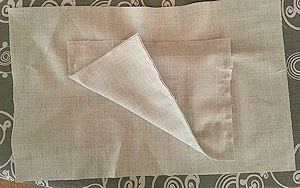 Finish the pocket: Turn the lining piece wrong side up. Pin the second pocket piece to the pocket piece that is stitched to the lining, right sides together. Stitch all the way around the pocket, moving the lining piece out of the way as you stitch each side. Stitch only through the pocket layers. The photo shows the finished pocket. The photo is taken of the wrong side of the lining. No pocket stitching shows on the right side of the lining, except the topstitching around the zipper opening.
|
|
Continue to page 3 for second lining piece |
Quick Reference |
Learn To Paint!free video tutorialsVisit my youtube channel. Free videos with step by step instructions. Paint beautiful paintings for your home. |

Please ShareI rely on advertising to keep my site free. Please share with friends. |
Privacy Policy & Terms Of UseBy using our website, you expressly consent to our Privacy Policy and Terms & Conditions. All Patterns, images and instructions are copyright protected. |