|
|
|
|
| HOME SEW CRAFTS DECOR SHOP |
|
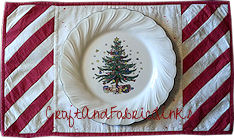
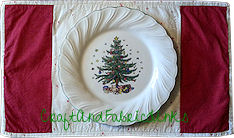
STRIPED PLACEMAT
Sewing Pattern page 2 |
| lessons holiday patterns sewing patterns |

|
|
Page 2
|
Directions - Creates Four PlacematsAll seams are 1/4"CUT FABRIC
|
 Side Border Fabric 2-color (candy cane stripe)
|
|
 Side Border Fabric 4-color ("special" 4-color stripe
|
Cut the strip into eight 5" segments. Each piece will measure 5" width x 12.5" height. You will have two border pieces for each mat. |
 Side Border Fabric 1-color (no stripes):
2. Cut Center SquaresFrom the center square fabric (white print in my Christmas placemats), cut 2 strips of fabric, each measuring 12.5" x w.o.f. (width of fabric). Cut across the entire width of the fabric (strips will be 12.5" x 42"-44" depending on your fabric width). Now, cut the first strip into 12.5" segments, so that you have three 12.5" x 12.5" squares. Cut one more 12.5" x 12.5" square from the second strip. You will now have 4 center squares, which will be used to create 4 placemat tops. |
3. Cut BackingFrom the backing fabric, cut 2 strips that measure 12.5" in height. Cut across the entire width of the fabric (strip will be 12.5" x 42"-44" depending on your fabric width). Now, cut the first strip into 21.5" segments, so that you have two 12.5" x 21.5" rectangles. Repeat with the second strip. You will have 4 backs in all, each measuring 12.5" x 21.5". |
4. Cut Batting or Fusible Fleece
|
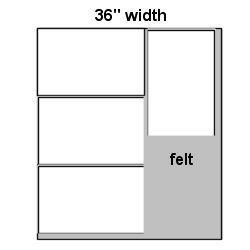 Use your backing pieces as patterns for cutting batting (or fleece or felt) pieces. For felt that is only 36" wide, you will need to place one mat vertically, as shown in the diagram.
SEWING INSTRUCTIONS
|
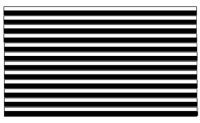 When finished, you will have a piece of "striped fabric" that measures 45" width x 24" height.
|
|
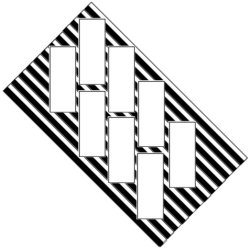 You will now need to rotate the fabric piece 45 degrees and cut the borders from your striped fabric.
Be sure all 8 pieces fit before you begin cutting! It might be helpful to cut 8 pattern pieces from
paper, each measuring 5" width x 12.5" height, and lay them out before cutting.
You will now need to rotate the fabric piece 45 degrees and cut the borders from your striped fabric.
Be sure all 8 pieces fit before you begin cutting! It might be helpful to cut 8 pattern pieces from
paper, each measuring 5" width x 12.5" height, and lay them out before cutting.
2. Assemble Placemat Tops
|
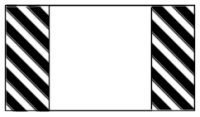 Sew the two border pieces to the
center square (solid border pieces or striped border piece). Each border
measures 5" wide x 12.5" height. When the
placemat top is sewn together, it will measure
21.5" width x 12.5" height.
Sew the two border pieces to the
center square (solid border pieces or striped border piece). Each border
measures 5" wide x 12.5" height. When the
placemat top is sewn together, it will measure
21.5" width x 12.5" height.
3. Attach Letters Or Other AppliqueIf you wish to add letters, do so at this time.
If you are going to wash the mat by hand, you may not need to sew the letters into place. If you plan to machine wash the placemat, I recommend stitching around each letter or applique. Edges of appliques can be outlined with fabric paint to help prevent fraying. Spray-on glitter can also add a nice touch.
Go to Page 1 for my letter patterns.
|
 To create your own FREE alphabet for applique, use any software you have that allows you to create interesting letters. Another good source for letters is coloring books and embroidery transfers.
I used a graphics program to draw my letters.
To create your own FREE alphabet for applique, use any software you have that allows you to create interesting letters. Another good source for letters is coloring books and embroidery transfers.
I used a graphics program to draw my letters.
ASSEMBLE & FINISH YOUR PLACEMATGo to: Assembling and Binding for instructions on finishing your placemat. You can finish the mat by adding a binding around the edge, or finish the placemat without binding. Both methods are explained in my free tutorial. |
Related Project
|
 See all of my sewing and craft projects for Christmas.
Quick Reference |
Learn To Paint!free video tutorialsVisit my youtube channel. Free videos with step by step instructions. Paint beautiful paintings for your home. |

Please ShareI rely on advertising to keep my site free. Please share with friends. |
Privacy Policy & Terms Of UseBy using our website, you expressly consent to our Privacy Policy and Terms & Conditions. All Patterns, images and instructions are copyright protected. |