Pumpkin Pocket Placemat
This pattern comes from our former site, CraftAndFabricLinks. Same owners - new site.
Disclosure: This site contains affiliate links. As an Amazon Associate, I earn from qualifying purchases. Clicking on links, and purchasing products, may result in the seller paying us compensation - at no extra cost to you. Affiliate links are in green.
Note: This is one of my original patterns on our previous site. I could only find one ancient photo. Fortunately, I have my diagrams. It is a wonderful pattern; my family enjoyed these placemats for many years.
Also see:
Follow Our Adventures
Easy Sewing Patterns
Fall Sewing & Crafts
Applique Lesson
Halloween Placemat With Pumpkin Pocket For Utensils

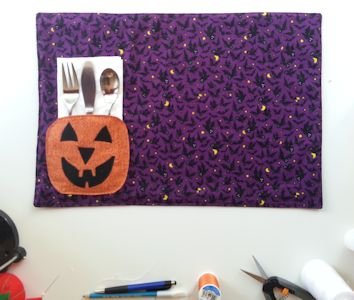
Depending on choice of fabric, this pattern could make a beautiful placemat for fall, Halloween, or Thanksgiving. Your littles won’t mind setting the table when they can tuck utensils into the pumpkin.
NOTE: Fusible fleece adds a nice padding. It noes NOT provide insulation. If you need insulation against heat or cold, use cotton batting and Insul-Bright.
Placemat Size
13" x 19" (this pattern creates 6 placemats)
Soft Padding
This project uses Fusible Fleece. This provides nice padding. I often use fusible fleece for this type of project.
Sewing Supplies: for six placemats
I recommend using a Rotary Cutter, Cutting Mat, and Sewing Ruler. I use these tools for most projects. They allow for easy, precise cutting.
thread
sewing scissors
quilting pins
fabric marking pencils
seam ripper
PRE-WASH, DRY, & PRESS ALL FABRIC BEFORE USING
Supplies - makes 4 placemats
Fabric
Note: for main and backing fabric, you need 40.5” in length (13.5 x3), so 1 1/4 yard of 45” width fabric allows for shrinkage. You need fabric that is at least 39” wide (19.5” x 2). Quilt fabrics usually come at least 42” wide, which allows from shrinkage. Placemat main fabric: 1 1/4 yard of 42” width fabric.
Placemat fabric: 1 1/4 yard of 42” width fabric
Placemat backing fabric: 1 1/4 yard of 42” width fabric
Batting or felt or fusible fleece: 1 1/4 yard of 42” wide material (or enough for six 13” x 19” placemats). TIP: Fusible fleece or batting makes layering your placemats quick and easy. Just fust to your fabric top, then add the backing.
Pumpkin: 1/12 yard of 42” width fabric (you need a width of 12” so 18” allows for shrinkage)
Pumpkin Face Pieces fabric: 1/4 yard of 42” width fabric (I used black)
Binding (optional): enough to go around your placemats. For 2” binding strips, you will need 1/2 yard of binding fabric.
I made placemats from the purple fabric, plus a couple extra out of the leaf print.
Other
1/4 yard of fusible web - such as Wonder Under, Heat N Bone Lite, etc. (optional, but nice because it holds the face pieces in place)
Pattern
Sewing Instructions
Use 1/4” seam allowance. Iron between each step. Read through all directions completely before beginning.
1. Cut Top, Back & Batting Fabrics
Follow layout per the following drawing for your top fabric, backing, and felt or batting. You will be cutting six pieces, each measuring 13.5” x 19.5”. The finished placemats will measure 13” x 19” (the extra 1/2” is for the seam allowance).
For precision cutting, use a rotary cutter, large sewing ruler, and cutting mat. If you do not have these items, good sewing scissors work well. The rotary cutter, ruler, and mat make the job easier and quicker.

2. Cut Pumpkins
Fold the pumpkin fabric in half. Use the pumpkin pattern to cut out six pumpkins, cutting through both layers.
ADD 1/4” SEAM ALLOWANCE AROUND EACH PUMPKIN!
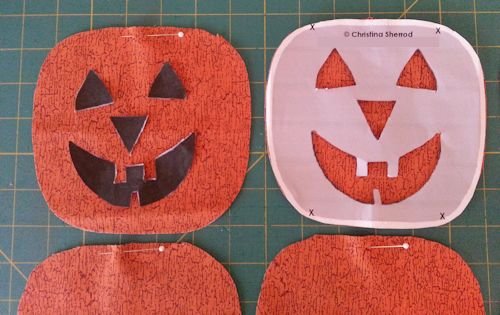
Pin each pumpkin’s layers together, with one pin at the top.
NOTE: I moved the “x” marks out a bit further apart after this photo was taken.
Notice that I have cut the pattern so that there is a 1/4” white area around each pumpkin. I need that for the seam allowance.

3. Cut Out Pumpkin Face Pattern Pieces
Using sharp scissors, cut out the paper face pieces from the paper pumpkin pattern. Set the paper face pattern pieces aside. The cut out areas on the pumpkin pattern can be used later as a guide for face piece placement on the pumpkins.
I placed the face pattern pieces onto the pumpkin to show you how it will look later.
Create Face Fabric Pieces
Following the manufacturer’s instructions, iron a piece of fusible web to the wrong side of the fabric that will be used for the eyes, nose, and mouth (I used black for all three). Place the face pattern pieces on the paper side of the fusible web, right side down, and trace around each face piece. Trace enough for six face sets. Cut out the face pieces from the fabric.
You will need enough faces for six placemats (six pumpkins). I marked my eye pieces “L” for left and “R” for right. It doesn’t really matter for this pattern whether you lay the pattern pieces right side down, but it does matter for many designs, so it is a good habit to get into.

4. Adhere Face Pieces To Pumpkin
Remove the paper backing from all face pieces. Using the paper pattern as a guide, place the face pieces onto a pumpkin. I actually placed the paper pattern over the pumpkin to be sure my pieces were placed correctly. You do not have to follow my placement, but I wanted to keep my faces somewhat uniform. Press with iron (following fusible web manufacturers instructions).

5. Stitch Face Pieces & Finish Pumpkin Pocket
This step is optional. I stitch the pieces onto the pumpkin because fusible adhesive alone can come off over time. It holds well, but washings can loosen the edges. Also, the satin stitching keeps the fabric edges from fraying.
Remove the pin that holds the pumpkin layers together. Place a piece of stabilizer under the pumpkin face (wrong side of pumpkin). Using an applique foot on your sewing machine (with a zig-zag needle plate), choose the zig-zag stitch. Set the machine for a narrow stitch with a short stitch length. I use a stitch width of 2.5 and a length of .4 or .5. The correct setting might be different for your machine. These setting create a nice satin stitch on my machine. Stitch a satin stitch around each face piece.
The white fabric showing under my pumpkin, in the following photo, is the stabilizer.

Cut away any excess stabilizer that goes beyond the pumpkin edges.
Pin the two pumpkin layers right sides together.
Stitch around the perimeter, using a 1/4” seam allowance. Leave a 2” area open at the bottom center for turning right side out.
For a lesson on applique & fusible web, go to: Applique Lesson

Turn right side out. Press. Press under the raw edges of the open area across the bottom.
Top stitch all the way around the pumpkin, turning the raw edges to the inside of the pumpkin. The pumpkin pocket is now finished. Set it aside.

finished pumpkin before topstitched edge
6. Pin Batting To Placemat Back
Lay out a fabric BACK piece, WRONG side up. Pin the fusible fleece (or batting) to the placemat back. Press with iron (if it has heat activated adhesive - follow the manufacturer’s instructions). My placemat backing fabric was the same as my placemat top fabric.
I pinned along the edges before pressing. Once pressed, the pins can be removed.

7. Stitch Placemat Layers
Pin the placemat top to the placemat back, right sides together. Stitch around the outer edge, using a 1/4” seam allowance. Leave 6” open on one side for turning. Trim corners.
Turn the placemat right side out. Use a turning tool (I use the blunt end of a crochet hook), push the corners out. Press, folding the raw edges to the inside of the placemat. Press under the open edges. Press around the entire perimeter of the placemat.
Topstitch around the perimeter approximately 1/8” from the edge. The topstitching will close the opening.
8. Stitch Pumpkin Pocket To Placemat Top
Lay the placemat right side up. Lay the pumpkin right side up, in the lower left corner of the placemat top. Place the pumpkin so that it is approximately 1” in from the left side, and 1” up from the bottom. OR place the pumpkin pocket wherever you would like.
Pin the pumpkin into place. BEFORE SEWING, place a napkin with utensils under the pumpkin. Using pins, mark where you will stitch the pumpkin to the mat. Be sure to leave the top OPEN for the napkin and utensils to be tucked into.
Topstitch the two sides and bottom of the pumpkin, stitching through all layers.
I have drawn black stitch lines onto the pumpkin pocket in the following photo. My drawing isn’t perfect, but you get the idea.

More Placemat Patterns


Rustic table round. Quick and easy crochet using bulky yarn. Add rows to create placemat; omit rows to create coasters.