Basic Square Pillow

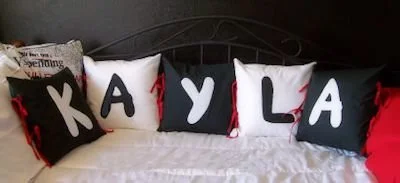
Optional Contrast Ties & Appliqued Letter
The directions on this page are for creating the basic envelope back square pillow, and adding optional letter and ties. The letters are padded with fusible fleece.
Special Note: This pattern is one of my oldest - Originally on our previous site: CraftAndFabricLinks.com. It is quick and easy. No zippers, yet the back opening makes for an easily removable pillow. Enjoy! Christina Sherrod, designer
Disclosure: This site contains affiliate links. As an Amazon Associate, I earn from qualifying purchases. Clicking on links, and purchasing products, may result in the seller paying us compensation - at no extra cost to you. Affiliate links are in green.
Also see:
Notes From The Workroom & Trail
Quilt Patterns
Craft Projects
Home Improvement

Pillow Cover Size
This project creates a 16” x 16” pillow cover
This square pillow is featured on many of my applique and quilt block patterns. The front can feature a quilt block or any applique.
I have used this basic, square pillow cover design for several pillow fronts.
Quilt blocks are often 8.5” x 8.5”, or 14.5” x 14.5” (unfinished). This pillow can be made to any size you need for your quilt block or applique. Simply adjust the size as necessary.
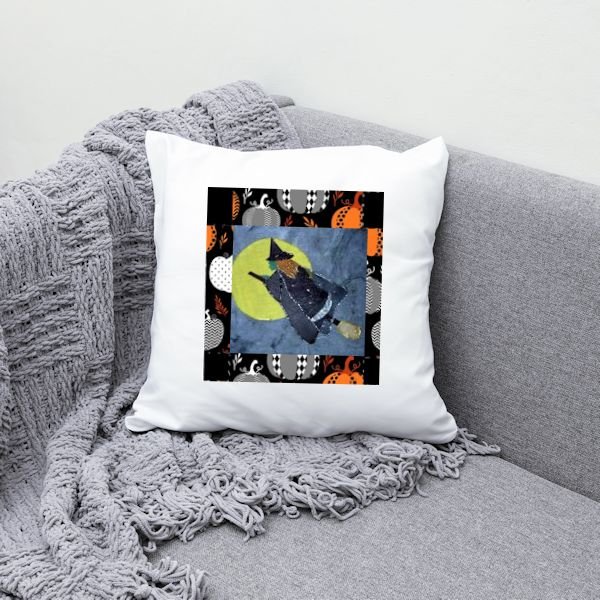
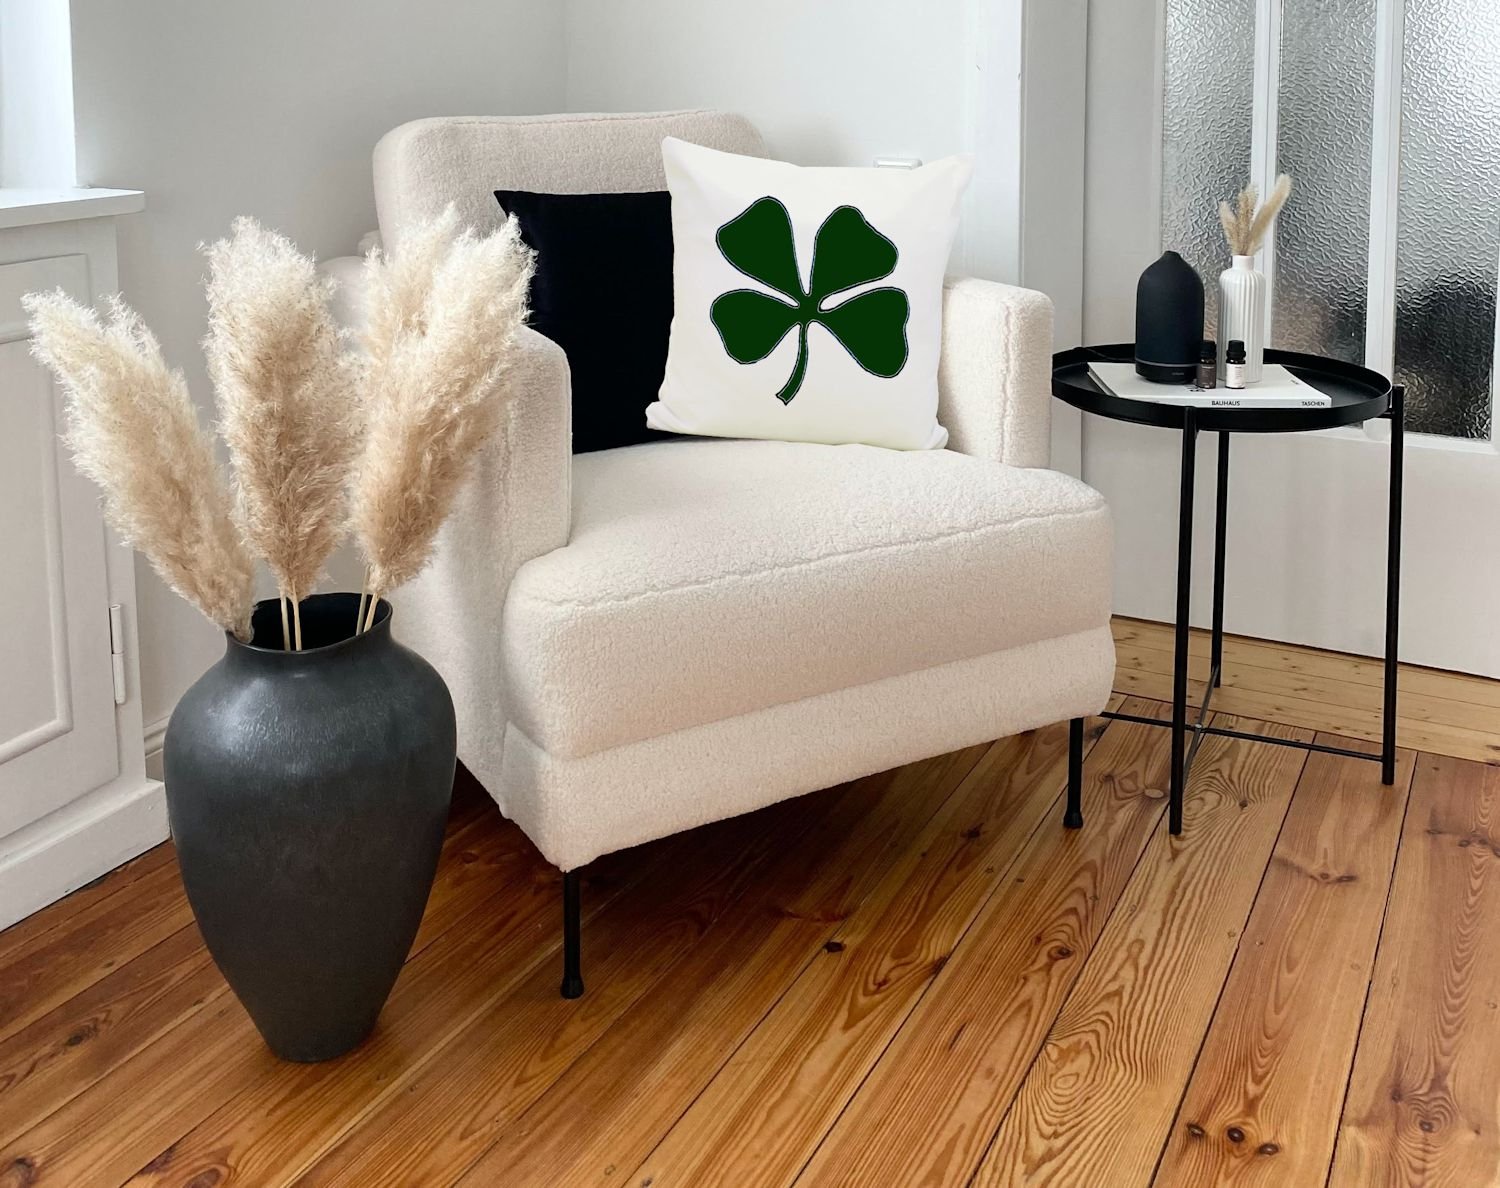
Your quilt block can take up the entire front, be pieced into the front (use white strips or other color around the block), OR it can be appliqued to the front, as shown below in my Halloween and Shamrock blocks below.
Go to: quilt block and applique patterns for more designs for use on your pillows.

Adjust to any size of pillow. See my envelope back pillowcase pattern for creating a cover that your bed pillow will not fall out of - nicely finished and quick to make.
SUPPLIES - for one pillow
16” pillow form
Fabric
1/2 yard pillow cover fabric (fabric must be at least 41” wide): this is enough for the front and back
3” tie fabric (if you wish to add ties - see letter pillow at the top of the page): must be at least 41” wide - in other words, you need a piece of fabric that is 3” x approximately 41” - 44”
7” x 9” piece of letter fabric (if you wish to add a letter)
Other Supplies
Fusible Web (iron-on adhesive): 7” x 9” piece (for letter - larger if you are adhering it to your quilt block)
Fusible Fleece: 7” x 9” piece - for the padding of the letter
Letter Pattern
To create your own FREE alphabet for applique, use any software you have that allows you to create interesting letters. Good sources of letters are coloring books and embroidery transfers.
Google offers free fonts to download. Many digital art programs and apps offer interesting fonts as well.
I created my letters using a graphics program. You can download my letters as pdf files. Enlarge or shrink as needed.
General Sewing Supplies
thread to match fabric background
sewing scissors
pins (I use quilting pins)
large sewing ruler
rotary cutter and mat (optional but nice)
fusible web (iron-on adhesive: for attaching applique pieces)
stabilizer (optional - if you do any machine embroidery you will need stabilizer)
DIRECTIONS
Cut Pillow Fabric

Cut one 16.5” x 16.5” piece of fabric for the pillow front OR use a 16.5” x 16.5” quilt block.
Cut one 24.5” x 16.5” piece of fabric for the pillow back.
Repeat for the number of pillows you are making.
Create Letters
Your letter should be approximately 6.5” wide x 8.5” tall. I marked off a 6.5” x 8” area on a piece of paper and drew letters large enough to fill this space, using our pattern as a guide. You can also use a copy machine to enlarge the letters.
Need a different size? Copy at more or less than 100 percent, or print the pdf file (see patterns above) at more or less than 100 percent.
Create Letter Applique
NOTE: our letters are backward, so they can be traced to fusible web for other projects. You will need your letters to NOT be backward. Adjust as follows.
For this project, turn the letter pattern over and hold it up to a window. The letters should show through the paper. Trace over the letters (they will no longer be backward when traced on the other side of the paper).
Cut a 7” x 9” piece of each of the following:
letter fabric
fusible fleece
fusible web
Do this for each letter needed (I made 5 pillows, one for each letter of K A Y L A)
Follow the directions on the fusible web to fuse the web to the WRONG SIDE of your letter fabric. If you are using Wonder Under or Heat N Bond, lay down your letter fabric, wrong side up. Place the fusible web over the fabric, paper side up. Iron over the paper side to fuse the web to the fabric.
Place the fusible fleece down, right side up (adhesive side is slightly rougher and is the WRONG side - that side should be face down).
Peel the paper off the wrong side of your letter fabric. Place your fabric right side up on top (right side) of your fusible fleece. Your letter is no longer backward. Iron over your fabric, fusing the wrong side of your letter fabric to the right side of the fleece.
Create Pillow Front With Applique
Place your fabric/fleece unit right side up.
Cut out your letter pattern, and place it onto the right side of the fabric. Cut out your letter.

Place the letter onto the pillow front. I centered my letters. Pin in one or two places to firmly hold the letter in place. Iron the letter onto the pillow. The adhesive on the back of the fleece will hold your letter until you stitch it into place. Hand stitch or machine applique (see next paragraph) around the edges of the letter. Placing stabilizer under the main fabric can assist the stitching . The photo shows the applique stitch on the edge of the letter.
For successful applique, use a narrow zig zag stitch with a very short stitch length. I used a 2.5 width and .4 length. I did not need stabilizer, due to the fusible fleece. You might prefer to use stabilizer. I practiced with one letter on a scrap piece of fabric to be sure I was happy with the results. Use good quality thread and an applique foot. The applique foot has an opening in the back so that the stitches can easily pass through the foot. Stitch so that the outer stitch is just to the OUTSIDE of the letter. The letter’s edge will be totally encased, which will help prevent fraying.
Create Pillow Ties
Cut two strips of tie fabric, each 1.5” x w.o.f. (width of fabric, or about 41” -44” long).
Cut the strips in half, so that you have 4 strips, each measuring 1.5” x approx. 20”.
Iron under 1/4” along each long side and each short side. Fold the fabric in half, the long way, right side out. Press.
Top stitch around all three open sides, close to the edge. Turn tie over to be sure you have stitched through all layers.
Repeat for each pillow.
Fold each tie in half. Place ties on pillow front so that they are evenly space. I placed mine 5.5” from the top and bottom of the pillow front. Pin tie so that the fold of the tie is at the edge of the pillow, on the right side of the pillow front.

Baste the ties into place, close to the edge.

Create Pillow Back
Cut the 24.5” x 16.5” piece of fabric in two so that you have two pieces, each measuring 16.5” x 12.25”.
Serge or zig-zag stitch across one 16.5” side of each piece. Iron under 2” of the serged edge on each piece to create a 2” hem. Topstitch hem into place.
You now have TWO pieces to the pillow back, each with a hemmed edge.
Stitch Pillow Front To Pillow Back
Lay down your pillow front, right side up. Place one pillow back down on the pillow front, wrong side up (so your pillow front and back are right sides together), lining up the unfinished edges. The back’s hemmed edge will be toward the center of the pillow. Be sure the tie ends are not caught between any edges.
Base around all three sides, close to the edge. You now have one side of the back basted into place.

Lay down the other back piece, wrong side up, lining up the other end’s edges. Baste into place. You now have the second side of the back basted into place.
Stitch around all four sides, using a 1/4” seam. This stitches the back to the front of the pillow.
NOTE: The two back pieces now overlap. That opening will be handy for slipping the pillow form in and out. I love this design, because I can easily remove the cover for washing.
The following photo shows the back of the pillow, with the overlapped edges in the center.

Completed Pillow

Your pillow is now finished. Turn it right side out, and insert the pillow form.
The bows on the sides of the pillow.
Envelope Back Opening Pillowcase
To see another explanation of this method, but without applique and ties, go to: Envelope Back Pillowcase.
It is constructed in the same way, but fits a rectangular pillow.
Quilts & Pillows


Articles & Tips


Nicely constructed pillowcase with contrast cuff and piping trim. Cuff is nicely finished on the inside. Free sewing pattern with directions for standard, queen and king.