Create Robe Pattern
Learn how to modify a simple tee shirt pattern!
Full instructions for robe
side pockets, buttons, custom fit
add skirt to create a dress
NOTE: This lesson first appeared on our previous site, CraftAndFabricLinks.com.
Disclosure: This site contains affiliate links. As an Amazon Associate, I earn from qualifying purchases. Clicking on links, and purchasing products, may result in the seller paying us compensation - at no extra cost to you. Affiliate links are in green.
Images: I apologize regarding images. I only have the one image of the robe, and I tried to resurrect it as best I could. We will be using these instructions to create new new robe, and will add new photos at that time.
Also see:
Articles & Tips
Clothing Patterns & Lessons
Craft & Decor Projects
Home Improvement
Create Many Things From One Simple Pattern
Using your own sweatshirt or tee shirt pattern, you can make a button-up robe with side pockets. It is easy to alter patterns to make just about anything. I used a basic pull-over tee shirt pattern as a guide to make this child’s comfy, button-up robe - with pockets!
I used to add skirts to basic tee shirt patterns to create dresses for my little girls. I could make entire wardrobes from just a few basics. All I needed were the starting patterns. I used the butcher paper to draw new patterns, and mixed and matched them to create entirely new clothing pieces.
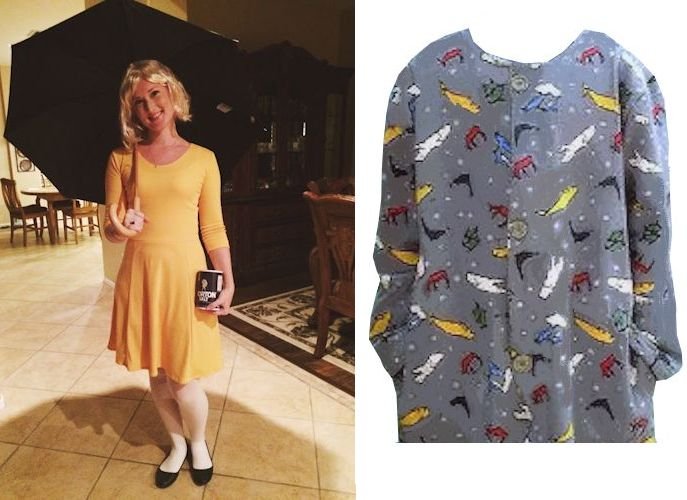
Morton Salt Girl
In the following images, I used a basic tee shirt pattern (and existing dress that I was happy with the fit of) to create the dress top. I added a flowing skirt with panels, and attached that to the top. Voila! I had a Morton Salt Girl dress for Halloween.


Create Your Robe Pattern
Follow these steps to convert your sweatshirt (or tee shirt) pattern into a robe pattern. The pattern must be a simple pull-over, with scoop (rounded) front neckline.
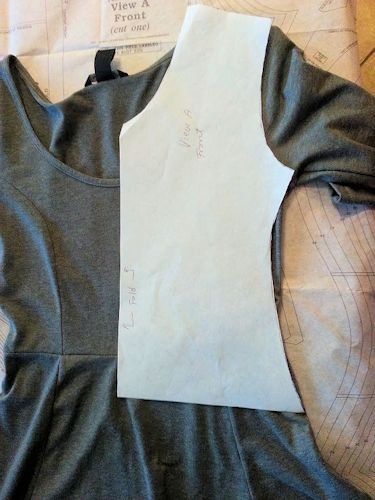
You will start with a tee shirt or sweatshirt pattern like the one I show above in the Morton Salt Girl costume.
These instructions are assuming a 1/4” seam allowance.
SUPPLIES
Project Supplies
butcher paper (comes on a roll) is perfect for patterns. I used to buy it at Costco. Amazon carries it.
tee shirt or sweatshirt pattern with scoop neck front
interfacing
fabric for robe (I used cotton sweatshirt type fabric)
- you may wish to draw your patterns before purchasing fabric in order to compute quantity of interfacing and fabric needed
buttons
Basic Sewing Supplies
cutting mat, large sewing ruler, & rotary cutter (optional, but I consider these must-have tools)
sewing scissors
thread to match fabric
pins (I like to use the longer type quilting pins)
DIRECTIONS
CREATE YOUR PATTERN
Draw Your Main Pattern Pieces
To start, trace the sweatshirt or tee shirt pattern onto butcher paper. I used an actual pattern that I knew fit my daughter. Merely tracing over a ready-made tee shirt is not a good idea. You need a good base to start from, and that means an actual pattern you know is a good fit.
Pull out a long piece from the roll of butcher paper.
Trace the front, back, and sleeve pattern pieces.
At this point, you have a copy of the original pattern - drawn onto your paper. No changes have been made yet.
For my Morton Salt Girl costume, I used used an existing dress, plus a basic tee shirt, as stated above. You can do the same for a robe.
CREATE FRONT PATTERN PIECES
Fold the front pattern piece lengthwise down the center and mark the center. Draw a line down the center of the front section. Cut the pattern along this line.
Redraw the front piece, adding 1” to the center edge (this adds .75” plus a 1/4” seam allowance).
To redraw the front piece, you can cut out the half piece, then trace around it on your paper, adding the extra section at the center.

ADD LENGTH TO FRONT & BACK
Lay out your new front piece, and the back piece.
Now, you need to add to the length of the 2 pattern pieces (front and back). Add length per your own needs - floor length, short, etc. Add the SAME length to the back piece as you did for the front piece. The side seam of the back must be exactly the same length as the side seam for the front, because the front and back will be stitched together at the side seam.
Be sure to allow for a hem.
Widen the piece at the base to allow for walking.
Refer to the following diagram.

MARK THE SIDE OF THE FRONT FOR POCKET
If you wish to add side seam pockets, mark the outer side of the front piece for pocket placement. Place a mark for the pocket top, and the pocket bottom. Refer to the section below on adding pockets.
CREATE FACING PATTERN PIECES
You will need a facing for the neckline and center front sections. This is due to the fact that you need to finish the neck nicely, and you will need to set up the center front for buttons and button holes.
Place a new piece of paper over your front and back pattern pieces. Trace a facing that runs aroudn the edge of the pattern pieces. See the following diagram. The figure shows the facng fits to the original pattern pieces.

SLEEVE PATTERN
Use the tee shirt or sweatshirt sleeve pattern. Alter the pattern if needed for length. Your sleeves can be finished with a hem or ribbing (once the robe is constructed). If you are hemming the sleeves, you will need to allow extra length for the hem.
For ribbing instructions, go to: Attach Ribbing Lesson .
CUT FABRIC PIECES
Using the facing pattern pieces, but facings and interfacing for your facings. Cut two opposite facings and two opposite interfacings (see next paragraph).
Cut two opposite front pieces from your robe fabric (fold fabric lengthwise, then place the pattern piece onto the fabric and cut through both layers - this will give you a right and left piece).
Cut two sleeves from your fabric.
Cut one back piece.
If adding pockets, proceed to the following section on pockets. If not adding pockets, proceed to Construct Your Robe.
CREATE POCKETS
ADD SIDE SEAM POCKETS (optional)
If you wish to add pockets, do so at this time.
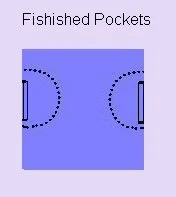
I added side seam pockets to my daughter’s robe. That means they were in the side seams of the robe (rather than sitting on the front of the robe). This type of pocket is hidden, and hands are slipped into the pocket at the sides of the robe. It creates a clean look, and these pockets are easy to make.
NOTE: The following images show a skirt front. Your front will be half (your pattern piece is half of a front - not a full front). The steps are the same.
1. ADD EXTENSIONS
Draw an extension on the outside edge of your front section. This extension will be a facing for your pocket. Draw the extension in the place where you wish the pocket to be (probably around the hip area). The extension should measure 1/2” and should extend a length that is equal to the hand width, plus about 2”. The rectangular pieces at the sides of the main piece on the following image represent the extensions (they look like rectangular ears).

2. DRAW POCKETS
Draw pockets in the shape you want. They need to be large enough for the hand to fit into nicely, and they must come to about 2” above and below the extensions.

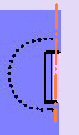
3. Reinforce and clip the pocket facings.
Do this by stitching on each side of the corners of the facings (I marked with circles in the following diagram). Clip from the edge ALMOST to the circle - do NOT cut your stitching. The clipping is shown in red. Press facing under. Sew a box along the edge of the facing to reinforce it. You now have a little notch cut-out on the side of the robe. Refer to the image after step 4.

4. Stitch Pocket To Robe Front
Stitch the RIGHT side of the pocket to the WRONG side of the robe front around the curved edge (not the side seam edge). This pocket shows as pink in the following diagram.
Your robe front now contains a pocket. Remember that the diagrams show a skirt front, but the concept is the same.

CONSTUCT YOUR ROBE
STITCH SLEEVES & SIDESEAMS
You are now ready to stitch your robe together and add buttons!
Sew the front and back robe pieces together at the shoulder seams.
Lay a sleeve out flat. Pin it to the shoulder area. Sew the sleeve into place at the shoulder. The round head of the sleeve is now attached to the shoulder area of the robe.

Pin the underarm seam of the sleeve, right sides together, and pin the side seam of the robe.
Stitch the seam. I start at the sleeve end and sew on up under the arm and then down the side seam, ending at the bottom of the garment.
Read the next section on stitching the side seam if you have added pockets.

When stitching the front to the back, be very careful! Do not sew the pocket into the side seam. The line that will be stitched is shown as a dashed red line in the following diagram. Notice that it stays clear of the pocket opening.
When the front and back are stitched together, your pocket resides within the side seam. The stitching of the pocket shows on the front of the robe.
I created many dresses and skirts for my girls when they were little. They LOVED side seam pockets. The following diagram shows the skirt front, right side out, with the pocket stitching showing on the front of the robe. Hands can be slipped into the side notch openings of the pocket. Your robe will look just like this, but you will have an opening in the front center.
ADD FACINGS
Sew the front facings to back facing, right sides together at the ends. Add interfacing at this point, if you want it.
You will now have one long facing that will run around the entire inside edge of the robe (across the back neckline and down the two front center areas). Sew the facing to the robe, right sides together. Turn the robe right side out. Press.
BUTTONS AND BUTTONHOLES
Line up the original center lines of the front. Remember that we added 1” beyond the center of each front piece. This would have created an overlap of 2”, except that each side has a 1/4” hem, which uses us 1/2”. Your overlap area should be 1.5”. This strip will be used for buttons and buttonholes. Add buttons and buttonholes.
Hem the bottom and sleeves, or add ribbing to the sleeves.
Finished!
I created this robe for my daughter, using nothing but a tee shirt pattern. From that one starting pattern, I could create short or long sleeve shirts, sweatshirts, robes, pajama tops and more. I merely added to the pattern as necessary.
Understanding how garments are assembled allows use of one basic pattern, and adjusting it as necessary, to create many different items.
To make a pajama pants pattern, go to: Custom Pajama Pants Pattern .
Happy Sewing!
More Clothing Articles


Sewing Lessons


Articles & Tips


Super easy scarf crochet pattern, using only double crochet. Back loop holds layers together.