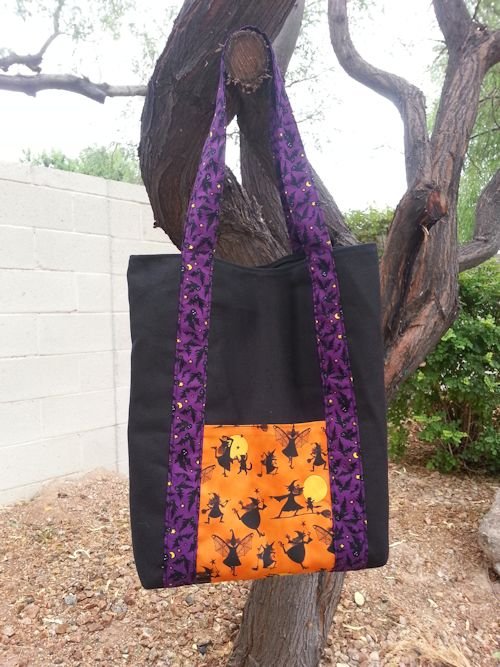
Trick Or Treat Bag
Super easy - great for beginners!
Size: 11.5” wide x 14” high x 3”
Tote Bag With Front Pocket
The instructions are based off of my super easy tote. The construction of this bag follows a different sequence due to the added front pocket and contrast straps.
Also see:
Halloween Projects
Fall Projects
Accessory Patterns
Sewing Lessons
Mitered Corners On Bottom
Nicely mitered corners on the bottom allow for a roomier bag.

Disclosure: This site contains affiliate links. As an Amazon Associate, I earn from qualifying purchases. Clicking on links, and purchasing products, may result in the seller paying us compensation - at no extra cost to you. Affiliate links are in green.
SUPPLIES
Project Supplies
Bag main body: 1 piece of canvas or duck cloth measuring 15" x 34"
Pocket: 1 piece of Halloween print fabric measuring 8" high x 8" long (8" square)
Straps: 2 strips of fabric, each measuring 3.5" wide by 53" long (or use 1" webbing - used for straps on totes)
Sewing Supplies
thread
sewing scissors
quilting pins
large sewing ruler
fabric marking pencils
seam ripper
rotary cutter and mat (optional but nice)
INSTRUCTIONS
NOTE: USE 1/4” SEAMS
1 Cut Fabric Pieces
Cut out the main body piece: follow the instructions for Easy Totebag to cut out the main body piece. Optional: to help prevent fraying, serge or stitch around the outer edge of the main piece.
Cut the piece for the pocket. Cut the pieces for the straps.
2 Pocket Construction
Press under 1/4” on the top of the pocket piece. Press under another 1/4”. Repeat on the bottom edge of the piece. Topstitch the top hem. Leave the side edges unfinished.

3 Stitch Pocket To Bag
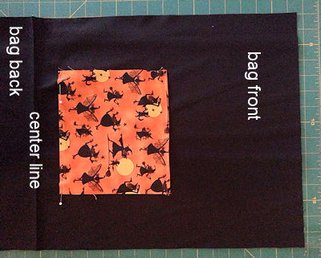
Fold the main piece across the width; press, or mark the center line with a pin.
Center the pocket, right side up, 1.5" from the fold line of the bag piece. The pocket will lie on the bottom front of the bag when the bag is finished. The 1.5" gap will become part of the bottom of the bag.
Stitch across the bottom edge of the pocket, 1/8" from the bottom edge. Baste the sides of the pocket into place, close to the edge. Leave the top of the pocket unstitched.
4 Partially Hem Bag Top
Press under 1/4" along each short end of the main bag piece. Press under another 1/4" on each short end of the bag piece. Top stitch the hem on each end of the bag, but LEAVE 2" UNSTITCHED ON EACH END OF THE HEM. The side hems will be stitched later.
5 Attach Straps
Cut two strap pieces, each measuring 3.5" x 53".
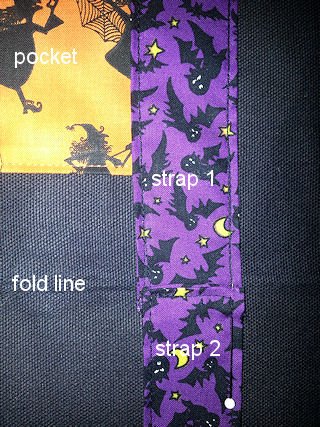
Strap 1: Press under each long side 1/4". Fold the strap wrong sides together, lengthwise. Top stitch around all four sides, 1/8" from the edge.
Place strap 1 onto the main bag piece so that the two ends are 1/4" beyond the center fold line. Fold the straps as shown on the Easy Totebag instructions. I placed my strap ends approximately 3" from the bag sides. It doesn't matter where, exactly, they are placed, but they need to cover the sides of the pocket. When the straps are stitched into place, the stitching will hold the pocket in place. Pin the strap handle into place.
Stitch over the previous stitching, stitching down 1/8" from the edge on both sides of each strap end.
Strap 2: Press under the two short ends 1/4". Press under each long side 1/4". Fold the strap wrong sides together, lengthwise. Top stitch around all four sides, 1/8" from the edge.
Place strap 2 onto the back side of the bag, so that the strap ends cover strap 1 ends 1/4". Pin into place. Stitch into place.

6 Stitch Bag Sides / Create Miter
Unfold the top unstitched hem areas. Fold the bag right sides together. Stitch the side seams, using a 1/4" seam.
Following the instructions on the Easy Tote Bag, create the mitered corners at the bottom of the bag.

7 Finish Top Hem
Fold the unstitched hem under on each side of the bag. Topstitch the top hem into place.
Accessory Sewing


Fall & Halloween Projects


Use double sided pre-quilted fabric to create this roomy tote with pockets. Multi-use bag.