Creative Cards

Create beautiful, economical, meaningful cards.
Disclosure: This site contains affiliate links. As an Amazon Associate, I earn from qualifying purchases. Clicking on links, and purchasing products, may result in the seller paying us compensation - at no extra cost to you. Affiliate links are in green.
Also see:
Notes From The Workroom & Trails
Art & Painting
10 Easy Sewing Projects
Craft Projects
Get Creative
Creating your own cards can be easy and fun. The best thing is, it does NOT have to be an expensive hobby. Use your computer and printer to print messages and images if you don't own stamps. Learn easy watercolor stamping. Scan your own artwork and print to cardstock. We show examples of all of these processes.
Paper & Embellishment Supplies
Purchase a large pack of variety paper (used for resumes etc.) and card stock to add layers to your cards. Many craft supply stores sell "scrap bags" of small pieces of card stock. If you sew, you will have fabric scraps that can be used.
There are an endless variety of items you can use to create your own unique cards. You probably already own a lot of these things. Stencils, watercolors, oil paints, fabric scraps, colored pencils, crayons, ink stamps, bits of ribbon, buttons ... The list is endless. Don't be afraid to try new techniques. Mix and match colors, paper shapes, and textures to create interesting results. This is just a small list of ideas.
Tools
Common tools and supplies that I use are stamps, stencils, paint, cardstock, watercolor markers, paper cutter, decorative scissors (cut in decorative designs), glue, photographs, graphics software, printer, and double sided tape (such as Fiskars), fabric, scanner (for scanning photos or other images), ribbon and other embellishments. If you sew and craft, several of these items are already a part of your tool chest.
Gather your tools and materials, and create a clean work surface. Place a large protective paper on your table (I use freezer paper bought on a roll at Costco). Be sure to have plenty of paper towels, soap, wet wash cloths etc. available for cleanup.
Scanned Images & Photographs

My cardinal card was created from a scanned image of one of my paintings.
If I have a design that I really am happy with, I want to use it more than once. I can do that by scanning it. Most printers have scanning capability. If you do not have a scanner, take a good quality photograph of the design. You can then print it directly to cardstock, or create images that will attach to card fronts or interiors. I created many cards by scanning my paintings. You can also upload the design to a printing company for professional printing to create cards, coffee mugs, clothing, coffee mugs and other items.
Once I have a scanned image that is print ready (200-300dpi quality), I use my graphics program to add it to a card size image (10” x 7”). I use PaintShop Pro® for this task. It will print with my image on one end of the card stock sheet (what will be the front), and my information about the image prints on the end that will be the back of the card, once the card is folded. I purchase the card stock from Red River Paper (not affiliated with us in any way). The card stock is scored for easy folding; purchase envelopes to fit your cards. Once printed and folded, my cards are 5” x 7”.
NOTE: I printed directly to the card itself. You can also print to smaller pieces of cardstock, then adhere that to a card. This gives a nice, layered look.
Go to my youtube painting tutorial channel to learn how to make beautiful paintings. Then scan or photograph your paintings to create unique, custom cards.
The two painting examples below show the cards printed and not yet folded. I added gray backgrounds so the cards would show. The photo card is an example of what it would look like printed and folded.
Adding Text
For the card at the top of the page, and the photo card below, I merely used my graphics program to create and add the text. Use a smart phone app or your favorite graphics program.


Extra Tip - create custom stickers from scanned images
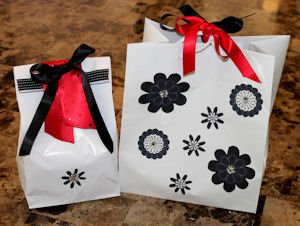
My daughter was hosting a party, and chose the color theme of red / white / black. She wanted party favor bags in that theme. I scanned some fabric I knew she loved to create the perfect stickers for the bags. Once scanned, I used PaintShop Pro® to pull out the shapes I wanted - use your favorite graphics program. I printed the shapes to one-sheet labels, then cut out my “stickers”. The stickers, plus red and black ribbon, were used for decorating white bags. She loved them!

Watercolor Stamp Cards
You do not have to be a watercolor artist to create beautiful watercolor cards. I used stamps to create outlines, then filled in the graphic with watercolor pens.
The stamp itself creates the image.
With watercolor stamping, watercolors are applied directly to the stamp using a brush or watercolor pen. The stamp is then pressed to the paper. Brushes dipped in diluted paint, or watercolor pens, are then used to fill in areas. It's that simple.
The first thing is to gather your supplies. Below is a list of supplies we used. Remember, you don't have use all of these items. We tested a variety of items, all easy to find at craft and sewing stores. Several of these items are already part of a crafter's tool chest.
SUPPLIES - watercolor stamp cards
Cardstock / Paper:- A variety of colors, finishes and textures
Stamps: - Several different themes (holiday, floral etc.) in foam or rubber.
Watercolor Brush Pens: - Just paint onto your stamp, then stamp the image onto your cardstock.
Optional: acrylic paint to brush onto paper
Watercolor Pencils: - easy to use! Just color in with these pencils, then lightly brush over with water and you have a "watercolor painting".
Brushes: - synthetic or natural fiber: use for filling in your designs.
Dish for mixing paints with each other or with water
Paper cutter: - Not a must, but nice to have.
Scissors & Paper Edgers: - Craft scissors and edgers to add decorative edges to cards, stationery, etc.
Glue & Adhesives: - glue sticks, craft glue, foam glue, wood glue, bead glue, iron-on adhesives etc., depending on your project.
Double-sided tape - Fiskars double-sided adhesive (I LOVE this stuff!)
Computer Printer: - Use for printing greeting text or images to paint with pens.
DIRECTIONS - watercolor stamp cards
Apply watercolor paint to the stamp (or cover it with watercolor paint from the watercolor pen).
Don't worry about getting paint "outside the lines" because the stamp only transfers color from the raised areas of the stamp. Feel free to use different colors on different areas of the stamp. Tip: work quickly because if the paint dries on the stamp, you must reapply it before stamping. When you are finished applying paint to the stamp, turn the stamp over and press it firmly to the paper.
Tip: Do not "wiggle" the stamp or you will get a blurred image.
You can now use acrylic paint, watercolor paint or watercolor pens to fill in the image.
I used two techniques. The first was to use the watercolor pen to enhance key lines. The second was to dilute the acrylic paint and watercolor paint with water and apply it with a brush.
To dilute the pen paint, simply scribble a bit of pen into your paint tray and mix in a drop of water. Use your brush with diluted paint to fill in the areas on the image. If using acrylic paint, wet the brush, dab it into the paint, dab it off onto a paper towel, and then use it to till in areas of the image.
The stamp gives a sharper line, the watercolor pen gives a deeper tone, and your brushed paint gives a nice, soft finish.
Need A Stamp To Get Started?
If you do not have a stamp, download one of my free graphics to help get started. I offer a few on my 5 Fun Kids’ Crafts page.

Scan and print your child’s artwork; create and scan paintings, print photographs to cardstock. Add your own embellishments. Hand made cards can be both economical and meaningful.


I turned a fallen tree disaster into a beautiful evergreen bouquet for my front porch. Easy! Use holiday items from your stash.