Seminole Quilted Glasses Case

learn seminole quilting while making this beautiful case
originally on our previous site: CraftAndFabricLinks.com
Seminole Piecing
Seminole piecing is a clever method of creating intricate diamond patterns, made of squares, by stitching strips together, cutting the strips, and re-arranging them into a diamond pattern. The end result looks quite complicated, but it is actually not difficult to achieve. With a bit of patience and practice, you can learn this technique and incorporate it into quilts and other items.
Disclosure: This site contains affiliate links. As an Amazon Associate, I earn from qualifying purchases. Clicking on links, and purchasing products, may result in the seller paying us compensation - at no extra cost to you. Affiliate links are in green.
Also see:
Notes From The Workroom & Trail
Holiday Projects
Sewing Lessons
Clothing Patterns
A few words about this pattern . . .
The seminole quilted eyeglass case in my original design first appeared on our previous website (CraftAndFabricLinks.com) many years ago. People loved it, I decided to tweak the pattern a bit. I created a new design that includes a small pouch inside. It holds the glasses inside, without the need for adding buttons or closures. I also changed the construction so assembly would be easier. I love it!
♥ © Christina Sherrod May 2008 ♥ (updated again 2015 & moved to Spruce & Fjell in 2023)
Glasses Case Size
Finished size: approx. 4" x 7"
All seams are 1/4".
NOTE: Adjust size to fit your needs.
Supplies

Cut the following fabric pieces: (choose your own colors - I will refer to colors shown for this project)
Diamonds & Triangles:
NOTE: These strips and pieces are longer than necessary, but allow for "mistakes". Pieces will be trimmed later.
peach print: cut 1 strip 1.75" x 18"
dark green: cut 1 strip 2" x 18"
light green: cut 1 stip 2" x 18"
Border Pieces
brown: Cut 2 strips 1" x 8"
Cut 2 strips 1" x 3"
Lining
Cut 2 piece 4.5" x 7.5"
Inner pouch: Cut 1 piece 4.5" x 3"
Main Body
peach print: cut 1 piece 8" x 1.75" and one piece 8" x 6.5"
Pattern
Rounded Corner Template (pdf file)
NOTE: This template says “craftAndFabricLinks.com” - that is our previous site.
Other
thread to match background of fabric
large sewing ruler (optional but nice to have)
scissors or rotary cutter
pins
PRE-WASH, DRY, & PRESS FABRIC BEFORE USING
If you plan to wash your glasses case in the future you will need to pre-shrink the fabric before using. Cotton fabrics (such as quilt fabric) shrink; pre-wash, dry and press before using.
DIRECTIONS
Note: all seams are 1/4 inch. Always iron between steps.
Sewing Supplies: thread, scissors, quilting pins, large sewing ruler, seam ripper
hint: quilting pins are easier to use than regular pins; a tupperware box works well as a supply box.
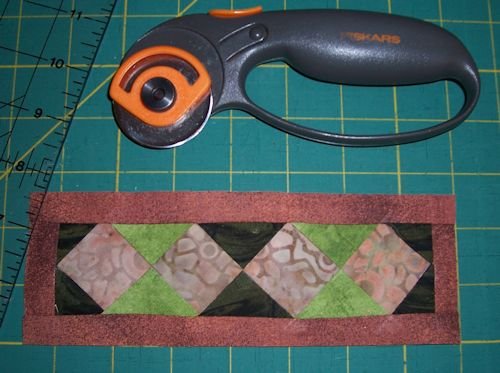
Create Diamond Section
Lay out three long strips of fabric, with the narrow one in the middle (i.e. the strip measuring 1.75" wide is in the middle). Sew the three strips together, right sides together. Press seams away from center strip. Trim ends straight, using sewing ruler or quilter's square.

Lay the stitched piece so that the strips are vertical. Cut the piece into 1.75” wide strips. You should have 10 strips. This is more than you will need, but the extra allows for errors.
Next, take your 7 best strips of each set and lay them out diagonally, next to each other. Rotate which row is on top (i.e. if dark green is on top for one strip, the one adjacent should have light green on top).

Sew the strips together right sides together. Trim off points. Use a sewing ruler and rotary cutter for best results. Cut off ends, leaving 4 "diamonds" plus 1/4" all the way around. The extra quarter-inch will be the seam allowance at the edge of the diamonds. See photo below.


Your diamond piece should measure approximately 2" x 7". Don't worry if your piece is not this exact size, however. Other pieces will be added and the entire piece will be trimmed to a final size later.
If you need help with points, go to: Quilt Lessons: Points
Measure across the width of the diamond strip; it should measure approximately 2". Cut two pieces of border fabric 1" x 2" (or the width you need). Stitch a brown strip to each end of the diamond strip. Press seams toward outer edge. Cut two pieces of border fabric 1" x 7.5" and stitch them to the two long sides of the diamond strip. Press seams toward outer edge.
Trim the bordered diamond strip so that its finished size is 2.5" x 7.5".
Create Outer Shell
Now that the seminole center piece is complete, we can create the outer glasses case shell.

Using main case fabric (peach print), cut one piece 7.5" x 1.75", and one piece 7.5" x 6.5". Stitch the narrow strip to the right side of the diamond strip, right sides together. Stitch the larger strip to the left side of the diamond strip, right sides together. Trim your finished main case piece to 9" x 7.5".
Cut fusible fleece 9 " x 7.5". Following the directions on the fusible fleece, fuse the fleece to the WRONG SIDE of the main case piece.
Create Lining
Cut two lining pieces, each measuring 4.5" x 7.5".


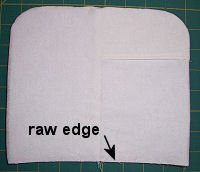
From lining fabric, cut inner pouch piece 4.5" x 3". Press under a 1/4" hem; topstitch hem. Lay one lining piece right side up. Lay the pouch piece right side up, directly on top of the lining piece. Stitch around the 3 edges, close to the edge. This pouch will be at the TOP of the eyeglass case, on the inside of the back of the case.
Stitch the two lining pieces together, right sides together, with the side containing the pouch on the RIGHT.

Create Rounded Corner - optional
If you wish to create rounded corners for your glasses case, do so at this time. Rounded corners create a small opening on the side of the case, allowing easier access to the glasses.
The right corner of the case is rounded and left open to allow easy removal of glasses. We provide a template for this purpose.
Fold the outer shell in half lengthwise, wrong sides together. Use the template to round off the upper corner opposite the fold. Repeat with lining.
Unfold when finished. Press out flat.
If you have not done so already, download the rounded corner template.
Attach Lining To Outer Shell
Stitch the lining to the main piece, right sides together, stitching 1/8" from the edge. Stitch only the top and two sides. LEAVE THE BOTTOM EDGE OPEN. Turn entire piece right side out. Press.
Finish Eyeglass Case

Fold the case right sides together, lenghwise. Starting just above the hem line of the pouch, stitch close to the edge down the side and across the bottom. Take a few stitches back and forth at the top to reinforce that area. Zig zag stitch across the bottom seam allowance; trim as needed. Turn case right side out. The inside side seam is nicely finished.
Inside Pocket
The inside pocket holds the glasses inside the case. I love this!


Finished!
Try various color combinations.
Use as border on quilts, tote bags, pillows and other items.
Sewing Lessons


Articles & Tips


Learn Intarsia and Tapestry crochet. Bring Hygge into your home with this cozy, Scandinavian minimalist Christmas tree design. Use for wash cloths, pillows, hot pads.