DIY Chenille
oh-so-soft blanket
originally on our previous site: CraftAndFabricLinks.com
Disclosure: This site contains affiliate links. As an Amazon Associate, I earn from qualifying purchases. Clicking on links, and purchasing products, may result in the seller paying us compensation - at no extra cost to you. Affiliate links are in green.
Handmade Chenille
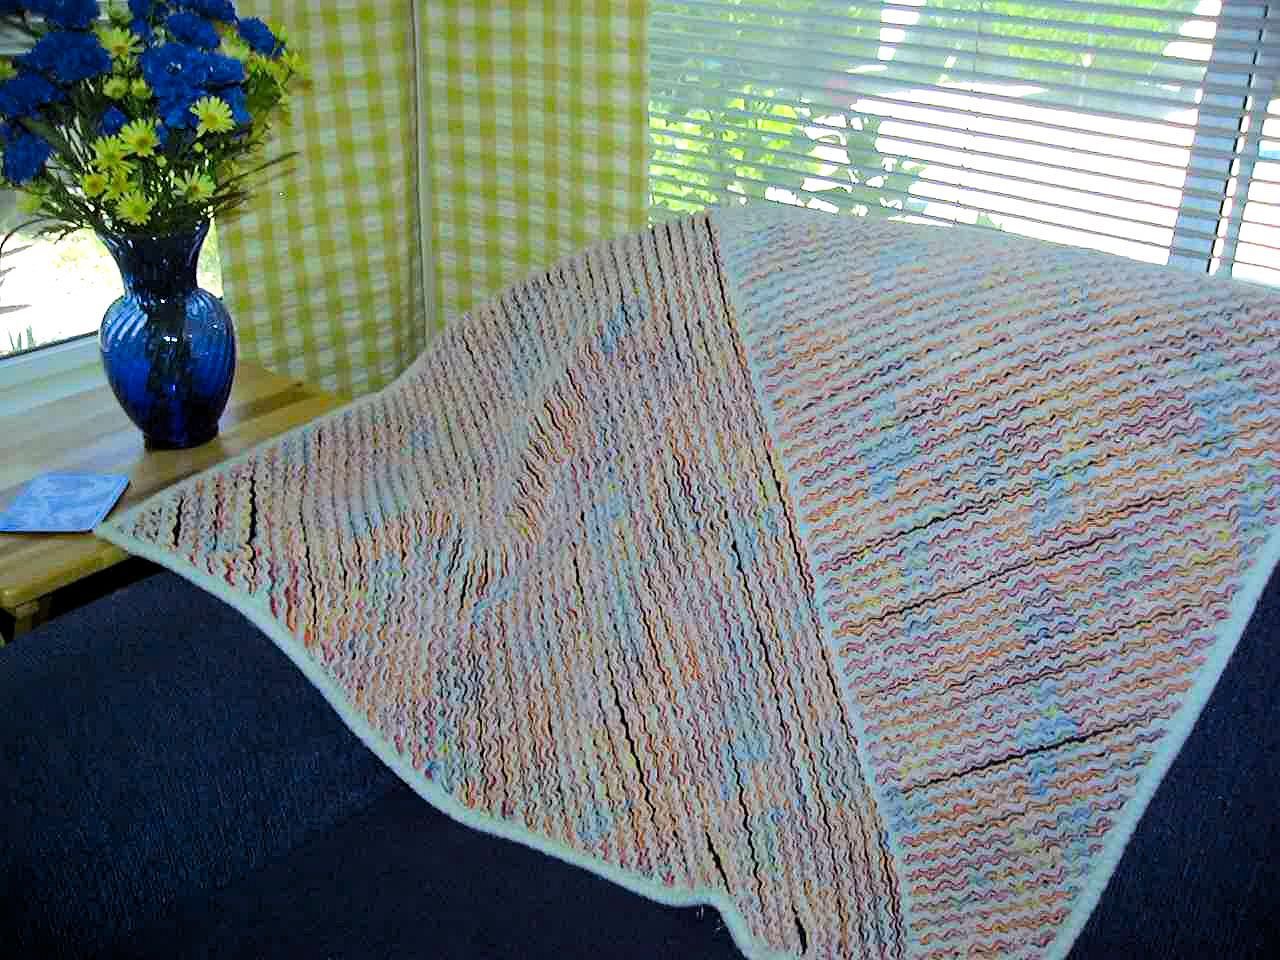
Handmade chenille is easy to make, especially with the use of a quilt bar (also called edge guide). Our chenille instructions show you how. I saw a blanket like this in a quilt fabric store and decided to make one. It was fun to see what it turned into after washing.
Finished Blanket Size
45” x 45” (before washing)
Size depends on width of fabric and shrinkage after washing your new blanket. Your blanket will be the same width as your fabric.
SUPPLIES
Fabric
Use cotton flannel for this project.
1.25 yards of four different colors/patterns of 44-45" flannel. Use colors that blend well together and choose a good quality fabric.
NOTE: If your fabric is 42" wide, that is fine - we can work with that. It just means that your blanket will be 42" x 42". Of course, after washing it will be smaller. Quilt fabric used to routinely come 44" to 45" wide. I notice in stores now that it is often less than that.
WARNING: Be careful to choose colors that are less likely to run. It might be a good idea to pre-test your fabric (pre-wash a sample to check for color-fastness). The navy I used faded onto the yellow when I washed my blanket, turning the yellow into a light blue. Still pretty, but not my choice. Patterns are not real important - they do not show up in the finished blanket. I used a football player print for color; only the overall color showed up as you can see in the top photo.
Chenille Brush (brush chenille if needed to fluff it up - a tooth brush works)
I layered my colors as follows: yellow on top, orange/blue print, apricot, navy as base layer.

General Sewing Supplies
thread to match fabric background
sewing scissors
pins (I use quilting pins)
large sewing ruler
rotary cutter with cutting mat (or scissors)
Binding
Cut binding either 1.5” wide or 2” wide (your preference), and long enough to go all the way around your quilt (about 180” + about 5” extra). This measurement is based on each side being 45”. 4x 45 = 190. Piece strips together if necessary. If double-sided binding is your preference, cut the binding to 2.5” wide, and fold lengthwise.
Refer to Assemble And Bind Quilt for instructions on binding your finished blanket. NOTE: Batting and backing is not necessary. This blanket is quite heavy due to the 4 layers of flannel. One of the above pieces serves as the base layer (and shows on the back). If you wish to use batting and backing, purchase a piece of 45" x 45" batting, and another 1.25 yards of 45" wide fabric for the backing. Create the blanket as directed below, then add the batting and backing before cutting the upper layers into strips.
Assembly Instuctions - fabric layers
All seams are 1/4”
Lay out your four layers, one on top of the other, right sides up on a flat surface. Your base layer should be a "right side" on both sides. If your base piece has a wrong side, add a backing piece (as stated under "supplies above"). The backing will be your bottom layer and will be placed wrong side up. All other layers will be placed over this one, right side up. If you are using batting, it will be placed
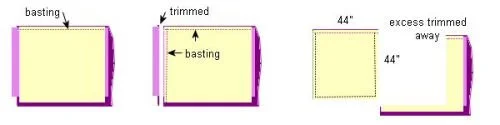
Your edges may not line up exactly - that is ok. Line up all layers' edges on at least one straight selvege side. Line up the other sides the best you can. Pin along the first side, through all layers. Baste through all layers, close to the edge. Line up the layers on a side perpendicular to the first side, as evenly as possible. Since this will be a cut edge, the edge may not be exactly straight. Draw a straight line perpendicular to the first side, as close to the edge as possible. Be sure that all four layers come out at least 1/4" to the outside of your line. Pin and baste this side right over the line you've drawn. Trim to even the layers' edges. Repeat on the remaining two sides. NOTE: The blanket should be square. Before sewing the fourth side, measure each end's distance from the opposite side, to be sure your blanket is square. The overall size is not crucial, but your sides must be straight. If your smallest width of fabric is 44", then your blanket will be trimmed to a size of 44" x 44". By the time I was finished with squaring and trimming, my blanket measured about 42" x 42" because I had one piece that was only 42" width, rather than the full 45". Refer to the diagram at below.
INSTRUCTIONS
"Chenille" is made by stitching straight lines 1/2" apart, cutting between the lines (do not cut base layer), and then washing and drying the fabric to create fraying along the cut edges. Draw parallel lines on the back side of your blanket (or top side if that is your preference), 1/2" apart. You can use any design you wish, so long as they are straight lines. Be sure your lines remain straight and parallel.
NOTE: As an alternative to drawing lines, you can use a quilting bar (also called an edge guide). This will help you stitch straight lines an equal distance from one another. See photo on right.
Quilting Bar
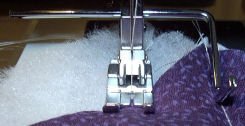
As an alternative to drawing lines, you can use a quilting bar (also called an edge guide). This will help you stitch straight lines an equal distance from one another. Refer to the photo.
For further instructions on using a quilting bar, go to: DIY Pre-quilted Fabric .
Thread & Stitch Length
My top fabric was the pale yellow shown above. My base fabric was navy blue. I didn't use backing, so my base fabric showed on the backside of my blanket. I wanted the thread to match both my yellow and blue fabric, and I had drawn my lines on the navy blue fabric; therefore, I stitched on the navy side. I used navy thread for my top thread and white thread as my bobbin thread. I recommend using a slightly longer stitch length (I used 3, rather than 2.5) because you will be stitching through several layers.
Stitch Pattern

To create a blanket like mine, stitch one line on the diagonal. Then stitch a line perpendicular from that line out to one corner. That half of the blanket has lines stitched perpendicular to the diagonal line. The other half of the blanket has lines that are stitched parallel to the first diagonal line. Be sure to stitch completely between two stitched lines. Lock your stitches (back-stitch) at each end. Refer to the diagram.
Cutting Instructions
Once all lines have been sewn, you are ready to cut between the lines.
Using very sharp scissors, snip through your top three layers, half-way between your stitched lines, starting at your outer basted line. DO NOT cut through your base layer (or batting or backing if you are using those). Cut only between the stitching - do NOT cut through the stitching itself. Be sure to stop just before your outer basted line. This will leave a small margin along the outside edge of the blanket, outside your basting.

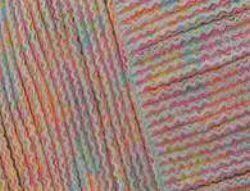
When finished cutting, the blanket should look like the one in the following photo, with snipped lines.

Finish Your New Chenille Blanket
Bind Your Blanket
Refer to Assemble And Bind Quilt for instructions on binding your finished blanket.
Washing Instructions - washing creates “chenille”
When the stitching, cutting and binding are complete, the next step is to wash and dry the blanket. The wash/dry of the blanket will fray the edges of the flannel, creating the "chenille" effect. For added fluffiness, use a chenille brush or tooth brush. This further frays the chenille (use of a brush wasn't necessary for my blanket).
Related Patterns


Articles & Tips


Adorable doll quilt or quilt block. Prairie girl enjoying her garden along with her dog.