|
|
|
|
| HOME SEW CRAFTS DECOR SHOP |
|
LIZARD APPLIQUE Page 2
Sewing Pattern |
| lessons holiday patterns sewing patterns |

|
|
Page 2: directions |
DirectionsAll seams are 1/4"To learn how to fuse strips of fabric to look like southwest rock formations, go to: Sedona Landscape Pattern To learn how to create free motion embroidery, go to Free Motion Embroidery Lesson To learn how to finish a wall hanging / quilt: Assemble/Bind Quilt
|
 1. Print Cactus Page 3 and Lizard Stickers page if you have not already done so (link provided on
 |
3. Cut 2" from the top of the cactus page. Draw lines out to the edge from the existing rocks and ground lines on the page. Your page should now measure 9" x 9". Refer to photograph on right. |
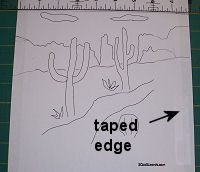 2. Tape a piece of blank paper under your printed cactus page so that the new page is 9" wide.
|
5. Cut a piece of fusible web the size of the sky piece (4" x 9"). Following directions on the fusible web, iron the web onto the wrong side of the sky piece. 6. Trace the other pieces onto the paper side of the fusible web. Trace around each individual object. You will have to move the pattern in order to fully trace each object. ADD 1/4" TO THE BASE OF THE ROCK PIECES. This added 1/4" will tuck under the ground piece, ensuring that there will not be any gaps between the rocks and ground. Cut the individual pieces apart (you do not have to cut the pieces out exactly - just cut loosely around each piece to separate the pattern pieces). 7. Cut fabric pieces large enough to fit the traced web pieces. Following the directions on the fusible web, iron each web piece to the wrong side of the fabric you have chosen for that piece. Cut out pieces following lines on paper side of web. Go to:Happy Day Applique for a free lesson using fusible web. |
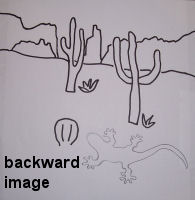 4. Trace the lizard of your choice onto the pattern page. Flip the pattern over to the wrong side. Hold up to a window or light box and trace over the lines on the drawing. The reason you must do this is because the pattern must be backward. You will trace it onto the paper side of fusible web, which will be fused to the wrong side of the applique fabric. The finished applique will not be backward.
|
|
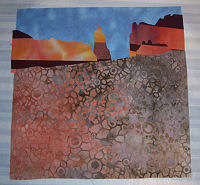 8. Lay the sky piece down on the stabilizer fabric, right side up. Following the pattern layout, lay down the ground piece so that it overlaps the sky piece. Tuck in the rocks so that their bases are tucked under the top edge of the ground piece. Following directions on the fusible web, press with iron to fuse sky, rocks and sand. Add other pieces (lizard, plants etc.). I added a couple of extra plants to my block.
|
|
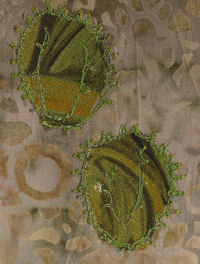
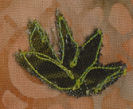 Machine embroider around cactus pieces, lizard pieces etc. Add free motion embroidery to enhance plants or add "grasses" and "flowers". I added free motion embroidery to create cactus needles on the barrel cactus.
|
Page 2: directions |
Quick Reference |
Learn To Paint!free video tutorialsVisit my youtube channel. Free videos with step by step instructions. Paint beautiful paintings for your home. |

Please ShareI rely on advertising to keep my site free. Please share with friends. |
Privacy Policy & Terms Of UseBy using our website, you expressly consent to our Privacy Policy and Terms & Conditions. All Patterns, images and instructions are copyright protected. |